


Records
Covers what Records are, the different field types available within them and how they are used.
Tip
Take some time to familiarise yourself with the common properties of records, which will help you use Workbooks with ease.
Records in Workbooks are displayed as forms, which are a collection of fields of information. Most fields will be self-explanatory and can be completed by entering text directly into the field. Throughout Workbooks you’ll see particular field types that behave in the same way, such as:
- Compulsory fields – Identified by a solid blue line at the left-hand side. You must populate these fields otherwise, you’ll be unable to save the record.
- Dropdown picklists – Identified by a down arrow – some picklists allow you to select one option only and others are multi-select.
- Lookups – Identified by the binoculars symbol – these fields allow you to link two records together and create a relationship between them, such as the Employer field on a person record.
- Checkboxes – Simply click in them to add a tick to the box
- Create Activity checkbox – If you check this box then click Save or Save & Close, a scheduled Activity record will be automatically created, linked to the underlying record. By default, this Activity is assigned to the same user as the underlying record.
- Postcode/address lookup – Wherever Workbooks provides address or postcode fields, users (who have integrated Workbooks with Postcode Anywhere) can auto-complete address fields.
- Reveals – Identified by a blue triangle – open up more fields for completion.
- Watch/Stop watching – Add records to the ‘My View’ section of a Landing Page by clicking Watch.
- View – Switch between Form Layouts
- Sharing Permissions – The padlock symbol allows you to see which users/user groups have access to the record and, if you have the right levels of permission, allows you to change the access.
- Additional Properties – The information symbol contains details about when the record was created/updated, by whom, etc, along with the unique Object Reference for the record.
- Print preview – Allowing you to print a copy of the record.
- Help – Clicking on the question mark symbol anywhere in Workbooks takes you to contextual help within our Knowledge Base.
- Tabs – Find links to different records.
If you need to record data for which there isn’t already a field, your System Administrator can create new customised fields on the appropriate record types within Configuration or can build an entirely customised view for that record type.
Line Item Grid
Transaction documents in Workbooks (ie, Quotations, Orders, Invoices, Credit Notes and Supplier Orders) include a Line Item grid where you can record products and services. As with Landing Page grids, you can control which columns are displayed and save your customised layout so it’s applied to the Line Item grid of all future transaction documents of that type (but you cannot filter Line Item grids or save your layout as a named view).
Updating Records
When a record is opened in Workbooks, it is assigned a Lock Version which is essentially a hidden integer field on the record in question. When the record is first created it is given a Lock Version of 0. Each time that record is then subsequently updated and saved by a user or via the API the Lock Version increases by 1.
Through the Workbooks UI, it is possible for more than one user to open a record at the same time. When this happens, it is only possible to save one user’s changes to that record. The changes made by the first user to click Save are retained. If this happens, the other user will be presented with the following message:
.png)
Click Reload to automatically re-open the record and display the latest data (including the changes that the other User saved).
If you click No, the fields will become read-only on the record and you will be presented with a reload button. Workbooks will also display a message at the top of the record highlighting what has happened.
_0.png)
Deleting Records
NOTE: Records that are deleted individually (using the ![]() symbol) disappear from your database completely and cannot be retrieved, therefore you might want to limit who can delete records. Remember, if you don’t have the Advanced Security Module you will not be able to change at a global level who can delete records.
symbol) disappear from your database completely and cannot be retrieved, therefore you might want to limit who can delete records. Remember, if you don’t have the Advanced Security Module you will not be able to change at a global level who can delete records.
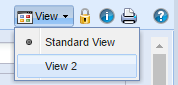
Changing View
If the ‘View’ button appears at the top right of the record, that means that there is more than one Form Layout available. For example, there may be a Standard View that all users use with read-only fields and another View for Managers only where the fields are not read-only. To change between the Views, simply click on the button and choose the View you want.
Opening tabs
You can click on tabs to open them but if there are too many to display on the screen, you can click on the hamburger icon in the top left to display a list of tabs you can move to ![]() . This applies to records and to reports. The hamburger icon will only appear if the screen is too small to display all the tabs at the same time.
. This applies to records and to reports. The hamburger icon will only appear if the screen is too small to display all the tabs at the same time.
Generating PDF documents from records
From each record, you are able to generate a PDF document from a template, which will allow you to conveniently collect the relevant data into a document that can then be printed or sent to the client/organisation.

The “Generate PDF” option will show on all record types, however, please note that certain templates will be required to have been categorised into the relevant category for them to show as available for the relevant record type.