


Using Calculated Criteria
How to use Calculated Criteria in order to refine the results to only include records in a report that fit one or another criteria, which don’t refer to the same field.
Sometimes you might want to include records in a report that fit one or another criteria, which don’t refer to the same field. For example, you might want to see all the People on your database who have a Town of London OR whose Postcode begins with SW. If you just add criteria within the Criteria tab, you will only be able to build a report that shows People who have a Town of London AND whose Postcode starts with SW, ie they fit both criteria.
In order to return the right records, you can include a calculated column in your report and use the results of that calculation as a criterion in your report.
The details below describe how to build the example described above, ie, a report that shows all the People on your database who have a Town of London (regardless of their Postcode) OR their Postcode starts with SW, regardless of the value in the Town field.
Start by building a report based on People. (Start > New > Report > A new blank report > People.)
Use the Add Column from People option to add as many or as few columns as you want your report to include. In the example being built here, we’ve included columns for the Person Name, their Postcode/Zipcode and their Town or City.
Next we need to add a calculated column that uses the IF statement so that we can see if the Town is London OR the Postcode starts with SW. Click Add Calculated Column, give the column a name, and enter the following into the Formula field:
IF(main_town_or_city = 'London' OR main_postcode_or_zipcode LIKE 'SW%', 1, 0)
NOTE: Within the formula we have used the LIKE function and the wildcard of % when looking for the Postcode, so that anything starting with SW, regardless of what (if anything) follows SW, will be included.
Below is a screenshot example of what the report now generates:
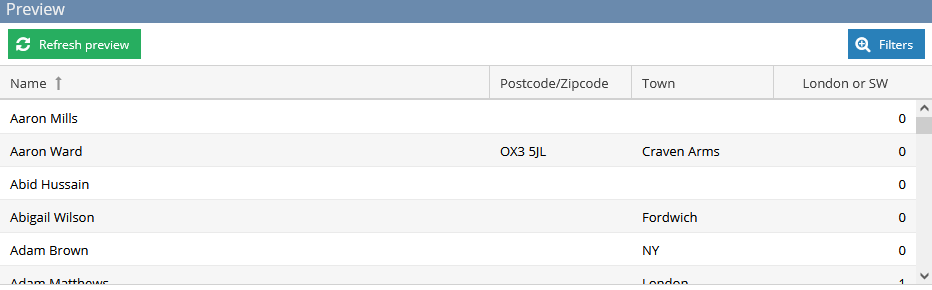
The row for Ally Pearson returns a 1 because the Postcode starts with SW (although the Town is Richmond).
The row for Bob Brown returns a 1 because the Town is London AND the Postcode starts with SW.
The row for John Smith returns a 1 because the Town is London (although the Postcode doesn’t start with SW).
The row for Mary Bloomfield returns a 0 because the Town is not London and the Postcode doesn’t start with SW.
Now that we have a calculated column that returns 1s and 0s for the relevant records, we can open the Criteria tab and click Add calculated criteria. In the dropdown picklist you’ll only be able to see the names of any Calculated Columns. When selecting the one that has been set up to identify the Town/Postcode we’re asked to choose an Operator. In this case choose = and enter 1 next to the number. This means that the rows in the report will be limited to those which generated a 1 in the Calculated Column. In this example, it would be the rows for Ally, Bob and John but not for Mary.
We now have a report that returns the data just for the rows we’re interested in. Of course, you may need to include a more complex IF statement in your report to return the right combination of records, but the above theory still applies.
NOTE: If you try to summarise a report that includes calculated criteria, the results you are looking for may be incorrect. In Workbooks reporting, the grouping which results from summarising a report is applied before the calculated criteria. In the above example, for instance, if the report were summarised by, say, Town, some of the rows of data would be excluded from the report. However, if you summarise by a value unique to the record (such as Object Reference or ID) the results will be correct.