


Meetings
Meetings are a type of Activity, and allow you to fill in Start and End Dates, specify attendees and create recurring Meetings
![]()

You can create Meeting Activities in Workbooks, just as you would any other type of Activity.
The record looks similar to other Activity records but includes fields for Location, Start and End Date/times as well as a section where you can create recurring meetings and another where you can specify the attendees. The icon also differs slightly from a standard Activity record to identify them as a different type.
- Creating a new Meeting
- Meeting Recurrence
- Updating a Recurring Meeting
- All Day Meetings
- Meeting Attendees
- Setting the Primary Contact
- Generating a PDF template
- Adding Meetings to your Calendar
Creating a new Meeting
A Meeting record can be created in Workbooks by clicking Start > New > Meeting or by navigating to the Activities Landing Page and choosing “New Meeting” from the left-hand menu.
As with any other record type in Workbooks, there are a number of standard fields that require values to be set before you are able to create the Meeting record. These are as follows:
- Subject.
- Start & Finish date/time.
- Assigned to: A list of users that currently have access to that database. You can assign the record to a user and they will be notified via the method set in their preferences.
- Status: An unrestricted picklist where a user can type any value they wish or alternatively, you can add to the values available by adding to the picklist called “Activity Statuses”.
- Priority: An unrestricted picklist where a user can type any value they wish or alternatively, you can add to the values available by adding to the picklist called “Activity Priorities”.
- Show Time As: Select from the following options; “Busy”, “Available”, “Out of office”, “Tentative”. You are unable to add to this picklist.
Meeting Recurrence
A Meeting record in Workbooks can be set up as a recurring meeting. This means that when you save the Meeting, several records can be created or updated automatically based on the settings that are chosen by the user.
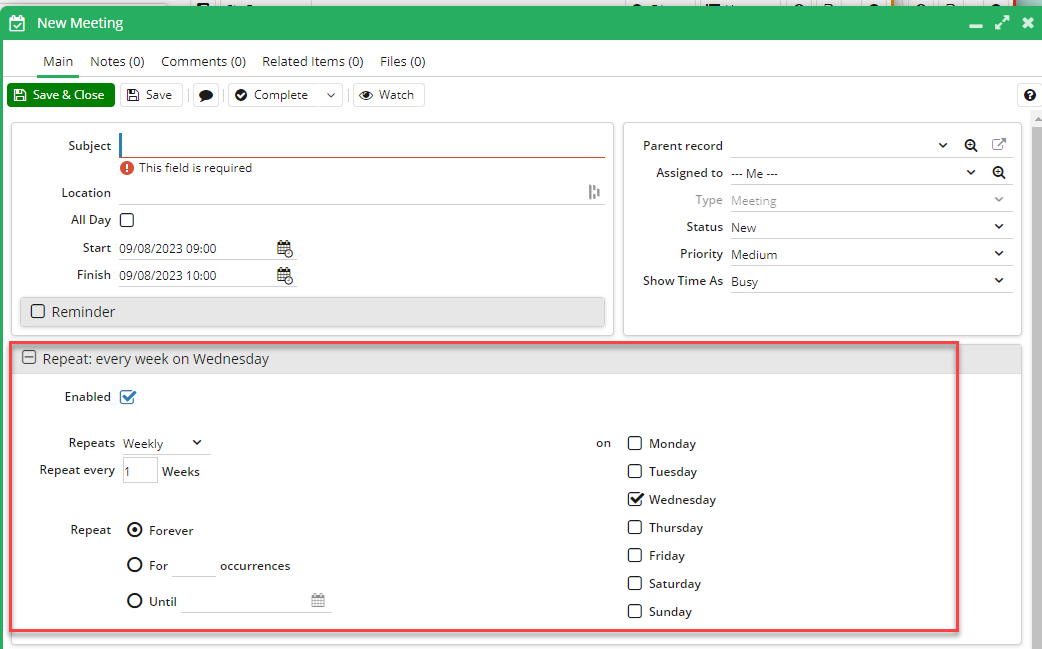
By default, the “Enabled” checkbox is not set. When ticked, this will allow the user to configure a number of settings for the Meeting from the following:
- Frequency: Daily, Weekly, Monthly or Annually.
- Frequency of Repetition: Free text allowing any value e.g. Repeat every 2 weeks.
- Specify the day: Monday through Sunday.
- Repeat: Forever, for X occurrences, until a specified date.
NOTE: Setting a Meeting to recur forever doesn’t create unlimited meetings. Records will be created for the intervals specified for a maximum of two years from the date of the first Meeting.
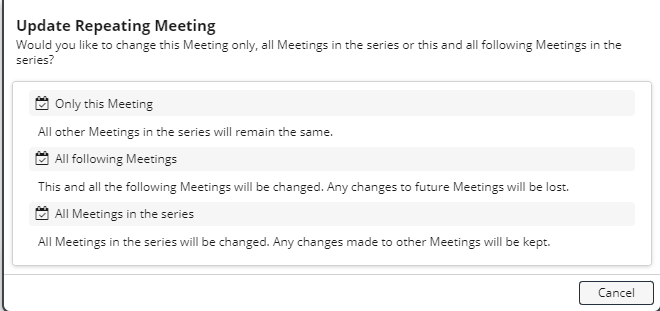
Updating a Recurring Meeting
After the initial save of a Recurring Meeting, Workbooks will create the relevant records. If you then make a change to one of these Meetings, you will be presented with three options when you next save. These are:
- Only this Meeting – all other Meetings in this series will remain the same.
- All following Meetings – this Meeting plus any future Meetings will be updated with the changes that you made.
- All Meetings in the series – all Meetings in the series will be updated.
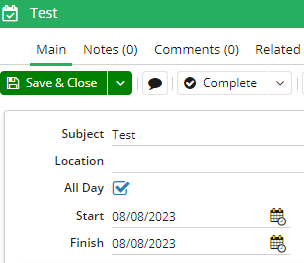
All Day Meetings
A standard meeting in Workbooks has a start and end date/time. It is possible to set an “All day” flag on the Meeting record which will automatically change the Meeting to run from midnight of the start date right through to 11:59PM of that day.
Meeting Attendees
Meeting records in Workbooks allow you to add attendees to track who was invited. Within the “Attendees” reveal, there are three key fields to store this information in Workbooks which are:
- Required: These people must attend the meeting for it to go ahead.
- Optional: Attendees that are welcome to join a Meeting but aren’t specially required for it to go ahead.
- Resource: Typically a Meeting room within a company such as meetingroom@workbooks.com.

NOTE: An email is not sent to the listed attendees automatically. The functionality is only designed to keep track of who was invited to a particular Meeting. It is possible to write an additional script to achieve this functionality. If this is something that you would like to consider, please contact support@workbooks.com for further information.
Setting the Primary Contact
When creating a Meeting record in Workbooks, you have the option of setting a Primary Contact. This is the main contact for the Meeting and best practice is to ensure that this is set for each Meeting record that you create.
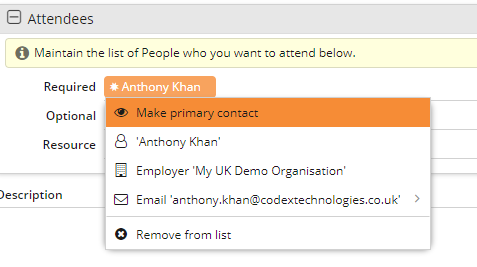
To set the Primary Contact, add them as an attendee by typing their name or email address into the “Required” or “Optional” fields. Workbooks will look up in pre-existing People and Sales Lead records to see if the contact exists as you type. If a record is found, select it from the list to add them as an attendee.
You can then either hover over and click the arrow that appears or right click on that attendee to reveal a menu with several options. The menu options change depending on whether you have added a Person or a Sales Lead as an attendee and the data that is stored against that record. From this menu, you can achieve the following:
- Set the Primary Contact – This will place a small black star against that contact to indicate the Primary Contact.
- View that attendee’s Person/Lead record – The attendee must already exist on your Workbooks database as a Person or Lead record to see this option.
- View that attendee’s Employer (Organisation) record – This Organisation must already exist on your Workbooks database and be linked to this attendee via the “Employer” field on the corresponding Person record to see this option.
- Call them directly from Workbooks using stored numbers – There must be a phone number stored on the Person or Lead record for this attendee otherwise this option will not be present in the list. You must also have Telephone Integration configured such as Skype.
- Email them directly from Workbooks using a stored email address – There must be an email address stored on the Person or Lead record for this attendee.
NOTE: It isn’t possible to add a Person/Lead as an attendee if they do not have an email address. You can however enter in just the email address, Workbooks will then give you the option to add that email as a record to your database if it doesn’t exist already.
- Remove them from the attendees list.
NOTE: You can only set one Primary Contact per Meeting.
Adding Meetings to your Calendar
Once you’ve created a Meeting record you can download it to your calendar by generating an iCal record (.ics file). If you have configured a recurring meeting these settings will be retained when you download the iCal file. There are two ways to do this:
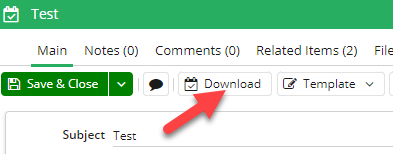
From a Meeting record – open the relevant Meeting record and click “Download“:
NOTE: Sometimes, your browser will block the download of the iCal file as a new window will open when you click “Download“. Please see our forum post on disabling the pop up blocker for Workbooks, here if you are experiencing problems.
If someone is making appointments on your behalf in Workbooks, the appointment maker can download the appointment and forward the iCal/ics file to you by email attachment. Upon receipt, open the attachment and Outlook will import it to the calendar as if you downloaded it yourself.