


Synchronising your Google Calendar with Workbooks
Once you have installed the Google Calendar integration, you will need to let your Workbooks know which calendar it should sync with
The synchronisation between your Workbooks Meetings and your Google Calendar is completed by automatic scheduled processes once you have completed the initial integration, which is broken down into three key areas. The guide below gives details on each of these. Follow the links below in order to access the relevant section:
- Creating your Workbooks specific Google Calendar – A vital step of the process is creating a specific Google Calendar for Workbooks to synchronise with.
- Logging into Workbooks via Google – By logging into Workbooks via Google, Workbooks knows which Google Account to synchronise with.
- Managing your Synchronised Calendar – Choosing your newly created Google Calendar as the target for the integration, and de-synchronising it should the need arise.
Creating your Workbooks specific Google Calendar
This step is necessary, as Workbooks will synchronise every Meeting from the past 6 months that is not marked as “Private” into Workbooks. It is highly recommended to use a fresh Google Calendar to prevent duplicates of old meetings being imported into Workbooks or Google.
Each user will need to create a Google Calendar for Workbooks to synchronise with. It is important to give the calendar a logical name that will allow you and a system administrator to easily identify which calendar is the one you have created for this purpose. An example of a good naming convention for you to follow when naming your calendar is “<YOUR NAME> – Workbooks”. Information on how to create a new calendar can be found here.
Logging into Workbooks via Google
Once the system administrator has installed the Workbooks app to your company’s Google account, each user will next need to login in Workbooks using their Google account in order for them to have their Workbooks calendar synchronise with the Google calendar they have created.
For more information on how to log on to Workbooks using a Google account, see our Knowledge Base article on logging in to Workbooks, here.
Managing your Synchronised Calendar
Synchronising your Calendar
When you have created the Google Calendar you wish to synchronise with Workbooks and logged in to Workbooks using your Google Account, you are able to synchronise your calendars.
In order to do this click Start > Preferences > Integration > Google Sync:
NOTE: This window may take a few moments to populate as it is a web process.
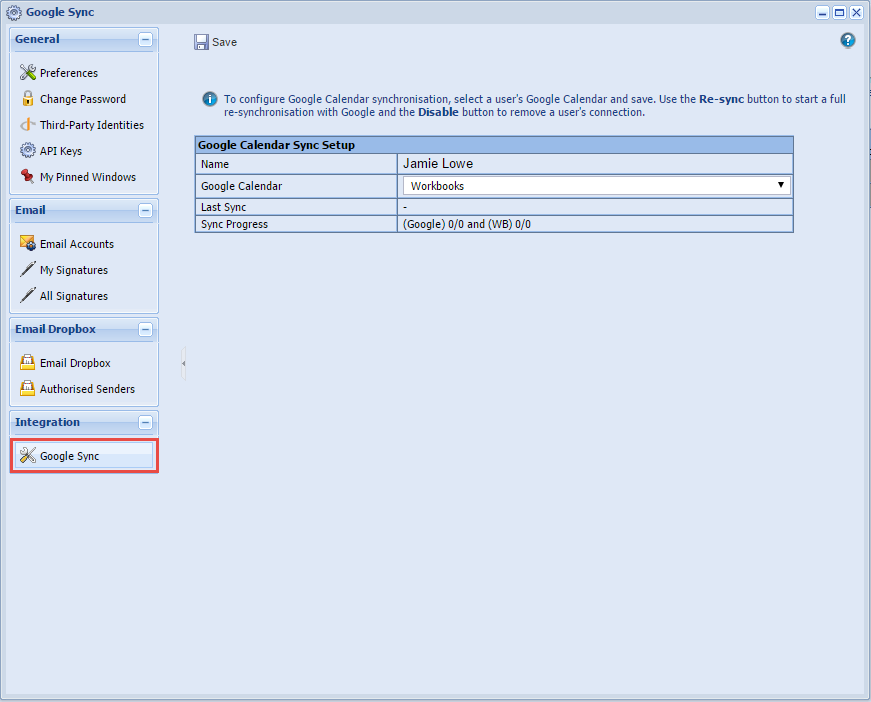
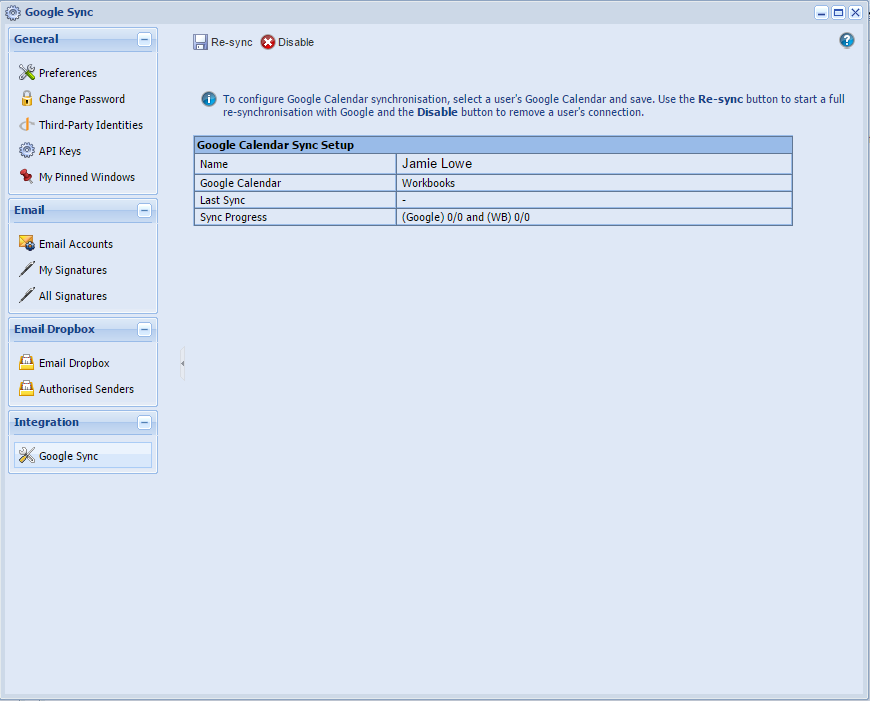
From here select the name of the Google Calendar that you have created from the Google Calendar picklist (in the above screenshot it is called “Workbooks”). Click Save. Once your selection has been saved, you will see the following screen:
NOTE: There is a re-sync button at the top of this screen. IT SHOULD NOT BE PRESSED. It does not force a manual synchronisation of meetings. It could result in created meetings not being synced.
De-synchronising your Calendar
If you wish to either disable or synchronise a different Google Calendar to your Workbooks account, then you need to click the Disable button. You will see the following screen:
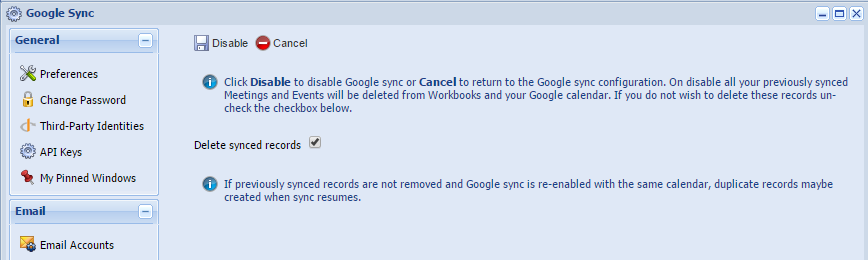
In order to cancel this process click the Cancel button. If you wish to proceed, ensure you take note of the Delete synced records checkbox. If you choose to select this box then any Meetings synchronised to Workbooks from your Google Calendar will be deleted from Workbooks, and vice versa. This means that all Meetings will be preserved in whichever environment they were originally created, and only the synchronised copies will be deleted. This prevents duplicate copies being made if the same calendar is synchronised to Workbooks again.
After considering this and making the appropriate selection click the Disable button if you wish to proceed with the process and the Cancel button if you don’t. After you have completed this process you will be able to synchronise a new calendar with Workbooks via the same process used previously.