Knowledgebase articles
- Welcome to the Knowledge Base
- Introduction
- Training
- Getting Started
- Preferences
- Activities
- Cases
- Importing Data
- Leads
- Marketing
- Introduction to Marketing
- Marketing Campaigns
- Mailing Lists
- Products
- Mailshots
- Upload Library
- Templates
- Event Management
- Compliance Records
- Force24
- Spotler Integration
- What is Spotler?
- Navigating your Spotler homepage
- GatorMail
- GatorLeads / Web Insights
- Tracking Code
- Setting up the Plugin
- Viewing Web Insights Data on your Form Layouts
- Domain Names and Online Activities
- Reporting incorrect Leads created through Web Insights
- Reporting on Web Insights data
- Using UTM Values
- Why aren’t Online Activities being created in the database?
- Why is GatorLeads recording online activities in a foreign language?
- GatorSurvey
- GatorWorkflow
- GatorPopup
- Opportunities
- Projects
- Integrations
- Mapping
- Electronic Signing Tools
- Creditsafe Integration
- Zapier
- Introduction to Zapier
- Available Triggers and Actions
- Linking your Workbooks Account to Zapier
- Setting up Zaps
- Posted Invoices to Xero Invoices
- Xero payments to Workbooks Tasks
- New Case to Google Drive folder
- New Case to Basecamp Project
- New Workbooks Case to JIRA Ticket
- Jira Issue to new Case
- 123FormBuilder Form Entry to Case
- Eventbrite Attendee to Sales Lead and Task
- Facebook Ad Leads to Sales Leads
- Wufoo Form Entry to Sales Lead
- Posted Credit Note to Task
- QuickBooks Online
- Survey Monkey responses to Tasks
- Multistep Zaps
- Email Integrations
- Event & Webinar Integration Tools
- GoToWebinar
- ON24
- Microsoft Office
- Outreach
- Installation
- Outreach Authentication
- Sync People to Outreach Prospects
- Sync Organisations to Outreach Accounts
- Sync Workbooks Opportunities to Outreach
- Sync Tasks/Activities from Workbooks to Outreach
- Sync Outreach Sequences to Workbooks
- Sync Outreach Sequence States to Workbooks
- Sync Outreach Sequence Step Numbers to Workbooks
- Sync Prospects/Accounts/Opportunities from Outreach to Workbooks
- Sync Outreach Tasks/Calls/Meetings to Workbooks
- Scribe/Workbooks Connector
- RingCentral
- Auditing
- Comments
- People & Organisations
- Reporting
- Introduction to Reporting
- Using Reports
- Introduction to Charts
- Exporting Reports
- Advanced Reporting
- Report Snapshots
- Dashboards
- Transaction Documents
- Introduction to Transaction Documents
- Displaying & Adding Transaction Documents
- Copying Transaction Documents
- Transaction Documents Fields Help
- Transaction Documents Line Items Help
- Printing & Sending Transaction Documents
- Managing Transaction Document Currencies
- Managing Transaction Document Statuses
- Setting a Blank Default Currency on Transaction Documents
- Credit Notes
- Customer Orders
- Invoices
- Quotations
- Supplier Orders
- Contract Management
- Sagelink
- Introduction to Transaction Documents
- Configuration
- Introduction to System Administration
- Users & Security
- Database
- Accounting
- Email Integrations
- Customisation
- Creating & Modifying Picklists
- Theme
- Record Types
- Creating Custom Fields
- Report-based Custom Fields
- Linked Fields & Reference Fields
- Record Templates
- Form Layouts
- Customising relationships between parties
- Opportunity Stages
- Custom Records
- Sign In Customisation
- Automation
- Contact Support
- Releases & Roadmap
Managing your Imports
An Overview of how to check the status of any Imports you have run
Import Landing Pages
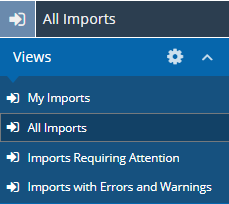
Workbooks has three native Views associated with Importing:
- My Imports.
- All Imports.
- Imports Requiring Attention.
As it is possible to apply filters here, it is also possible to create your own View.
Creating your Own Import Management Landing Page View
An example of a View you may want to have is any Import in your system that had errors or warnings. To do this go to All Imports and apply the appropriate filters

Like Customising Views on any other Landing Page, this can be saved by clicking the View > Save as, then given a Unique name.
This view will then appear on the left hand menu to be able to be selected.

Managing your Import
After an import is done, different information is collected in separate tabs for you to review:
- Summary – Provides an overall description of the Import including its progress, numbers of errors and more.
- Affected Records – Gives information on which Records were either created or updated.
- Errors – All of the errors that have occurred during the Import.
- Rejected data – Shows the rows in the uploaded file that enforced no change or action during the Import.
- Warnings – All Warnings logged whilst attempting to Import data.
- Field Mapping Settings – Shows the mappings that were set during the Import Wizard.
- Error Handling settings – Shows the settings applied during the Import Wizard error handling configurations.
- Uploaded File – Has the Import file shown as well as the option to export again.
Managing Errors
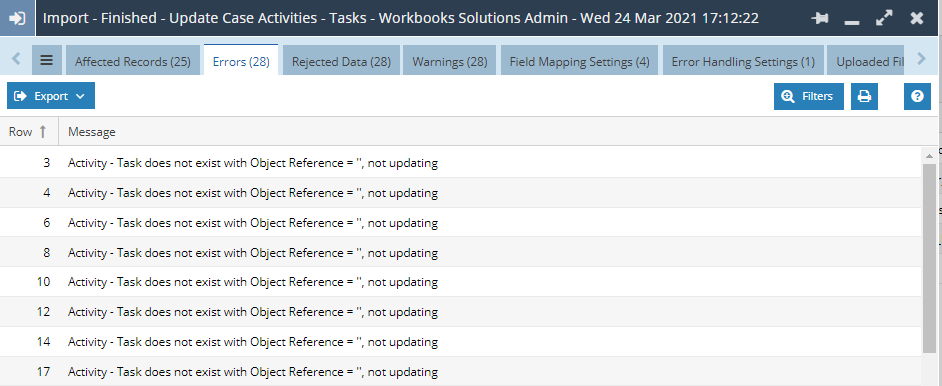
When looking at the Error tab you will see 2 columns; ‘Row’ and ‘Message’. The Row column refers to the row in the upload file and the Message provides information why the error occurred.

In the example above the there is no Task in Workbooks with the Object Reference ”. Looking at the Uploaded File tab, you will then be able to investigate which row and column has the wrong data.
Managing Warnings
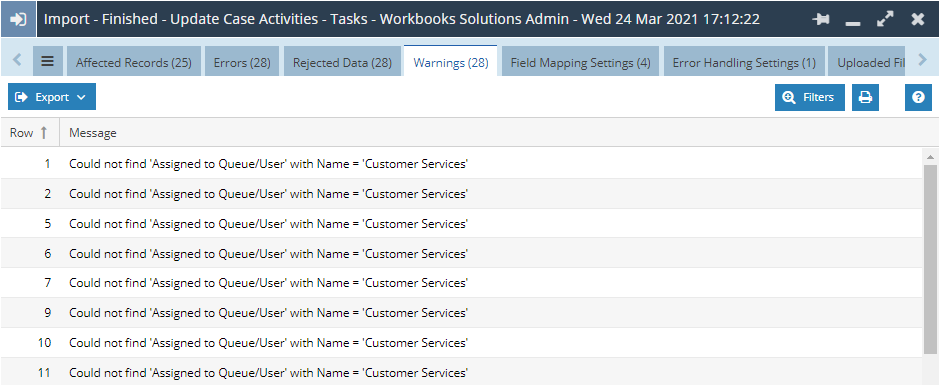
Like the Errors tab, the Warnings tab has two columns ‘Row’ and ‘Message’ that serve the same purpose as described above.

Like the Errors, you will be able to locate the wrong data within the Uploaded File tab. In the image above, it shows there is no Assigned to/Queue named ‘Customer Services’. This will need to be either changed in Workbooks for a queue to be added, or changed in the Upload file itself.
NOTE: When Managing Imports it is best practice to change the file that was uploaded to Workbooks rather than Exporting the Uploaded file from the Import Record. The act of exporting the file from the Import Record can affect the format of the file which can introduce other problems in the Importing process.