


Knowledgebase articles
- Welcome to the Knowledge Base
- Introduction
- Training
- Getting Started
- Preferences
- Activities
- Cases
- Importing Data
- Leads
- Marketing
- Introduction to Marketing
- Marketing Campaigns
- Mailing Lists
- Products
- Mailshots
- Upload Library
- Templates
- Event Management
- Compliance Records
- Force24
- Spotler Integration
- What is Spotler?
- Navigating your Spotler homepage
- GatorMail
- GatorLeads / Web Insights
- Tracking Code
- Setting up the Plugin
- Viewing Web Insights Data on your Form Layouts
- Domain Names and Online Activities
- Reporting incorrect Leads created through Web Insights
- Reporting on Web Insights data
- Using UTM Values
- Why aren’t Online Activities being created in the database?
- Why is GatorLeads recording online activities in a foreign language?
- GatorSurvey
- GatorWorkflow
- GatorPopup
- Opportunities
- Projects
- Integrations
- Mapping
- Electronic Signing Tools
- Creditsafe Integration
- Zapier
- Introduction to Zapier
- Available Triggers and Actions
- Linking your Workbooks Account to Zapier
- Setting up Zaps
- Posted Invoices to Xero Invoices
- Xero payments to Workbooks Tasks
- New Case to Google Drive folder
- New Case to Basecamp Project
- New Workbooks Case to JIRA Ticket
- Jira Issue to new Case
- 123FormBuilder Form Entry to Case
- Eventbrite Attendee to Sales Lead and Task
- Facebook Ad Leads to Sales Leads
- Wufoo Form Entry to Sales Lead
- Posted Credit Note to Task
- QuickBooks Online
- Survey Monkey responses to Tasks
- Multistep Zaps
- Email Integrations
- Event & Webinar Integration Tools
- GoToWebinar
- ON24
- Microsoft Office
- Outreach
- Installation
- Outreach Authentication
- Sync People to Outreach Prospects
- Sync Organisations to Outreach Accounts
- Sync Workbooks Opportunities to Outreach
- Sync Tasks/Activities from Workbooks to Outreach
- Sync Outreach Sequences to Workbooks
- Sync Outreach Sequence States to Workbooks
- Sync Outreach Sequence Step Numbers to Workbooks
- Sync Prospects/Accounts/Opportunities from Outreach to Workbooks
- Sync Outreach Tasks/Calls/Meetings to Workbooks
- Scribe/Workbooks Connector
- RingCentral
- Auditing
- Comments
- People & Organisations
- Reporting
- Introduction to Reporting
- Using Reports
- Introduction to Charts
- Exporting Reports
- Advanced Reporting
- Report Snapshots
- Dashboards
- Transaction Documents
- Introduction to Transaction Documents
- Displaying & Adding Transaction Documents
- Copying Transaction Documents
- Transaction Documents Fields Help
- Transaction Documents Line Items Help
- Printing & Sending Transaction Documents
- Managing Transaction Document Currencies
- Managing Transaction Document Statuses
- Setting a Blank Default Currency on Transaction Documents
- Credit Notes
- Customer Orders
- Invoices
- Quotations
- Supplier Orders
- Contract Management
- Sagelink
- Introduction to Transaction Documents
- Configuration
- Introduction to System Administration
- Users & Security
- Database
- Accounting
- Email Integrations
- Customisation
- Creating & Modifying Picklists
- Theme
- Record Types
- Creating Custom Fields
- Report-based Custom Fields
- Linked Fields & Reference Fields
- Record Templates
- Form Layouts
- Customising relationships between parties
- Opportunity Stages
- Custom Records
- Sign In Customisation
- Automation
- Contact Support
- Releases & Roadmap
GatorMail Field Mappings
Within GatorMail, fields can be mapped to and from People or Sales Lead Records, this includes both Standard and Custom Fields. These can be mapped in both directions, to either populate information from Workbooks into the body of your email in order to personalise the email content further or be used to populate Fields on a Person or Lead Record within Workbooks following a form submission.
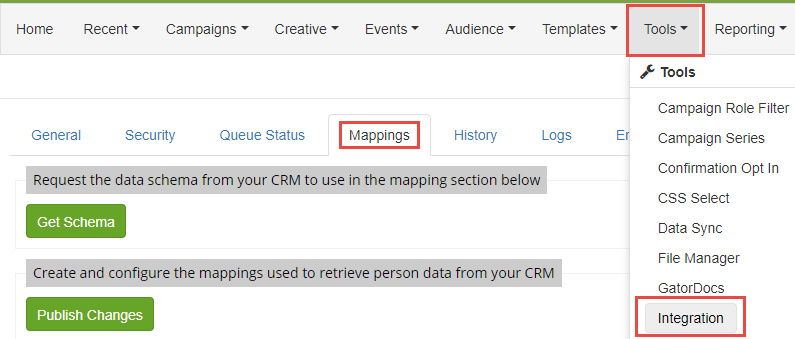
Field Mappings can be found in the GatorMail Portal, from Tools > Integration > Mappings
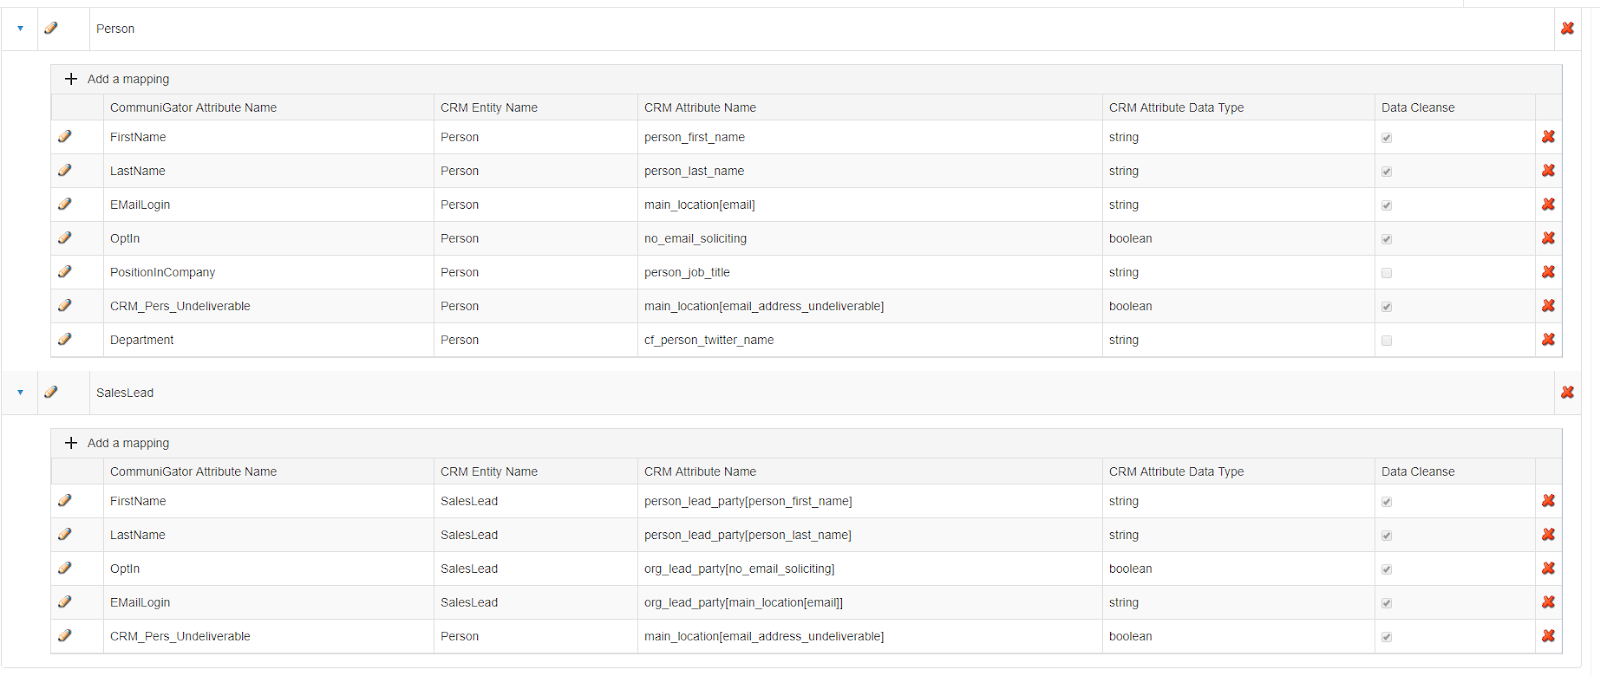
You will see that there are already a number of standard field mappings available for Person and Sales Lead:
To add a new Field Mapping, select the Add a mapping button above the list of mappings for your selected Record type:

This will create a new Field Mapping line that you can then edit:
![]()
In this example we will map the GatorMail Country field to the Country on a Person Field in Workbooks.
When creating these mappings you will only need to the change the Spotler Attribute Name and the CRM Attribute Name. CRM Entity Name will remain the same and CRM Attribute Data Type will be mapped automatically from the CRM Attribute Name depending on the Field type within Workbooks:
![]()
The final option is the Data Cleanse which is used for GatorForm Fields when the Data Cleanse box is checked and the Field on the Form is filled in then it will update the value within Workbooks with what was entered on the Field.
NOTE: If data cleanse is not turned on then no Form information for that field will be fed back to Workbooks.
If you are using these Field Mappings for Emails only, then you will not need to check this box.
Once you are happy with the setup of your new mappings, press the green plus on the far left of the new mapping:

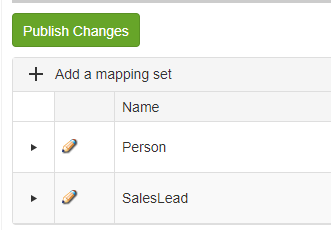
Once you have finished setting up all of your mappings, select the Publish Changes box above the Field Mappings to commit all of the changes:
If you have recently created new Custom Fields within Workbooks and you are unable to find them in CRM Attribute Name then you will need to use the Get Schema button. This will refresh all of the available Fields from Workbooks, however, this can take a few minutes to update so the Field may not be available immediately.
