Gator Smart Forms
Smart Forms are web capture forms that can be used within email Landing Pages and sent out through Campaigns to a targeted audience, or they can be embedded on to your website in order to capture new leads. In addition, Smart Forms can be added to Popups, which makes capturing prospect data even easier as your prospects won’t have to make as many clicks to complete an action. Data collected on the forms will be pushed back into GatorLeads. You could use a Popup to promote Newsletter sign ups, or to receive more information about an event you’re hosting.
Smart Forms are an great way to help identify unique visitors. Once a form is submitted a cookie is placed on the User’s browser meaning that the next time they visit they are identifiable by their email address rather than their company IP address.
If, like most customers, you’re using WordPress for your website, a Plugin is available to help you add the form to your website without having to amend the HTML widget. Information on the Plugin is available here.
There is now a web form option called Single Script. This enables automatic updates on your form when displayed on a web page, making the administration and maintenance of your forms much easier.
Additionally, Smart Form information also feeds back into Workbooks which can then be used to create or update information on the appropriate Person or Lead Record, more information on this can be found on the Field Mapping page.
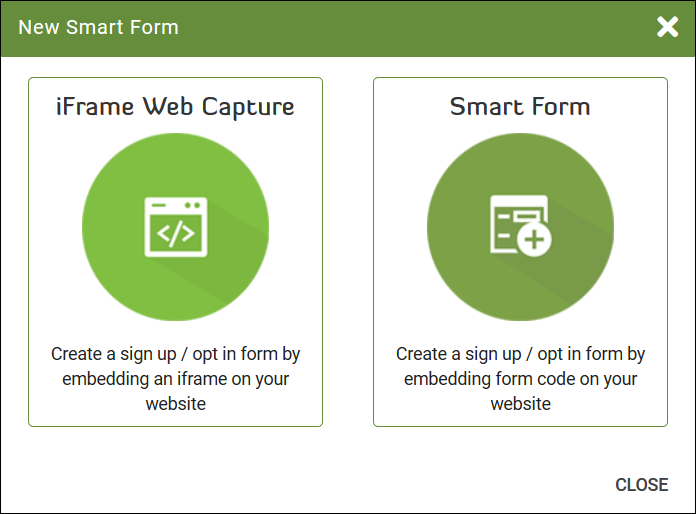
To create a Smart Form, go to Tools > Smart Forms then click Create New which will bring up a screen like this:

Here you can choose to create a form by embedding an iframe on your website or to create one by embedding HTML on your website. Where possible, we’d recommend using the embedded code as it provides a more secure submission and is more compatible with https based domains.
Select Smart Form and give your new form a Name and Description. If you want to create a Single Script form, make sure you tick the checkbox, then click Create which takes you to the setup screen where you have 3 tabs:
- Settings
- Fields
- Submit Rules
Under Settings you have a number of options on the left, which are:
- Submission Settings
- Email Address
- Confirmation Opt In
- Data Management
- Submission URL
- GatorLeads
- reCAPTCHA
- Pre-populate
- Design Settings
- Analytics Goal Conversion
- WordPress Plugin Settings
Settings
Submission Settings

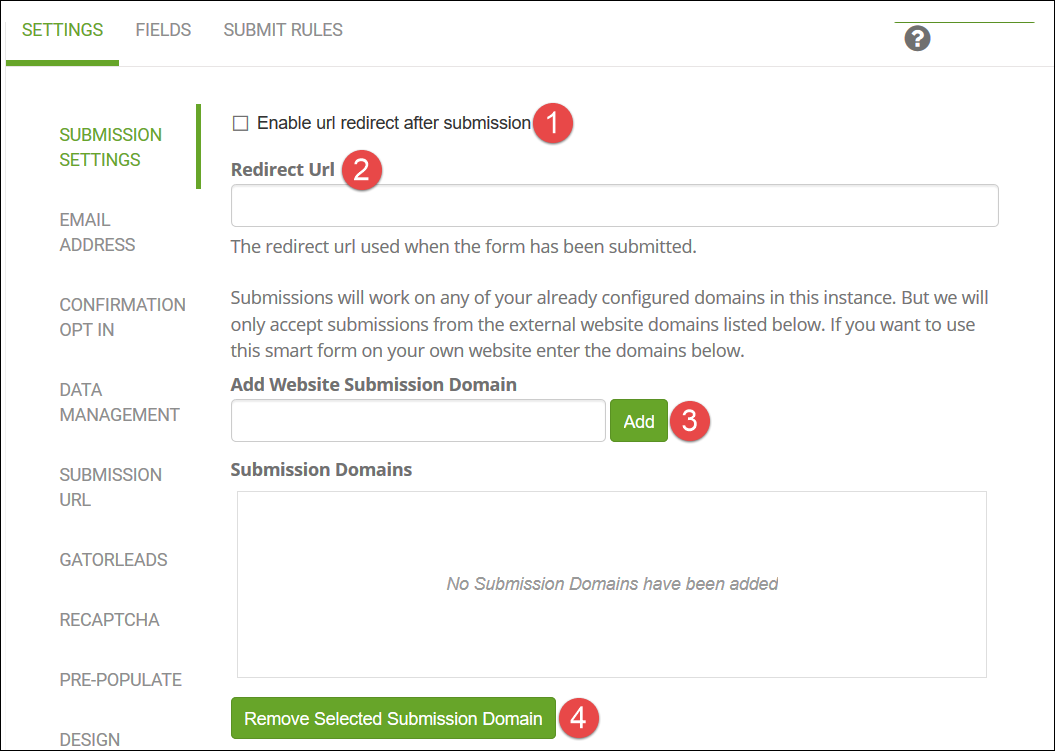
- Enable URL redirect after submission means that the person submitting the form will be directed to a different page once the form is filled and submitted.
- This is where you enter the URL that you want the person to be redirected to.
- The Website Submission Domain is usually your website domain but if not, needs to be a domain that has been set up with Spotler. When entering the domain, do not include the https:// part. You can add more than one if required and they will appear in the Submission Domains box.
- If you want to remove a domain from the Submission Domains box, highlight it and click Remove Selected Submission Domain.
Email Address
When a person completes a Smart Form, the email address is always a mandatory field, even if nothing else is. If you want the form to check the validity of the email address, you should tick the checkbox next to Enable Additional Email Validation and select an option from the dropdown next to Email Validation. The choices are:
- Standard Email Address – any valid Email address is allowed to be used to submit the form.
- Business Email Address – submissions from personal email address domains such as Gmail or Hotmail are prevented when submitting the form.
- AUS Government Email Addresses – only submissions with a valid Australian Government email address (.gov.au) can submit the form.
(The additional validation is added to the form as JavaScript validation.)
Confirmation Opt In
Enable Confirmation Opt In
Once the form has been submitted your selected Confirmation Opt In will be sent in an email to the User allowing for a “double opt in” process on the form.
Add confirm statement
The confirmation Opt In Statement is inserted into the Web Form so someone completing the form is able to confirm their opt in while submitting the form and do not need to do this via an email.
Data Management
Within Data Management you can decide what you want to happen to the submitted data. It allows you to control how you process the submission and can prevent the same contact from submitting a form multiple times.
Submission URL
If you have multiple Landing Zone URLs set up on your account you can select which URL you want to be used for posting data.
GatorLeads
The redirect URL will contain GatorLeads tracking information so once the User continues browsing your site you are able to track all subsequent activities. We recommend that you tick this checkbox.
reCAPTCHA
Adding a reCAPTCHA code to your forms means that human verification will be required before the form can be submitted. For reCAPTCHA to work, you need to have set up a site key and secret key for the domain where your form is located.
Pre-populate
When checked, data from previous form submissions will automatically appear in your new form.
Design Settings
Here you can set up the success and failure messages that appear when someone submits a form as well as defining the wording on the submit button.
Analytics Goal Conversion
If you want to use Google Analytics, you can set up your form to track what they call Events. Events are user interactions with content that can be measured independently from a web page or a screen load. Examples of events include: downloads, link clicks and video plays. More information on Google Events is available here.
WordPress Plugin Settings
Once you’ve created your Smart Form, you’ll want to display it on a website page, which is made easier using the WordPress Plugin. The settings you see in this session need to be provided within your WordPress account for the Plugin. More information on downloading and using the Plugin are available here.
Fields
This is where you choose which fields to display on your Smart Form. They’ve been broken up by their data type to help you find them more easily. Simply tick the checkbox next to the fields you want to use. As you do so, you’ll see the list on the right-hand side of Selected Fields grows and you can reorder them using drag and drop and remove them from your selection using the red cross on the right. The Email field is always added to your forms by default so cannot be deleted.
Submit Rules
Submit Rules allow you to control what happens when a person submits a form. When creating a rule you can do it based on a Page URL or on Field Data. You can choose to have a rule which redirects to a new URL, add the recipient to a Gator Campaign, add the recipient to a Gator Group or trigger an email notification. NOTE: If you choose to add a person to a campaign it must be a Refresh Non-Recurring Type.
Save and Get Embedded Code
When you’ve finished setting up your form click Save and Get Embedded Code, where you have 3 choices:
- Single Script
- WordPress Plugin
- Form Templates
Single Script
Choose this option and tick the checkbox next to Include in Single Script. This means any later changes to the form will be reflected automatically on the form. You can then copy the HTML from the two dialogue boxes to put on your website.
WordPress Plugin
Choose this option if you’re using the WordPress Plugin.
Form Templates
Choose this option to access the traditional script for inserting a form onto your page.
Save & Lock
We recommend that once you have fully setup and tested your form, you lock it before live submissions are made. This protects your form from any unwanted changes.
For more information on setting up smart forms please see Spotler’s help site here.