


Introduction to the CASE Statement
The CASE statement is similar to the IF statement. However, it allows you to apply more complicated logic than a simple yes or no response.
The structure of a CASE Statement is as follows:
You do not need to start a new line for each statement, but you may find it easier to read by doing so.
CASE
WHEN Statement1 THEN Outcome1
WHEN Statement2 THEN Outcome2
…
WHEN Statementx THEN Outcomex
ELSE Alternative
END
Every CASE statement requires two pieces of syntax at the start and end, being CASE and END respectively. You will not be able to create a CASE statement without them.
Examples of CASE Statements
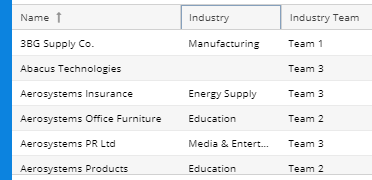
Example 1
When an Organisation has an industry of ‘Manufacturing’ output ‘Team 1’ if it is ‘Education’ output ‘Team 2’ otherwise output ‘Team 3’
The CASE Statement can then be broken down as following:
Statement1: industry = ‘Manufacturing’
Output1: ‘Team 1’
Statement2: industry = ‘Education’
Output2: ‘Team 2’
Alternative ‘Team 3’
Putting this together you will get:
CASE
WHEN industry = ‘manufacturing’ THEN ‘Team 1’
WHEN industry = ‘education’ THEN ‘Team 2’
ELSE ‘Team 3’
END
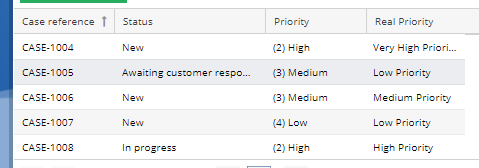
Example 2
When a Case Record is a high priority and in status new, call it ‘Very High Priority’, if it is medium priority and status new, call it ‘Medium Priority’ if it is high Priority case but the status is not new, call it ‘High Priority’ – If none of these criteria are met, then it is ‘Low Priority’.
We will then need to break this up into each statement and outcome:
Statement1: Case priority is high and status is new
Output1: Very High Priority
Statement2: Case priority is medium and status is new
Output2: Medium Priority
Statement3: Case priority is high and status is not new
Output3: High Priority
Alternative: Low Priority
This then becomes the following within the CASE statement:
CASE
WHEN priority_name = '(2) High' AND  status_name = 'New' THEN 'Very High Priority'
WHEN priority_name = '(3) Medium' AND  status_name = 'New' THEN 'Medium Priority'
WHEN priority_name = '(2) High' AND  status_name != 'New' THEN 'High Priority'
ELSE 'Low Priority'
END
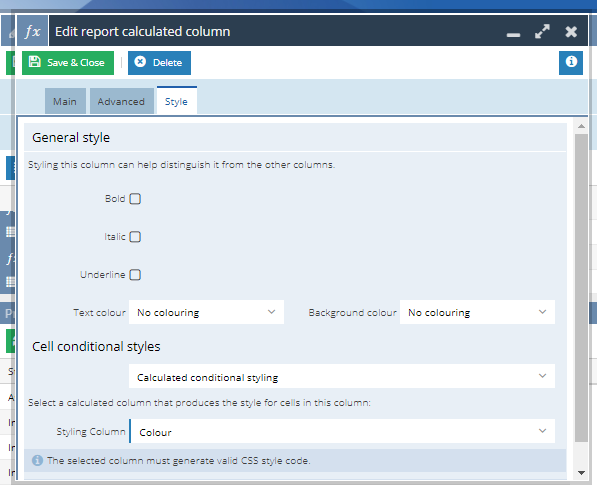
Example 3
CASE statements are also a great way to apply CSS styling to columns as you are able to apply a variety of colours to cells, depending on a number of criteria:
When a Case Record is a high priority and in status new, have a red background with bold black text, if it is medium priority and status new, have a yellow background with black text, if it is high Priority case but the status is not new, have a red background with black text otherwise it is a green background with black text.
This CASE statement has the same logic as Example 2, however, this time we are applying CSS styling rather than outputting values:
CASE
WHEN priority_name = '(2) High' AND  status_name = 'New' THEN 'font-weight: bold; background-color: red; color: black'
WHEN priority_name = '(3) Medium' AND  status_name = 'New' THEN 'background-color: yellow; color: black'
WHEN priority_name = '(2) High' AND  status_name != 'New' THEN 'background-color: red; color: black'
ELSE 'background-color: green; color: black'
END
You can now apply this to the “style tab” of the column previously created in example 2 as “Calculated conditional styling” (CSS).
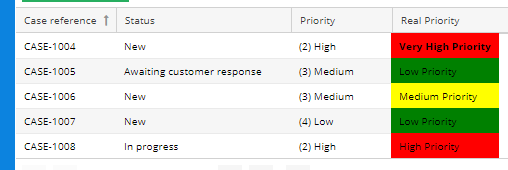
After doing so, you will see the following result in your report:
Below is a video for more examples of CASE statements.