Updating Related Records
The DocuSign Integration can be configured to update additional Records that are linked from the Record that is sent out for signature. This can be configured so that any Record linked through a Dynamic Linked Item can then have any standard or custom Workbooks Fields updated by the data provided by a signer.
This example will take you through the process of how to set up a DocuSign Template that will be sent from a Contract and update the Job Title field on a Person that is linked through a Primary Contact DLI.
Note: It is also possible to send a Workbooks PDF from a Contract, however this would require the creation of a custom PDF template.
Records can only be updated providing that a DLI has been created and populated on the Form Layout. For this example you will create a DLI that links to People, which will also create a “Primary Contact” relationship from the Contract to the Person. This field will then be used later to identify the person as the document signer.
First, create a Report that powers the Dynamic Linked Item which will be based on People records. You may already have such a Report in your Database, in this case then you can skip this step. Otherwise, there is a Template Report available from Start > New > Report > Create a report from a template report and open the Report “Template – Primary Contacts”.
Note: The DocuSign integration can only update Fields that are within the Report on the originating record of the Report. For this example Job Title will be included in the Template Report, but any custom fields will need to be added to the Report in order to update them.
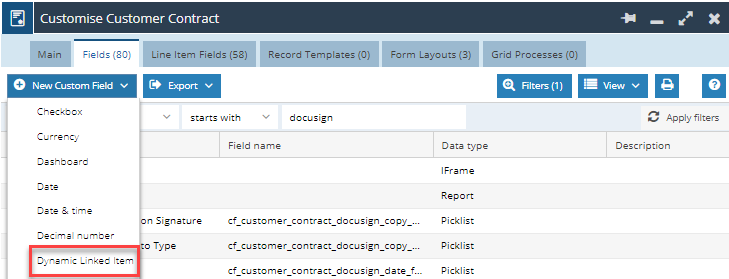
To create the DLI on a Contract, go to Start > Configuration > Customisation > Record Types > Customer Contracts > Fields. On this tab select New Custom Field then Dynamic Linked Item.
Give the Field an appropriate label such as “Primary Contact”, then select the report created above, or an existing Report to drive the field.
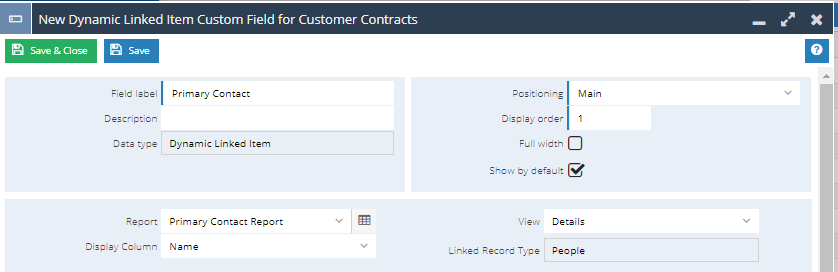
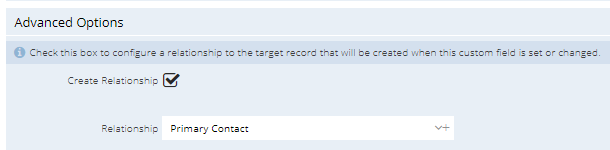
Under Advanced Options, set the Create Relationship checkbox to True and then specify that a Primary Contact Relationship will need to be created.
Once the Field has been created, add it to your Contract Form Layouts as required.

Once the Field has been configured in Workbooks, login to DocuSign and create a new Template. To do so, select New and then Create Template.

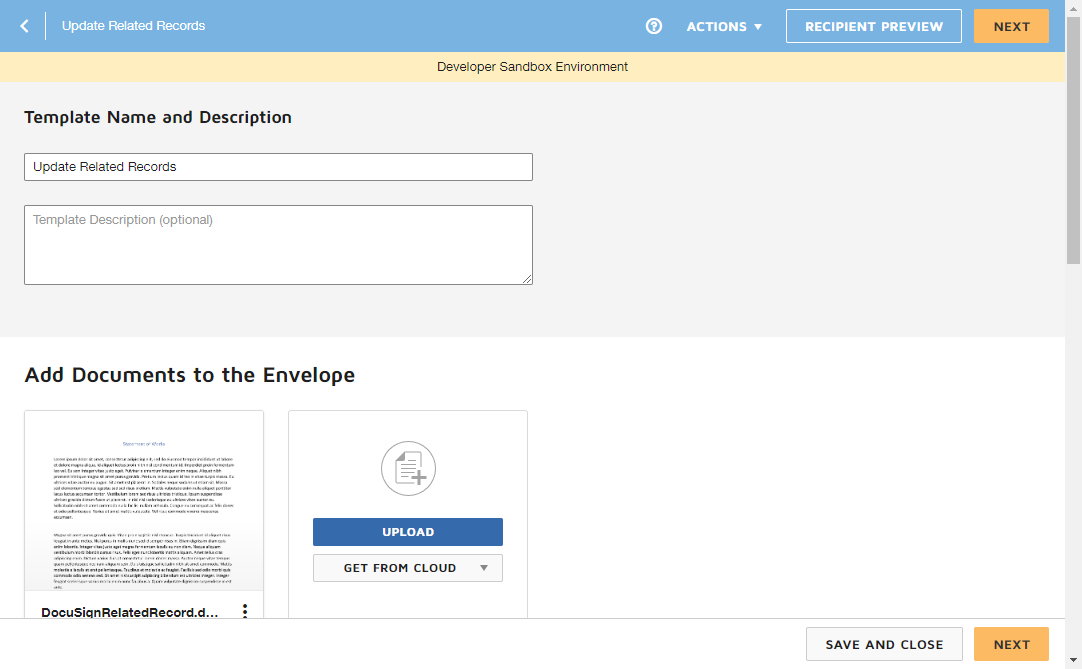
On the new Template, give it an appropriate Name & Description, then upload the file that will be sent out for Signature.

Set a Template Role within the Template to “Primary Contact” then save & close the Template. We will come back to this screen once we have configured the field mappings in Workbooks.
Create a New Document from the DocuSign integration Menu which is accessed from Start > Configuration > Email & Integration > DocuSign. Select New Document and Continue.
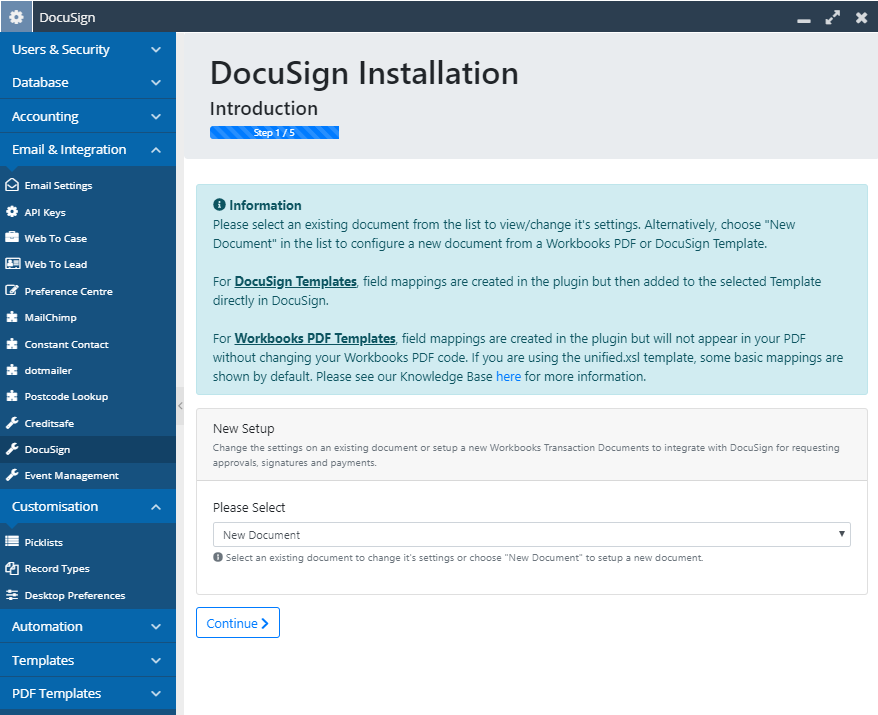
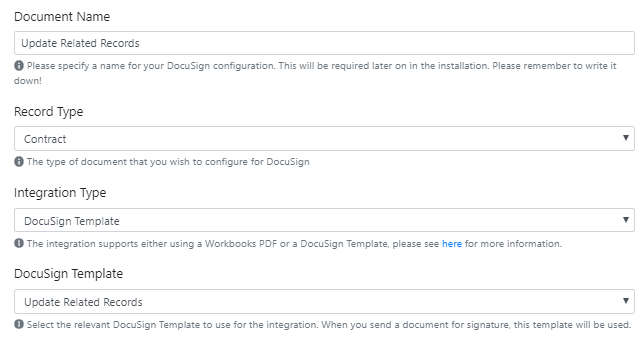
Configure the document to your specifications, giving it an appropriate name and selecting People as the Record Type.
This example is using a DocuSign Template so for Integration Type, select DocuSign Template. This will show a new option where you should select the DocuSign Template that you want to use. Select the Template that was configured in Stage 2.
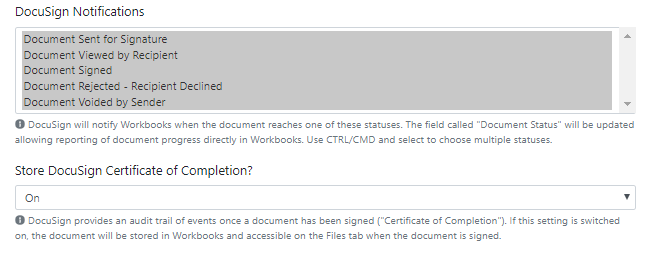
We recommend that you set up your template so that you receive all DocuSign Notifications enabling you to be kept fully updated on all customer actions. We’d also recommend that you turn on the Certificate of Completion setting.
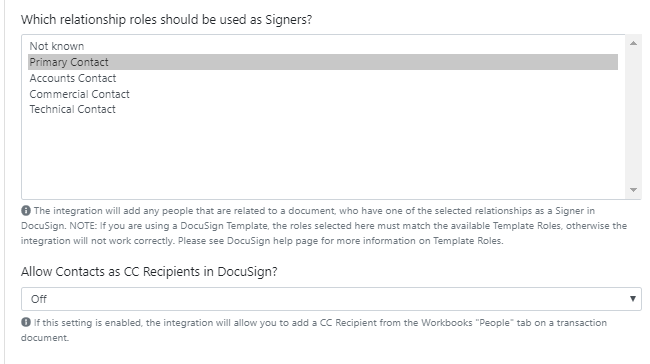
The Signer for this document will be the Primary Contact but you can use another role as required. For this example, the document will only be sent to the Primary Contact, so the CC setting can remain turned off. However, you can CC further contacts as appropriate for your business.
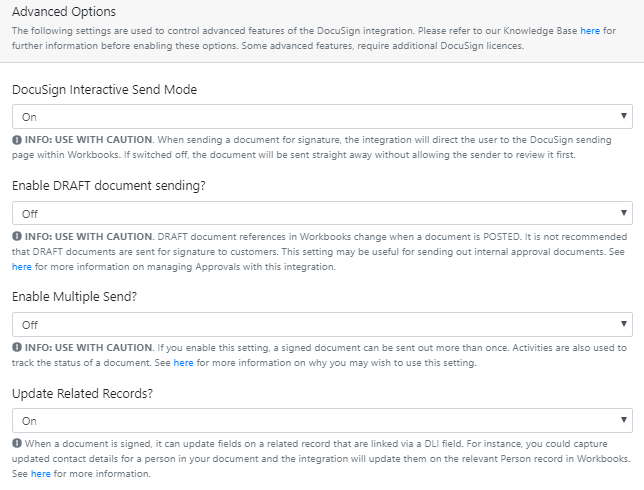
In the Advanced Settings section, we’d always recommend that Interactive Send Mode is turned on so that the draft document can be reviewed before it is sent out, otherwise the document will be sent straight away. Ensure that the Update Related Records setting is also turned on so that we can configure field mappings in the next steps. All other settings will remain set to off.
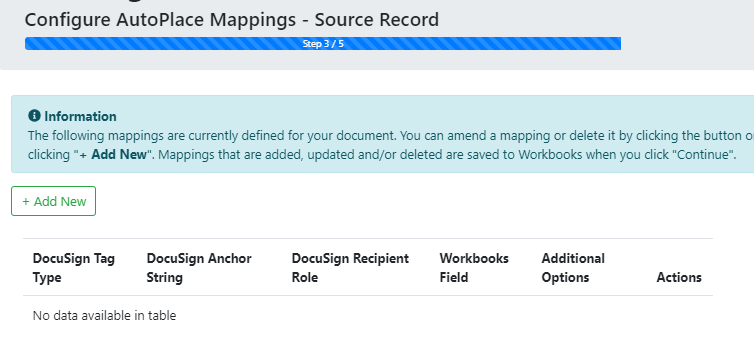
Once complete, the next step of the document setup allows you to configure the AutoPlace Mappings from the Source Record. In this example, the Source Record is the Contract as this is where you are generating the document from. We will not update any fields on the Contract, so you can click continue on this screen to skip this step.
This step allows you to configure the AutoPlace Mappings for any Related Records that are linked to the Source record via a DLI field. For this example, we will configure mappings for one DLI, which will be the Primary Contact (a Person record). To add a new mapping, select Add New in the top left under the info text.
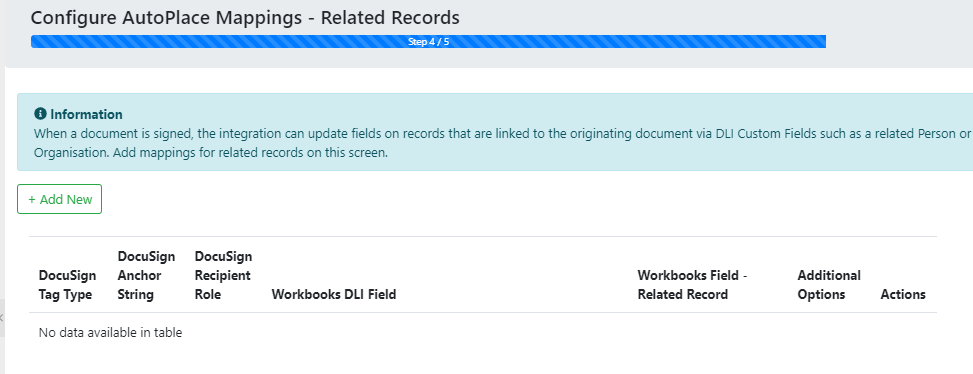
A new window will appear, where a mapping can be configured. You will need to set the following information as below:
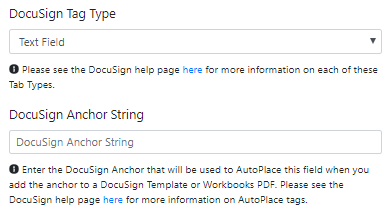
DocuSign Tag Type: This allows you to select the Tag Type for the field within DocuSign, this will need to match the field data type in Workbooks to allow data to sync across correctly. For this example you will need a Text Field.
DocuSign Anchor String: Anchor Strings allow you to automatically place a merge field of the selected type in your Template. For example if your Template uses the phrase “sign here” in multiple places throughout you could automatically overwrite this with a Signature tag. For this example it is not needed.
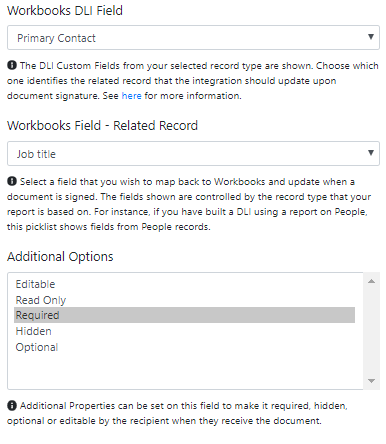
Workbooks DLI Field: Here you will be able to select from a list all available DLI fields on Source Record. For this example you will need to select Primary Contact.
Note: Dynamic Picklists are not supported and will not be shown in this list.
Workbooks Field – Related Record: This picklist shows a list of the available fields from the record type that your report is based on. For this example, our report is based on People records, so the fields shown here are for People. Choose “Job Title” from the list.
Additional Options: Select whether you want the field within the DocuSign Document to be Editable, Read Only, Required, Hidden or Optional. For this example we will make it Required so that it needs to be completed before the document is signed, but this is not necessary.
Once you have completed this screen, click Add to add the row to the mappings table.You can then add additional mappings if required by selecting Add New and repeating the same steps again.

Note: When you are finished configuring the mappings, ensure that you click Continue to save the mappings to Workbooks.
On the final screen, we recommend keeping this window open as you will need to refer back to some of the values specified here when setting up the Button Process in the next steps.
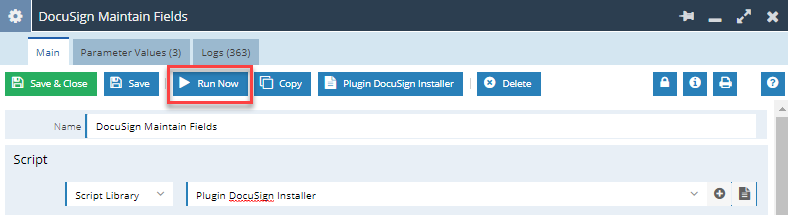
Any field mappings that are created, will be queued up to be pushed into DocuSign. They will only become available to add to your DocuSign Template after the DocuSign Maintain Fields Scheduled Process has ran. This Process will run hourly by default but can be prompted to run earlier by using the Run Now button.
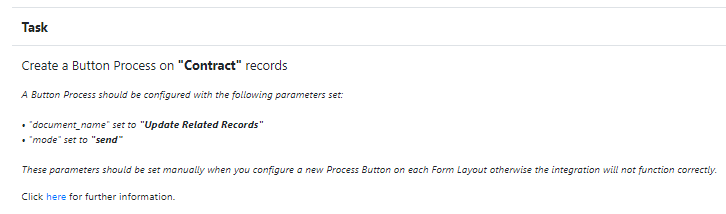
Now that your template has been configured – you will need to configure at least one Form Layout and Process Button to send a document for signature. Please see here on how to configure this part of the integration.
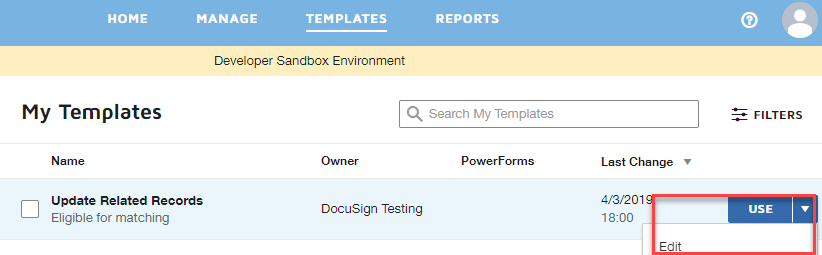
After the DocuSign Maintain Fields process has ran, return to DocuSign to add the new fields to your Template. In DocuSign, select the Templates option and use the drop down on the Use button to select the Edit option.
Here you can review your initial template setup and make any final changes to the Template. Once you are happy with the changes select the Next button to start configuring the Custom Fields.
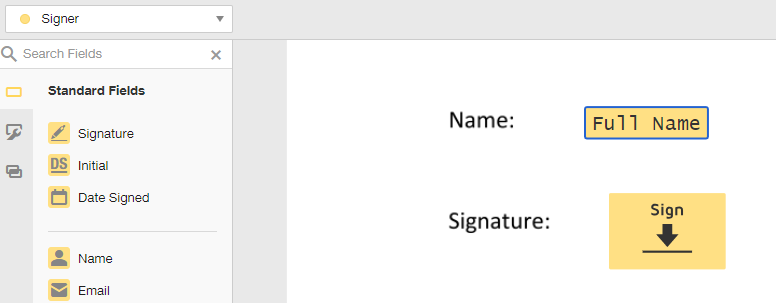
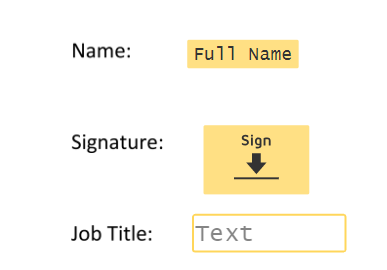
Fields such as Signature and Name can be found in the Standard Fields menu and these can be placed on your document where needed. The Full Name will be automatically populated when opened by the recipient, displaying what is in the Primary Contact name field within Workbooks.
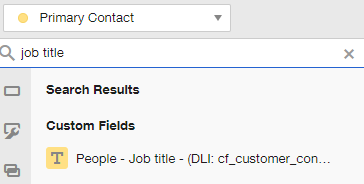
The Job Title field created earlier can then be found in the Custom Fields section, or by using the field search bar. This field will appear in the following format “{RECORD_TYPE} – {RECORD_FIELD_NAME} – (DLI: – {DLI_FIELD_NAME})”.
Note: This Field Name should never amended as this is what is creating the link between Workbooks and DocuSign.
Once this Field has been placed within the Document Template it is then ready to be sent.
/div>
Now that you have configured a DocuSign Template with Workbooks Fields and a Process Button on your Contract records, you are now ready to send a document for signature.
Before sending the document, ensure that the Primary Contact DLI has been populated and the relationship has been created, otherwise you will not be able to send the document.

To send a document, click Run Process and select the appropriate Process to run as configured in Stage 6.
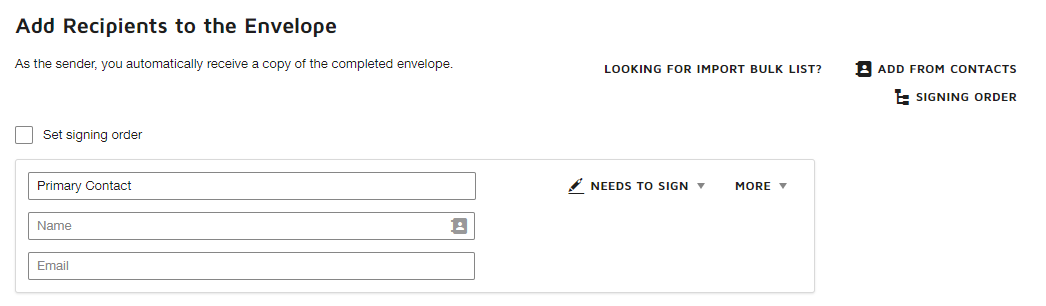
The Process will then switch to a DocuSign tab (only if you left Interactive Send set to “On” during the document setup) allowing you to review the details on the document and see how it will be presented to the Customer.
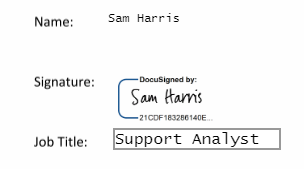
The Job Title field will pull data from the selected Person record in the DLI field, and pre-populate the field on the DocuSign form as shown.
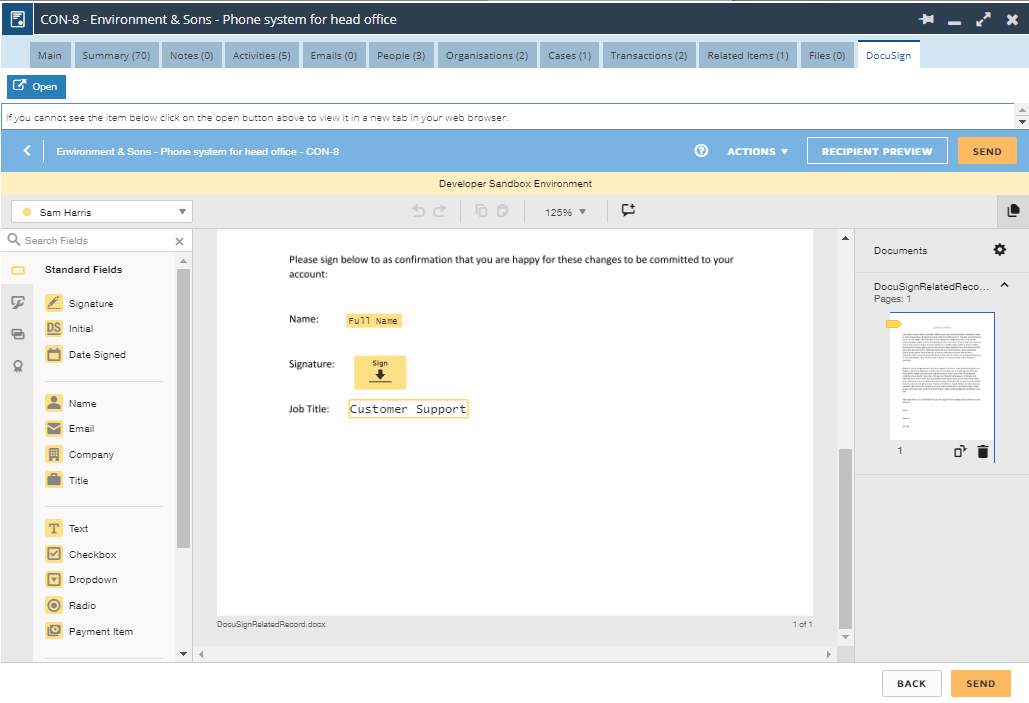
When the recipient views the document, they will see the value of Job Title Field pre-populated and will be able to edit the contents, providing it has not been configured as read only.
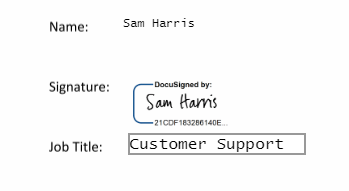
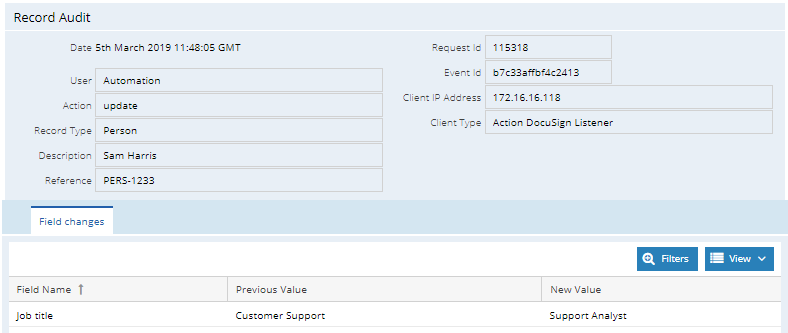
When the document is signed, the field value provided in the form by the signer will be reflected in the Workbooks field on the related Person record.
Once the Document has been signed, the DocuSign: Document Status Field will be set to Document Signed and a signed document will be available against the Contract.

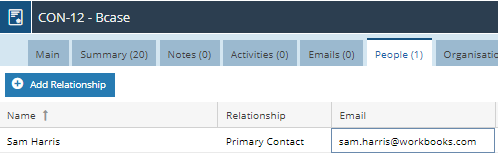
When opening the Primary Contact Record you should see that any field values specified in the form are now set in Workbooks:

This will also be reflected in the Record’s Audit, if you have the Audit Extension enabled.