Setup of Adobe Sign
Once you have authorised Workbooks to use your Adobe Sign account on your behalf, you can now configure the settings needed to send a record for signature using the integration.
Step 1: Select Document
NOTE: If there are no documents currently configured on your Workbooks instance, the Plugin skips straight to Step 2 (see below)
If you have already configured an Adobe Sign document previously, you will see the following screen:
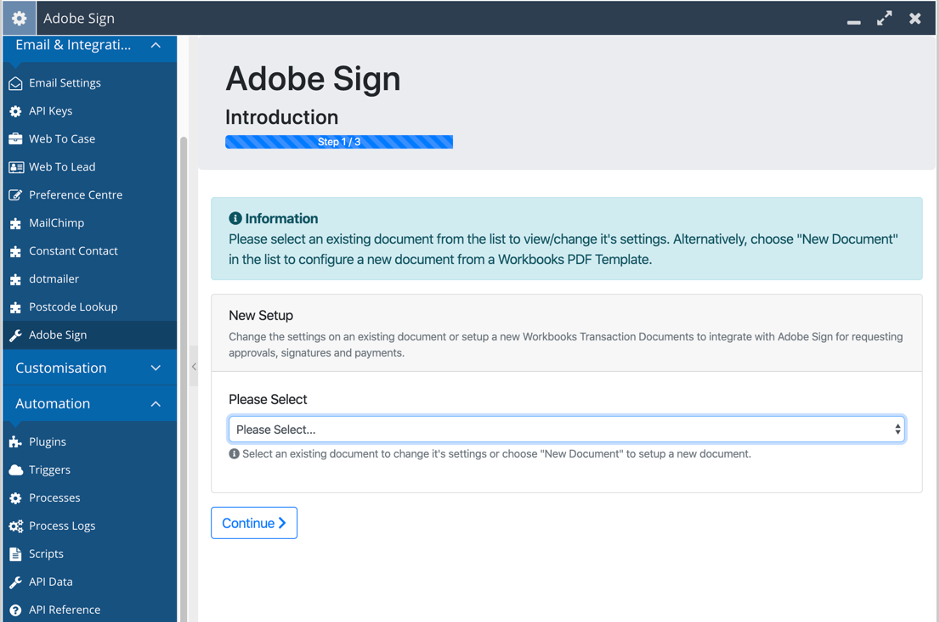
From here, you can:
- Update an existing document’s settings by choosing it from the list
- Create a new document, by choosing New Document in the list
Click Continue once you have chosen the appropriate option.
Step 2: Document Settings
Within Step 2 of the Plugin, the settings for an Adobe Sign agreement can be configured to suit your business needs. Below is an explanation of each of the settings, how they can be configured and what the result of each means:
- Document Name: This setting is used to uniquely identify a given Process Button’s configuration. When you click Run Process > Send via Adobe Sign from your chosen record type, the integration searches for the settings that it should apply by name.
- Record Type: An Adobe Sign agreement can be sent from any type of Transaction Record including Opportunities, Quotations, Orders, Contracts, Invoices, Credit Notes and Supplier Orders.
- Workbooks PDF: A list of PDFs as configured in this Workbooks instance, found under Configuration > Templates > PDF Templates. Make sure that you select the correct PDF for the Record Type that you have selected above.
- PDF File Name: This is a list of fields (Standard and Custom) from the selected record type above. You can select as many as you need by holding CMD/CTRL + Mouse Click. When an agreement is generated, this is the name of the file uploaded to the Adobe Sign agreement. Each field selected is concatenated with a “-“. NOTE: Blank fields are removed. The default field is the Customer Name and Object Reference if not fields are selected here.
- Signer Relationship: This option shows a list of Relationships as per the “Document People Roles” or “Opportunity People Roles” picklists in Workbooks, depending on whether this setup is for an Opportunity or other Transaction Document type. This setting allows multiple relationships to be selected by holding CTRL/CMD + Mouse Click. The integration will look for any people with the selected relationships, and automatically add them to the Adobe Sign agreement in the “To” fields with a SIGNER role. DLIs can be configured to automatically create the selected relationship to make it easy to add recipients to your documents
- Enable Draft Document Sending?: – Control whether users are allowed to send DRAFT status documents. Default is OFF. We would recommend using this functionality with caution. If a document is POSTED in Workbooks after it is sent for Signature, the draft DXXX-XXX Object Reference changes to the next number in the sequence. This could result in a signed DRAFT document becoming related to a POSTED record
- Allow Re-Send of Signed Agreements?: This setting allows your users to send a document for signature more than once, regardless of its status (including if it was Signed already). We’d recommend leaving this setting switched off which is the default behaviour.
- Automatically Assign Task To Queue: When a new agreement is generated using the integration, a Task record is created to track the status. The integration can automatically assign this task to a specified queue on creation if required which can notify as many users as needed by subscribing them to the chosen Queue. This setting is OFF by default. NOTE: If switched on, notifications to inform a user that their document has been signed or rejected are not sent and we would recommend building Reports/Dashboards instead to give visibility of your agreement statuses.
- Set Task Queue: If the setting above is switched on, you configure the Queue that the Task is assigned to, by choosing an available option from the list. If you would like to configure a new queue, you can do so from Activities > Manage Queues. Once created, click the refresh button to show in this list.
- Use Default Sender for Sending Agreements?: When a new agreement is generated using the integration, you can configure who the agreement comes from. By default, this setting is switched off and will try to send an agreement for signature from the current Workbooks User who clicked the Process Button. If no user is available, then the integration will use the Adobe Sign Admin User instead. If you would prefer to send all documents as one user, that is not the Admin User, create a new User in Adobe Sign, and turn this setting ON
- Default Sender: If the above setting is switched ON, you can choose which Adobe Sign user all agreements will be sent from by selecting a user from the list. NOTE: If this list is blank, or does not show any users, then the Scheduled Process called “Adobe Sign Maintain Users” may not yet have run. Wait up to 30 minutes, then revisit the Plugin again to update this setting later.
Step 3: Setup Document Mappings
This step of the Plugin allows you to control mappings for fields that are automatically written back to a Workbooks record upon signature.
Using Adobe Sign Text Tags, tags can be added to your PDF code to automatically place Form Fields on every agreement that you generate from the integration. Our Professional Services team can help with the changes required to your PDFs to support this if required. Please contact support@workbooks.com or your Account Manager in the first instance.
Alternatively, when an agreement is generated, Form Fields can be manually placed on each document in the required location within Adobe Sign.
Regardless of the approach, within Step 3 of the Plugin, click “+ Add New” then in the dialogue box that appears fill out the options:
- Workbooks Field: A list of fields for the record type chosen in Step 1 of the Plugin e.g all Contract fields. Select the field that you wish to automatically update when a document is signed.
- Adobe Field: This is a free text field and should be set to the name of the field that is configured in your PDF code.
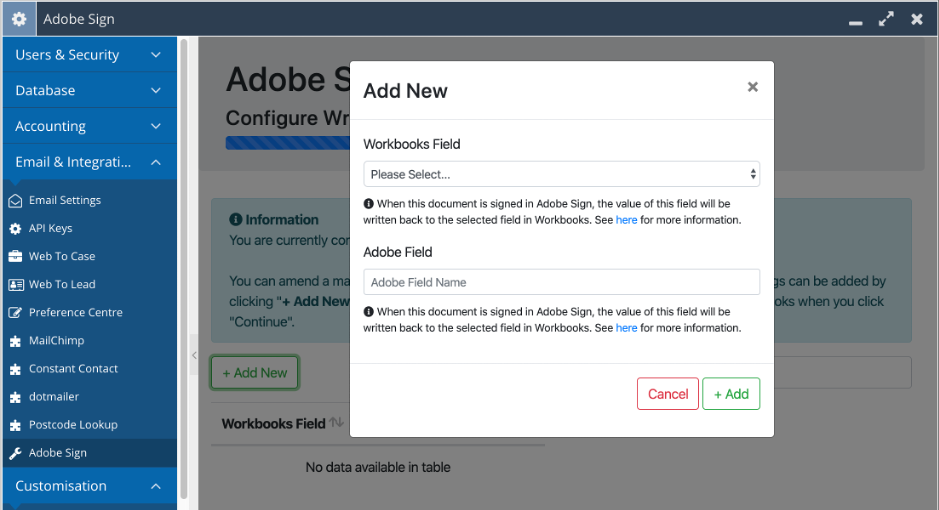
Click “+ Add” when you are happy with the mapping. Repeat for as many mappings as required and then click Continue.
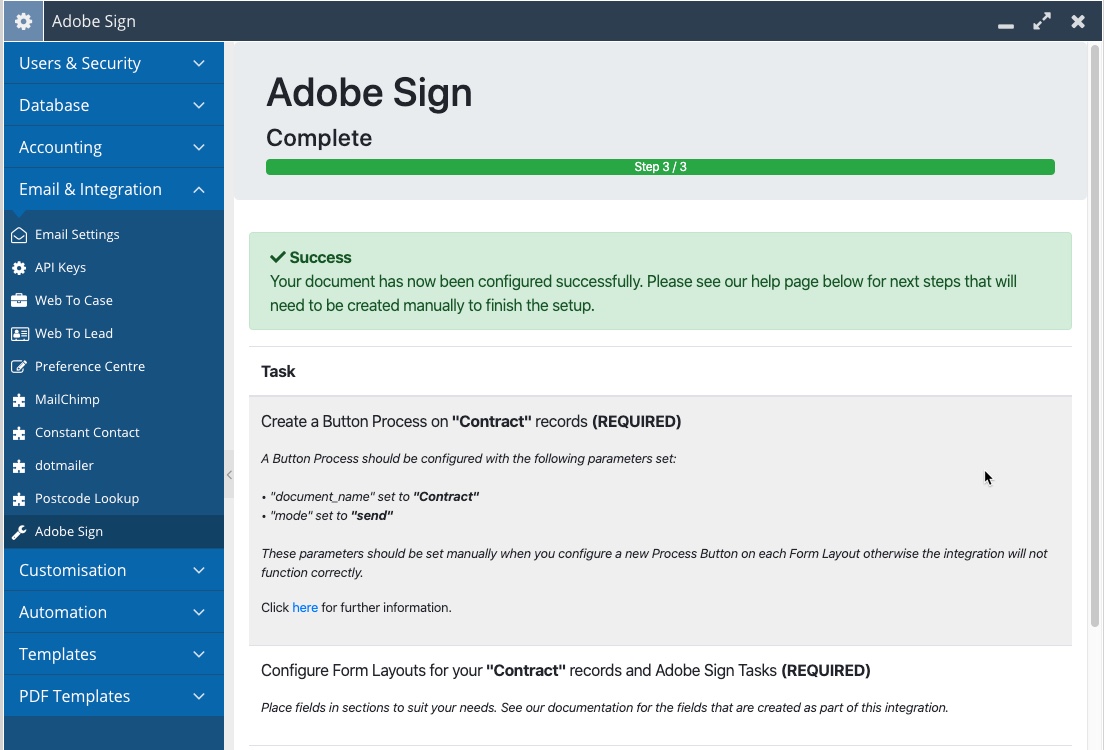
Step 4: Confirmation & Next Steps
This is the final step of the plugin and offers a list of next steps that we would recommend following to ensure that you have the best integration experience.
NOTE: Some actions are required and must be completed for the integration to function.