


Automatic Emails on Case Status Change
Configure automated emails to be sent when a Case changes status.
NOTE: This functionality is controlled by a Scheduled Process and requires settings to be configured under the Emails tab of the Case Portal configuration plugin to create the required configuration used by this process.
Interactions with Cases can be managed using our Public/Private Activity creation script, here for support teams using Case records to track requests. When an Activity is created to store actions taken, it can trigger an email that is sent to the primary contact of the related Case record to notify them of the update. Similarly, when new Cases are raised, an email can be triggered to notify the contact of their case number.
Step 1: Configure Plugin Settings
This functionality can be enabled via the Case Portal plugin, from Email & Integration > Case Portal. Under the Emails tab, set the following settings:
- Default Email Sender: Choose from a list of configured Email Accounts.
- Send Automatic Emails for Case Status Changes?: Change the value of this setting to On
Click Update Settings when you set the above. This triggers the creation of the following configuration automatically:
| # | Configuration Type | Name | Record Type |
|---|---|---|---|
| 1 | Scheduled Process | Case Email Notifications | N/A |
| 2 | Custom Field | Creation Email Sent | Cases |
| 3 | Custom Field | Email Sent | Activities |
Step 2: Create Email Templates
We have provided a set of Emails Templates to get your start with configuring this process. You may wish to simply use what we have provided, tweak them, or introduce your own templates and statuses. To access the Email Templates, click Start > Marketing > Templates > A Specific Record Type > Cases. From here we have provided the following templates for you to use:
| # | Template Name |
|---|---|
| 1 | Case Portal – Case Created via Portal |
| 2 | Case Portal – Case – In Progress |
| 3 | Case Portal – Case Closed via Portal |
| 4 | Case Portal – Case Closed Internal Team |
| 5 | Case Portal – Case Updated via Portal |
| 6 | Case Portal – Case Updated via Internal Team |
Save each template with a sensible name, you will need these when configuring a report in Step 3.
Step 3: Configure Report
We have provided a Template Report to get you started with configuring this process. To access the Template Reports, click Start > New > Report > Create a report from a template report and choose “Template – Case Notification Emails” from the list. Within the report, there are several columns which are needed by the process and should not be amended. You must however, configure the following columns to suit your business requirements:
Create a new calculated column called “Email Template” (NOTE: The name must be exactly as described, otherwise the process will not work). Paste in the following formula:
CASE
WHEN status_name = ‘New’ THEN ‘Case Portal – Case Created via Portal’
WHEN status_name = ‘In progress’ THEN ‘Case Portal – Case – In Progress’
WHEN status_name = ‘Updated by customer’ THEN ‘Case Portal – Case Updated via Portal’
WHEN status_name = ‘Email Received’ THEN ‘Case Portal – Case Updated via Portal’
WHEN status_name = ‘Awaiting customer response’ THEN ‘Case Portal – Case Updated via Internal Team’
WHEN status_name = ‘Closed’ THEN ‘Case Portal – Case Closed via Support Team’
WHEN status_name = ‘Closed:Customer Informed’ THEN ‘Case Portal – Case Closed via Internal Team’
ELSE ‘Case Portal – Case – In Progress’
END
This formula outputs the name of an email template to be used for a given status. For example, when the Status is In Progress, send an email using the Email Template called “Case Portal – Case – In Progress”. If you have given your email templates a different name when you created them in Step 2, or use different Case Status values, then update the formula accordingly.
Create a 2nd calculated column called “Send Email?“. Paste in the following formula, then save the column:
CASE
WHEN activities.cf_task_email_sent = 0 AND activities.name = ‘Case Update’ THEN 1
WHEN activities.cf_task_activity_sub_type = “Public” AND activities.cf_task_email_sent = 0 THEN 1
WHEN status_name = ‘New’ AND cf_case_creation_email_sent = 0 THEN 1
ELSE 0
END
This formula outputs 0 or 1 depending on the state of the Case record, or any related Activities created using our Public/Private Activity creation script, here. If the status of these Activities are set to “Public” or the Case record’s status is “New”, then 1 is output indicating that an email must be sent.
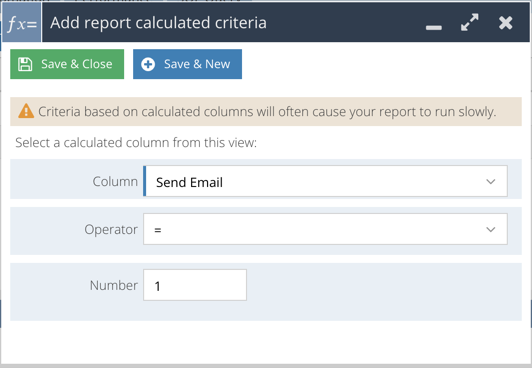
Create a calculated criteria using the above “Send Email” column. Setting the criteria to “Send Email?” = 1 as shown:
Step 4: Update Plugin Settings
Back in the Plugin, you can now configure the Report that this process should use. This will be the Report configured in Step 2. Under the Emails tab, provided you have set the Category to Case Portal on the Report created, it will be visible in the picklist.
- Choose a Report Which Identifies Emails to Send: Choose the report that you configured in Step 3 above
Click Update Settings when you set the above. Now, when the Case Status changes to one of the monitored statuses in your Report, an email will be sent to the primary contact of the Case.
You may wish to consider other Case Statuses, or other inbound channels not included in this process. For instance, tweaking this process to send out auto-emails for cases created on behalf of a customer when speaking with them on the phone.