|
In the Blog post How to Skyrocket your Sales Team's Performance Using these 6 CRM reports - today! the focus was on reports to give real-time information to sales leaders in order for them to make informed business decisions regarding their team's performance. The information below describes how to create the fifth of those reports: Marketing MQL Performance against Target: Are Marketing delivering enough leads?
5. Marketing Performance Report
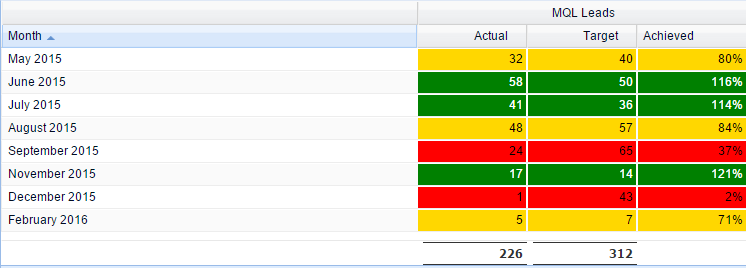
This kind of report gives you information on how many Sales Leads you have for each month and if you are hitting your targets or not. It allows you to make well informed business decisions regarding your Marketing Team's performance. It includes conditional formatting to highlight where things are on track and where attention needs to be focused. Information on how to write this kind of report is available below the screenshot.
-
Start by creating a Report based on Sales Leads. Add the three following columns and choose appropriate Titles for them: Created at, Id and Status. Id represents the Sales lead, so we chose to name it as MQL(Marketing Qualified Lead). You might use a different naming convention.
-
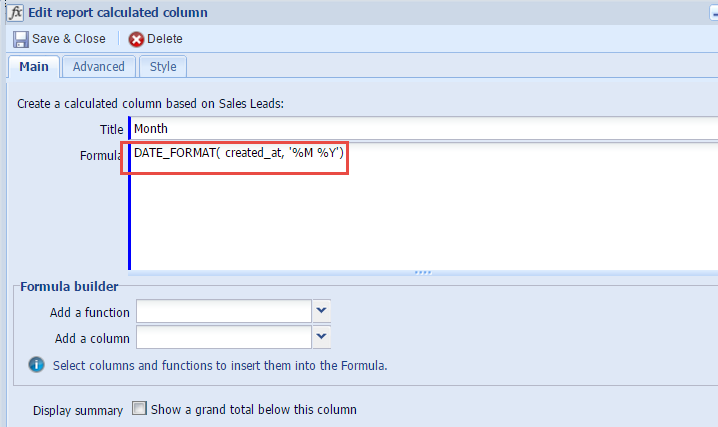
Created at is displayed with a default format which provides day, month, year, hour, minute and second information (the exact order of which will depend on your settings). In this report we want to change it to month/yyyy format. To do this, add a Calculated column on the Details tab and use the following formula, which is also shown in the screenshot below:
DATE_FORMAT( created_at, '%M %Y')
-
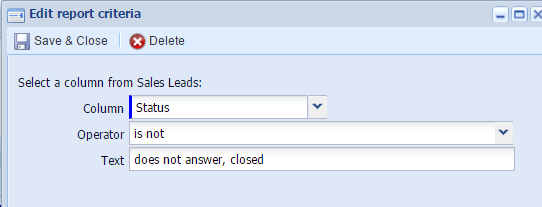
For the purposes of this report we've decided that MQL constitutes any Lead that doesn't have a status of 'closed' or 'doesn't answer'. To remove Leads with these statuses, add a report criterion as shown in the screenshot below. When building your own report, you might want to exclude Leads with different statuses.
-
Add a Summary view based on your Details view. Now you want to sort the months in the calendar order rather than in alphabetical order. To do that, add a Value column and type in Created at. Then, add a Grouping column, group by the Month, go to the Advanced tab and sort by Created at as shown in the screenshot below. If you don't want the Created at column to appear on the Summary view, make sure it's not displayed as a column by unticking it on the Columns list.
-
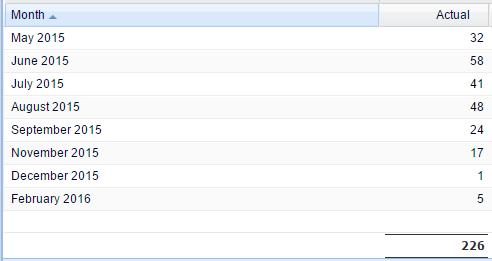
Now you want to see how many Sales Leads there are for each Month. Add Summarised column, type in MQL (or whatever you called your column) next to the Column field and calculate Count. This will add up the number of Leads and generate the Actual column containing the number of MQL Leads grouped by the Month as shown in the screenshot below.
-
To add Target and Actual columns, click Add Target on the same Summarised column used in the previous step and select the Actual, Target and Achieved option from the dropdown picklist. Add appropriate Targets for each month and the Achieved field will be populated automatically.
-
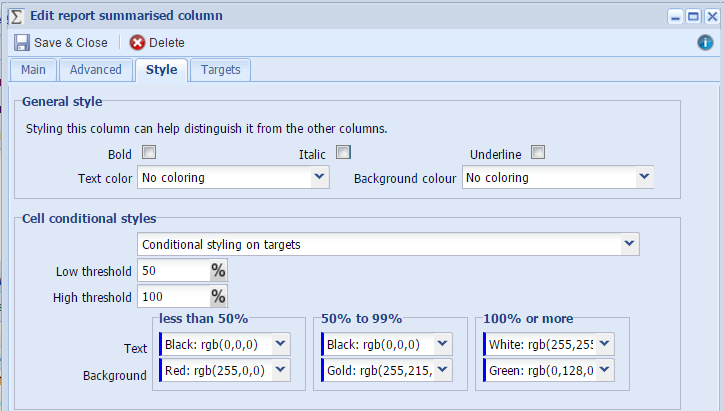
You can use Conditional styling on your Targets to make it easier for users to interpret the results. You can add colours by clicking on the Style tab in a Summarised column as shown in the screenshot below.
-
In this report we chose the low threshold to be 50%, so anything below 50% will be displayed in red, anything between 50% and 99% will show in gold and 100% or more will display in green. You can change the text and background colours as you wish.
-
You've now got a report that shows you how many Sales Leads your Marketing team is generating for each month. Having this report you are able to create a plan of action and discuss it with your Marketing team.
|


