


Using Activities
How to display, create and close your Activities
Tip
Creating a Follow-on Activity is the quickest way to complete an existing Activity and enter a new one.
Overdue Activities will be highlighted in red in your Activities Landing Page.
Displaying Activities
Activities that have already been created can be accessed from within the record they are related to. They are also grouped together on the Activities Landing Page, which you can access by clicking on Start > Activities.
By default, the Activities Landing Page gives you a choice of views, including:
- My Activities – a view that defaults to calendar view that includes both meetings and tasks to help schedule your everyday. (viewing in Calendar view can be changed via Configure View
- My Open Activities – A subset of the All Activities view showing a list of those open Activity records that have either been assigned to you or that you are Watching.
- All Activities – A list of all the Activity records on your database.
- Open Activities – A list of all the open Activity records on your database.
- Closed Activities – A list of all the Activities on your database that have been given a status of Complete.
To open any of the records displayed in the views above, hover over the row until it becomes underlined, then click on it once. You can customise the appearance of this (and any other) Landing Page including grouping, filtering and saving views. For more information on customising views click here. You can create new activities from Edit Grid mode, you can create both Tasks and Meetings from the grid. (Note: if you are editing a record in 2 places you will receive a warning message and options to edit will be greyed out)
Creating Activities
The most common way to add an Activity is to create it from within the specific record relating to the Activity. You can also create new Activities from the Activities landing page.
In the main tab of record for which you want to create an Activity, click New > Task. This will allow you select a task that you want to schedule for the future. Alternatively, open the Activity tab from any record type and choose Schedule an Activity to create an Activity that is due to take place in the future (Workbooks will automatically schedule the meeting to be 24 hours from the current date/time) or Record an Activity to create an Activity that has already taken place (Workbooks will automatically set the time to now). In both scenarios, you can change the times as required.
From the drop-down menu, choose the type of Activity you want to schedule or record (ie, Task, Phone Call, To-do or Meeting).
NOTE: If you’ve created the Activity against a Person record, you’ll see their name under Primary contact details.
Complete the form that appears with as much information as you can, bearing in mind the following:
- Assigned to – The Activity will automatically be assigned to you but you can assign it to someone else using the dropdown picklist next to Assigned to. Assigning a record to someone else triggers a notification to be sent to that user (provided that they haven’t switched off their notifications).
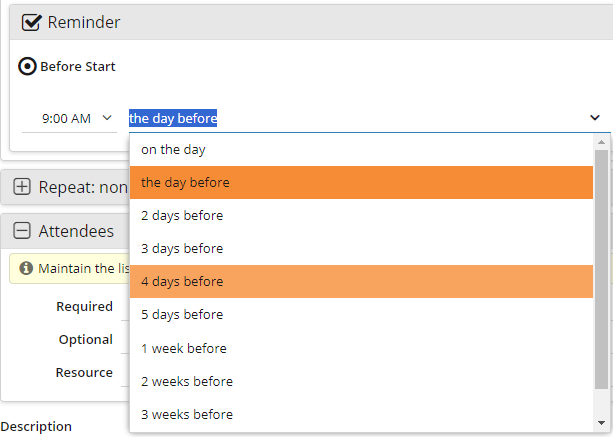
- Reminder – You can schedule a reminder for yourself, which will make a popup notification appear within Workbooks at the allotted time (depending on your choice of notification settings within Preferences).
- When setting a reminder you will get different time periods available depending on whether you choose to have a scheduled due time or just a date. Eg. If you enable a reminder for a task without due time you will see the below options to remind you
NOTE: Reminders only work for the user who has set them, ie, if you assign an Activity to another user any reminder you’ve set will NOT pop-up for them. As above, they’ll receive a notification that the Activity has been assigned to them, which they can open and then add their own reminder, if they wish.
- Description – You can enter more information about this activity and format the text in this field using the formatting tools above the text box.
- Status – Giving an Activity a Status of Complete will automatically populate the Completed Date with the date on which you changed the Status. It’s important to mark Activities as Complete to stop them appearing in your Open Activities view.
- Due – A Task’s Due date is when it must be completed by. Setting a Due date is optional by default but is recommended where possible to keep your Activities (especially in Calendar View) as useful as possible.
- Start/Finish – The Start/Finish fields should be used to identify the time period in which the Activity should occur. When using the Schedule View in Calendar, you’ll notice that the Start/Finish fields represent the two tails of the Activity in the Calendar grid.
Setting any of the date fields above in an Activity is done through the Date/Time widget (![]() ), which is specific to this record type. The date/time widget allows you to not only set a date (as the standard date widget does) but also, optionally, a time. When setting a Start or Finish value you can also identify date ranges via holding click and dragging the cursor. Setting a date range in either of these fields will dynamically update their counterpart.
), which is specific to this record type. The date/time widget allows you to not only set a date (as the standard date widget does) but also, optionally, a time. When setting a Start or Finish value you can also identify date ranges via holding click and dragging the cursor. Setting a date range in either of these fields will dynamically update their counterpart.
In addition, you can attach files to the Activity within the Files tab and link the Activity to other records within the Related Items tab. You can also send an Email from an Activity by clicking Send Email. The Email will automatically be linked to the Activity within the Related Items tab.
Activities are automatically linked to the Primary Contact’s Person record. In addition, if the Primary Contact is linked to an employer the Activity will also be linked to that employing Organisation. If the Primary Contact changes employer using the “Employer Wizard” (see here for more information), the employer field will stay unchanged until you reselect the Primary Contact.
If you create an Activity from within an Opportunity record, you’ll see a Link to Customer checkbox. If the Primary Contact for the Activity works for a different Organisation from the Prospective Customer on the Opportunity, you can tick this checkbox to link the Activity to the Prospective Customer Organisation record.
Phone Calls
If you use a VOIP telephone system you can use Workbooks to link directly to it and dial the number. You can also specify that Workbooks automatically logs a phone call activity. To dial a number automatically, simply click on the Call this number … icon next to the Telephone field. You’ll be offered two options: ‘Call the number’, and ‘Call the number & record a phone call’.
Both options will trigger your VOIP client to dial the number. The second option not only dials the number but also generates a Workbooks Phone Call activity for you. You can also trigger your VOIP client to dial a phone number from within a grid – clicking on the number will automatically dial the number or you can right click which will give you the options described above.
NOTE: If you haven’t specified a country code, Workbooks will ‘assume’ the number is a UK number. If you have specified a country code, remember to remove the leading zero from the number.
Closing Activities
When you’ve entered your Activity you can use the buttons at the top of the record as follows:
- Save & Close – To save and close the Activity.
- Save – To save the Activity and leave the record open.
- Complete – To close the Activity and set the Status to Complete.
- Complete and follow-on Activity – To close the Activity setting the Status to Complete and create a follow-on Activity, choose Complete & follow-on Activity.
- Complete and follow-on Meeting – To close the Activity (setting the Status to Complete) and create a follow-on Meeting.
Parent Record
Activities have the concept of a ‘Parent Record’, which helps to identify the record to which the Activity relates. This is particularly useful in Activity grids, as it allows you to quickly establish the roots and links of your Tasks and Meetings. The Parent Record field is unique in that it not only shows the name of the record to which the Activity relates but also the record type. Clicking on the Parent Record field within a grid will open the record to which it refers.
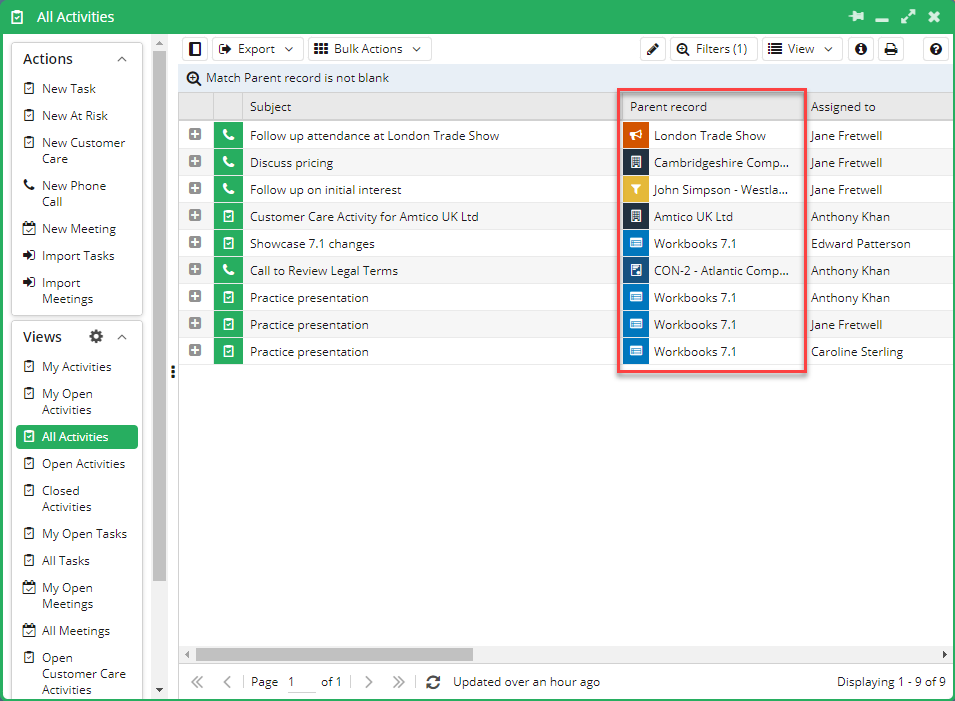
When creating Activities from other records, the Parent Record field will auto-populate with the relevant information for you but you can always change the field’s value manually via the form:
Tip
Try grouping by the Parent Record column in your Activity grids to collect Tasks and Meetings that refer to the same records!
When Reporting on Activities, you can drill through to the Parent Record and pull in values from that form via the “Parent x >” drill through. This is useful if you’d like to pull in data such as an Opportunity’s close date or a Case’s current status into an Activity Report. Similarly, if you wish to report from the Parent record, you can pull in data from the ‘child’ Activity via the “Child Activities >” drill through.