


Creating a Mailshot
Workbooks provides a Wizard to guide you through the steps of setting up a Mailshot
(more…)
NOTE: You can only send Workbooks Mailshots if your System Administrator has configured Workbooks to send emails via your own server, not through the Workbooks server.
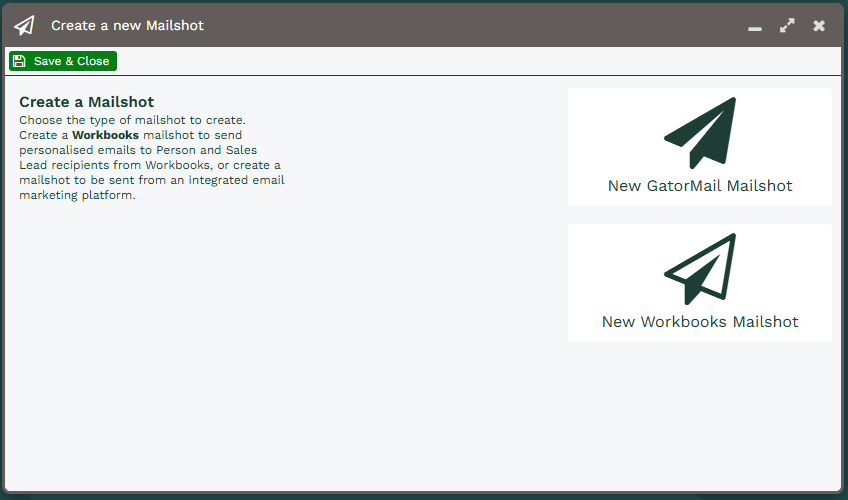
This opens a Wizard to guide you through creating your Mailshot.
- For Workbooks Mailshot please see below.
Once you have selected Workbooks Mailshot, click Next to move through the Wizard.
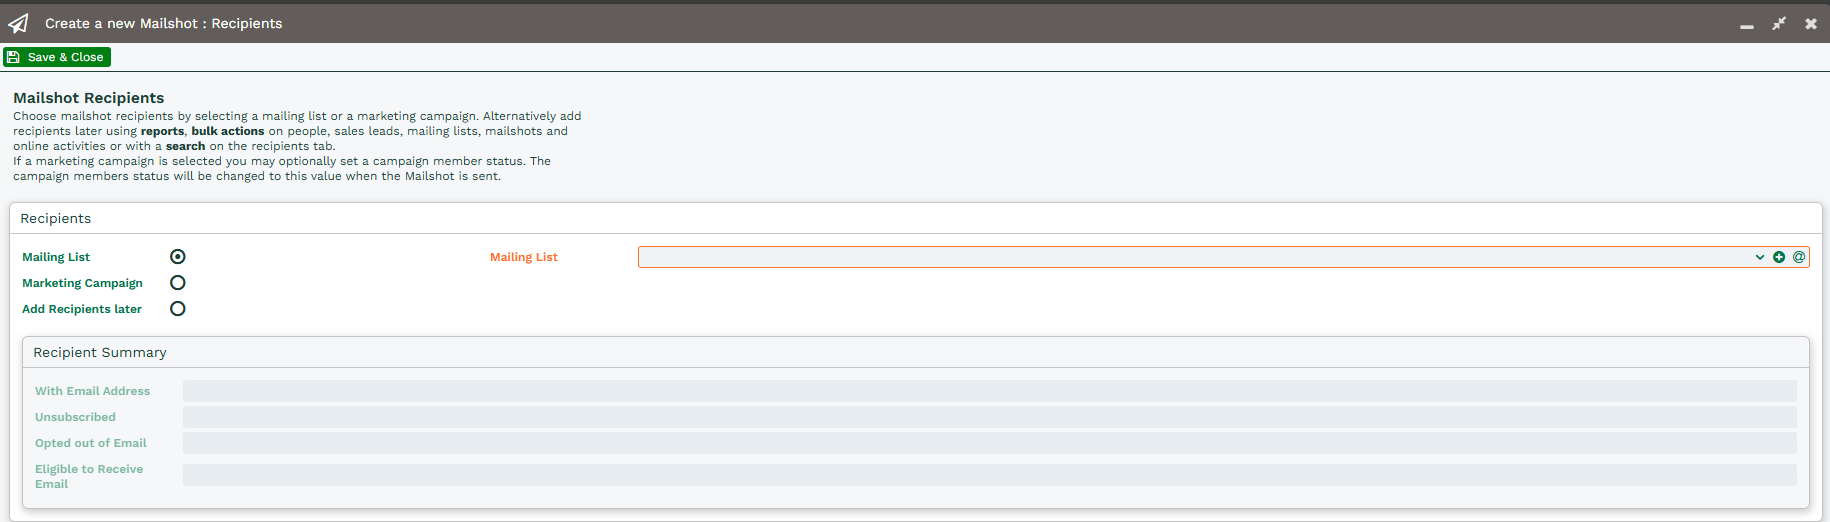
To add the list of Persons or Recipients that should receive this Mailshot email, please select the most relevant option –
- Mailing List – Tick the Mailing List option and select the existing list from the dropdown menu or click the + button to create a new one.
- Marketing Campaign – Similarly, if you want to send your Mailshot to the members of an existing Marketing Campaign, use the dropdown picklist select the appropriate Campaign. Choosing an existing campaign will populate the summary fields with information about how many members have email addresses, whether any have unsubscribed from this specific campaign (or have opted out of email altogether) and so on. Within the Mailshot an Unsubscribe is pulled from the Mailing List Member’s Subscription Status, this information feeds up into the respective Marketing Campaign. Whereas an Optout is where the “No Email” is True for a Mailing List Member on their Person or Sales Lead Record, this then opts them out from all email communications regardless of subscription status to the Mailing List. NOTE: By default the Public Name field is populated with the name of the Campaign. Bear in mind that this will be used on the public facing subscription management web page so you might want to enter an alternative name here. If you want to change the status of the campaign members you can use the dropdown picklist next to Change Member Status to. The list offered reflects the statuses already set up for the campaign. If the option you want isn’t there, you can click on the campaign symbol to open the campaign and add the status. If you want to create a new Marketing Campaign you can do so from this screen by clicking the + button.
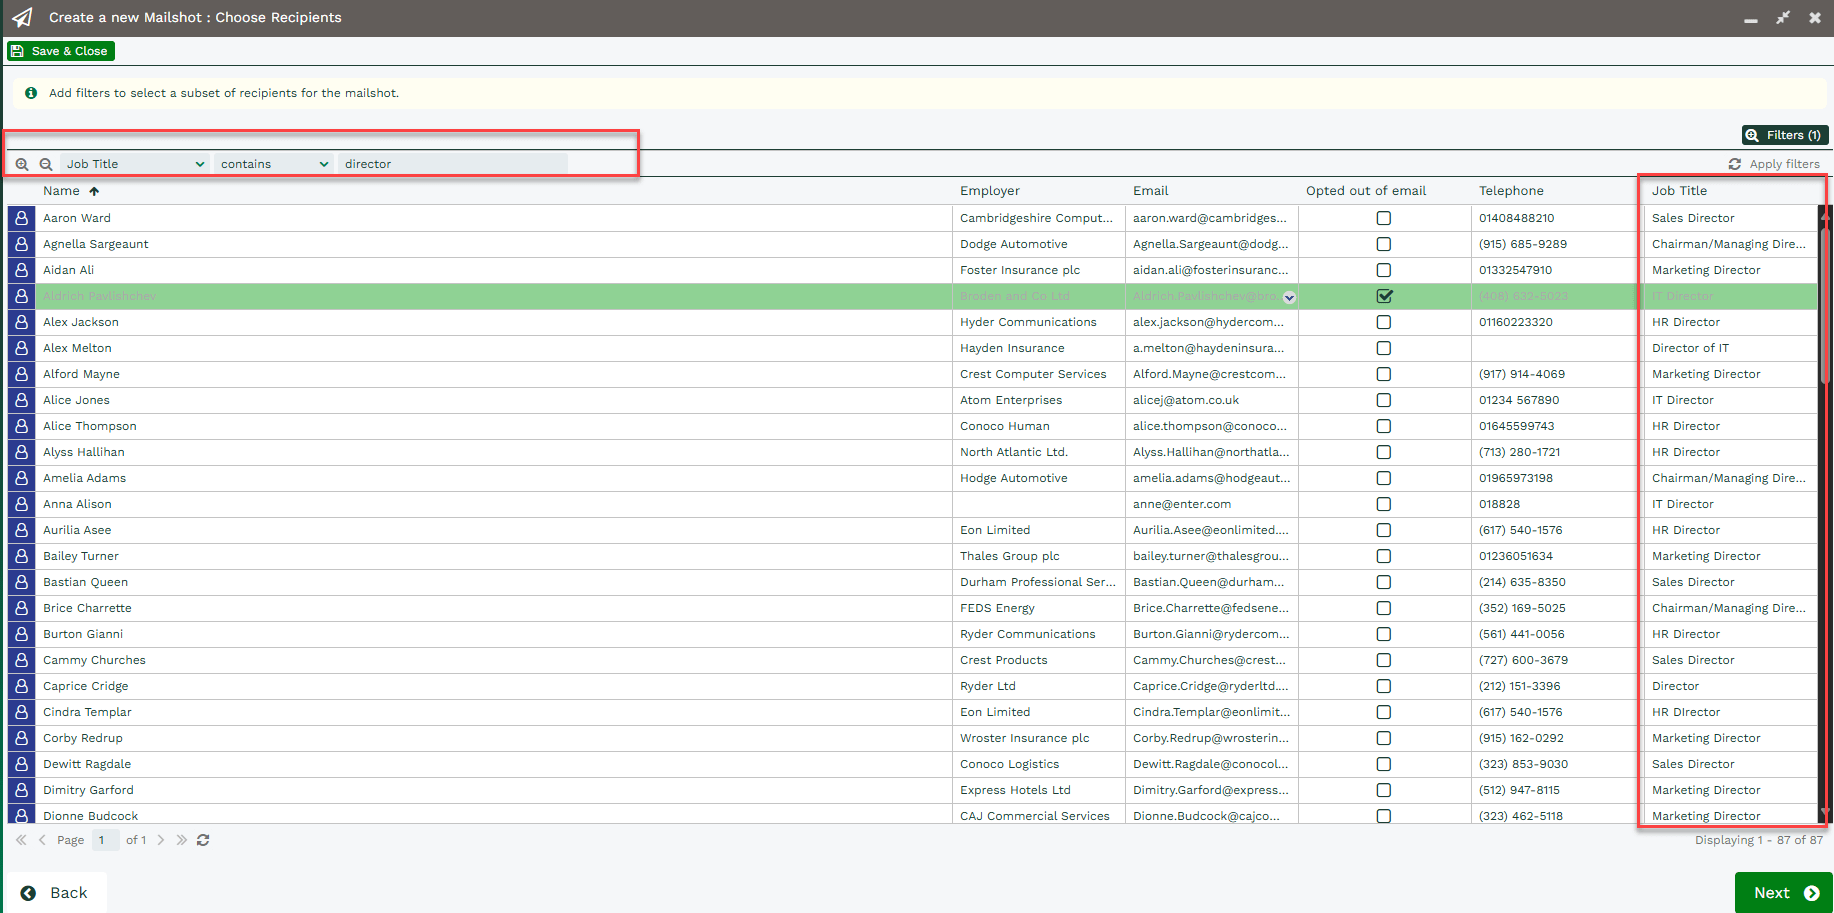
Click Next and the below Mailshot Filtering window opens:

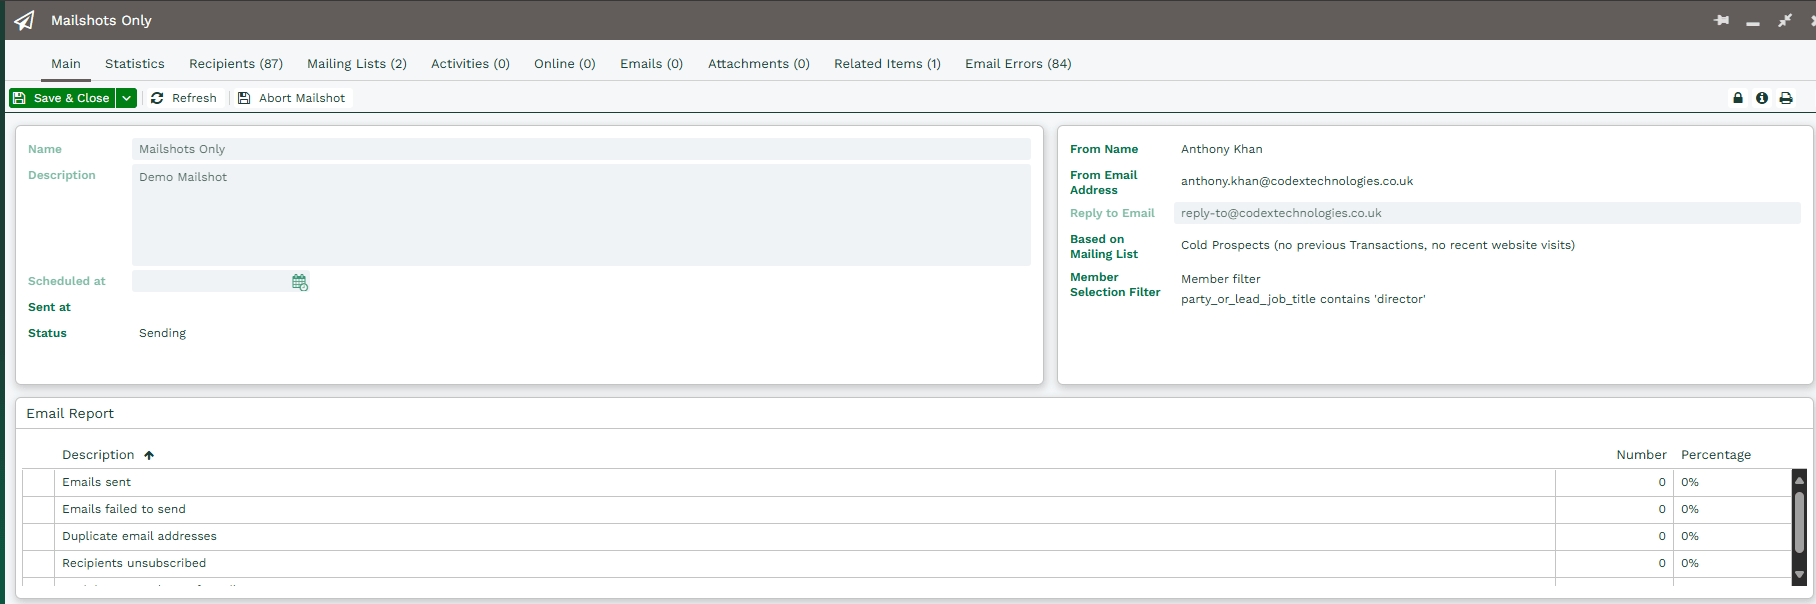
Workbooks gives you the ability to filter the mailshot recipients, in case you do not want it to be sent to all members of the Mailing List or Campaign. In this example, we have filtered the “people” down to those whose job title contains the word “director”, to help target the campaign better.
Click Next and Mailshot Details window open’s up:
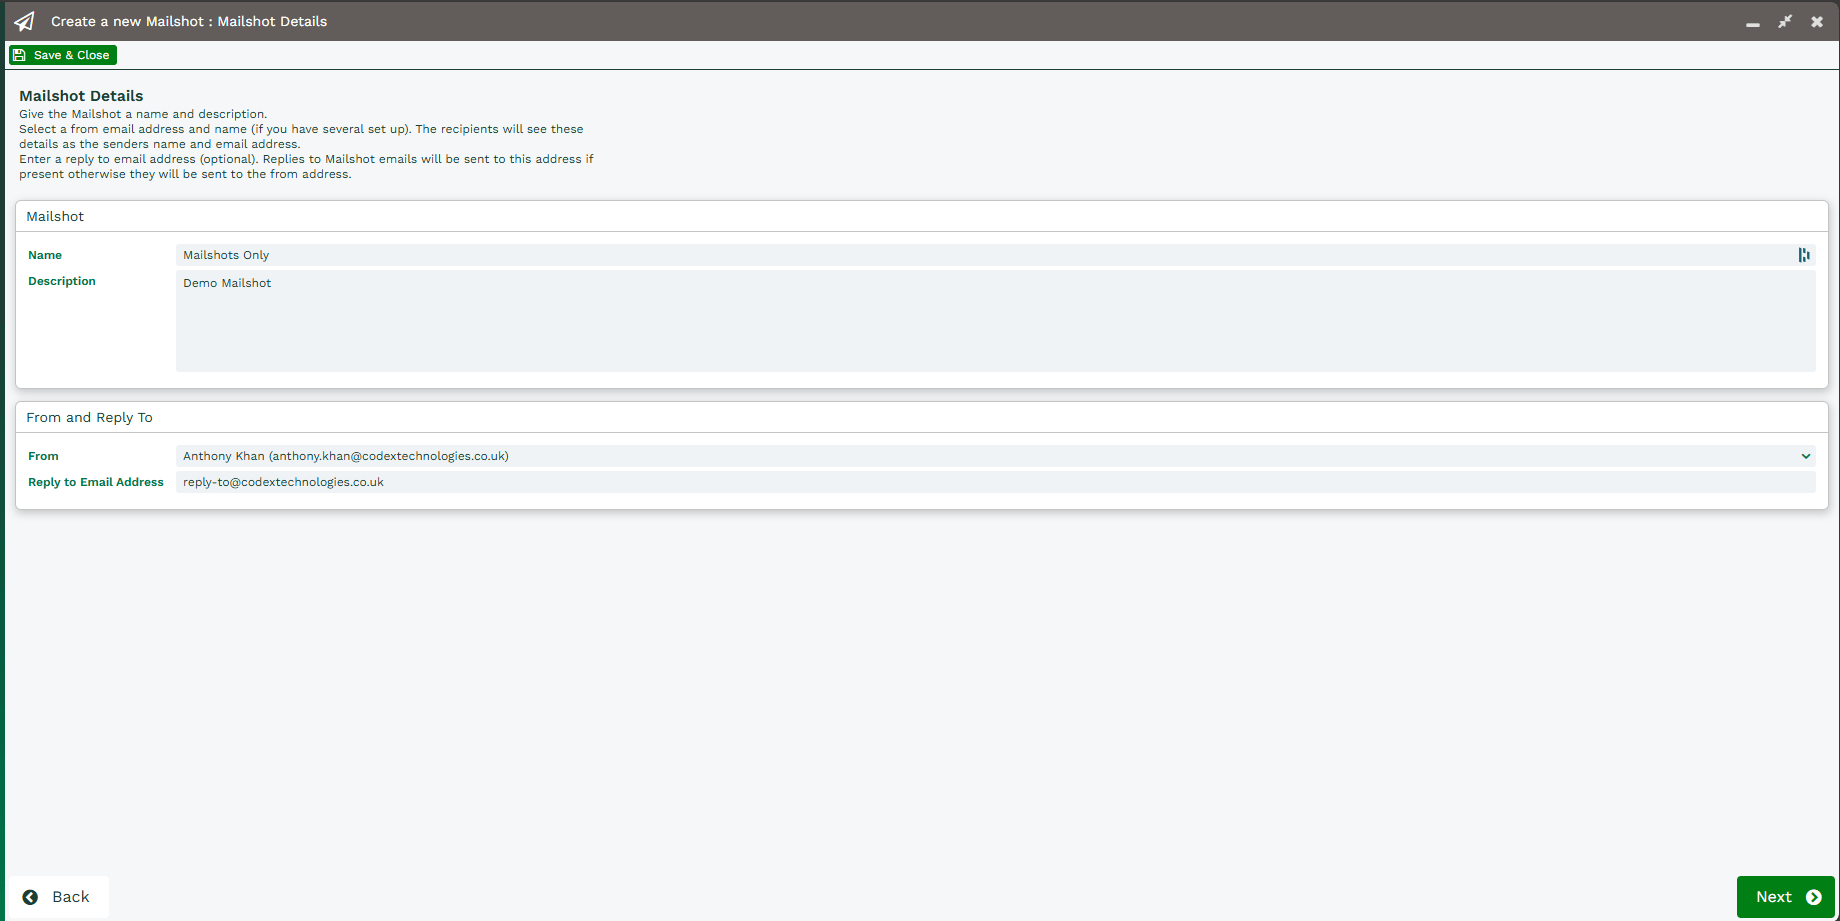
This screen is where you give your Mailshot a name and description and specify the ‘from’ and ‘reply-to’ email addresses.
By default the Mailshot will show the sending user’s login email address in the from details. Similarly, any responses will be sent to the sending user. If you want the recipient to see different details for the sender and the reply address you can change them here.
NOTE: To be able to specify a different ‘from’ address you need to have set up at least one alternative email connection within your Preferences. If you haven’t done this you will not be able to send the Mailshot from any address other than the one with which you have logged in.
Click Next and Mailshot Content window opens up:

The content of your email needs to be in the format of an email template which can be personalized with placeholders that substitute values from the recipient’s records.
On this screen, you can choose an existing template using the dropdown picklist next to Email Template or click + to create a new one.
When you select a template it will appear in the Content field in read-only format. If you want to modify the underlying template click on the template icon next to Email Template, make your changes (and remember to save them). Within the Mailshot wizard click the Back button and the Next button to invoke the changes, which you’ll now be able to see in the Content field.
When you’re happy with the email click Next and Mailshot Attachments window opens up:
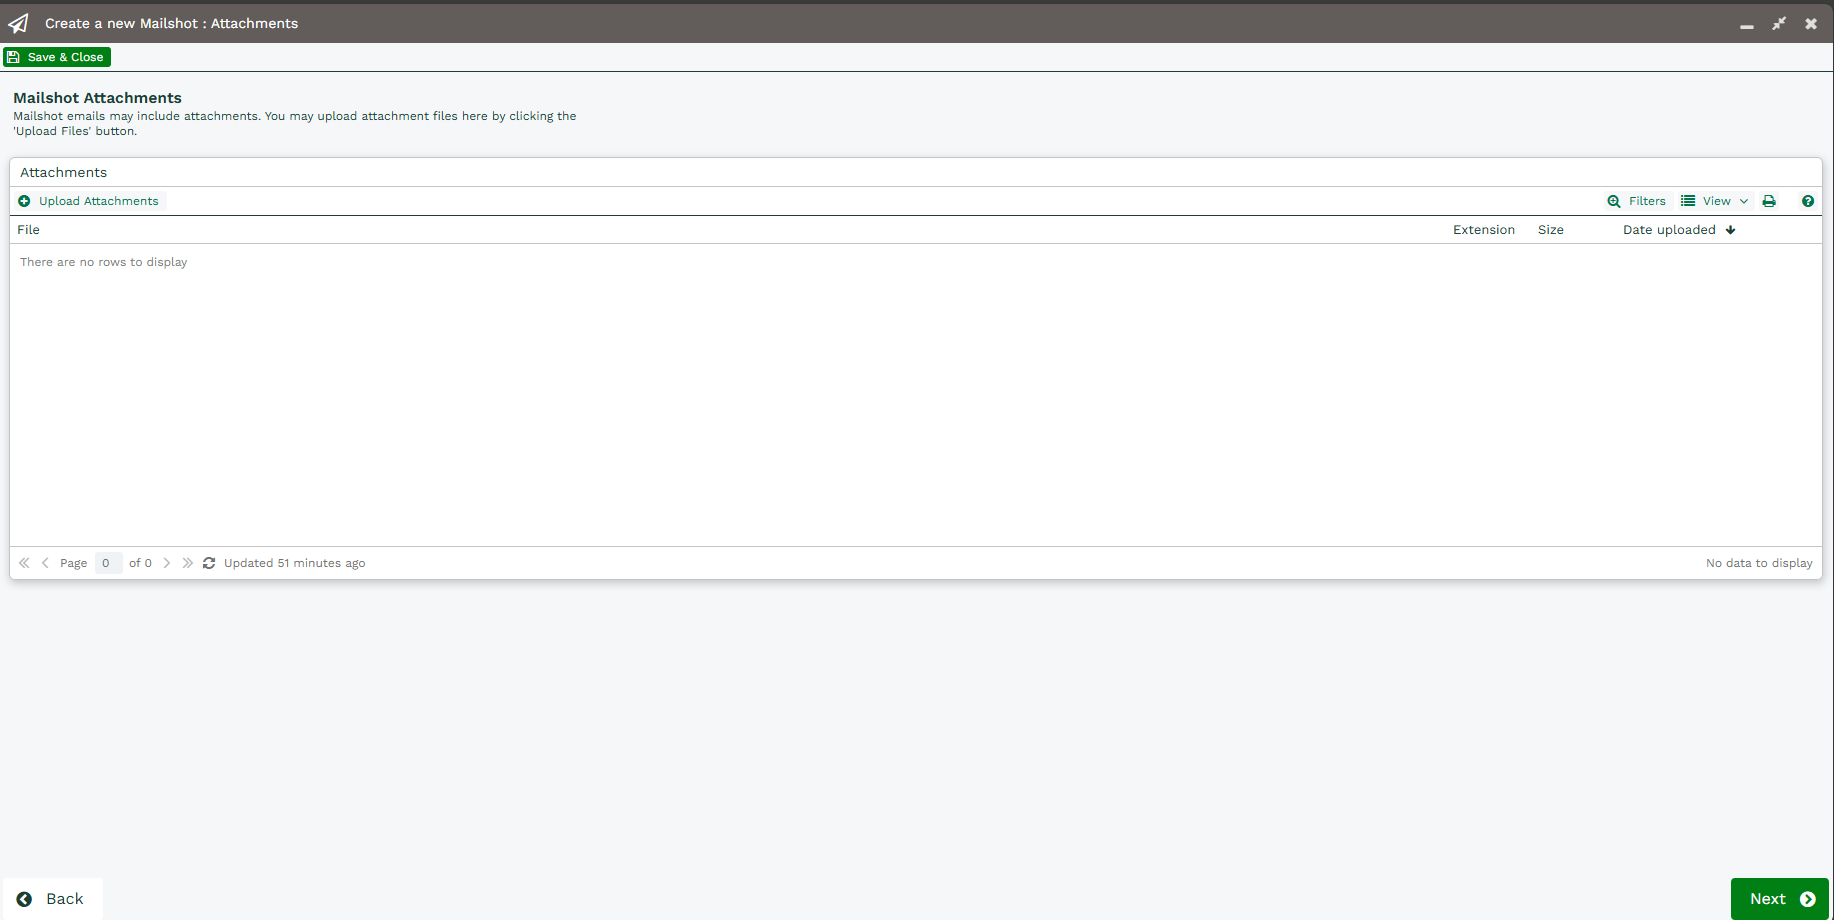
If you want to include attachments with your email you can upload them here. Simply click on Upload Attachments then click Choose File and browse to find the file you want to attach. You can upload a maximum of 5 files at a time, each less than 16 MB in size. When you’ve chosen all the files you want to attach, click Upload.
When you’ve attached all the required files click Next and the Final window of the set up wizard opens:
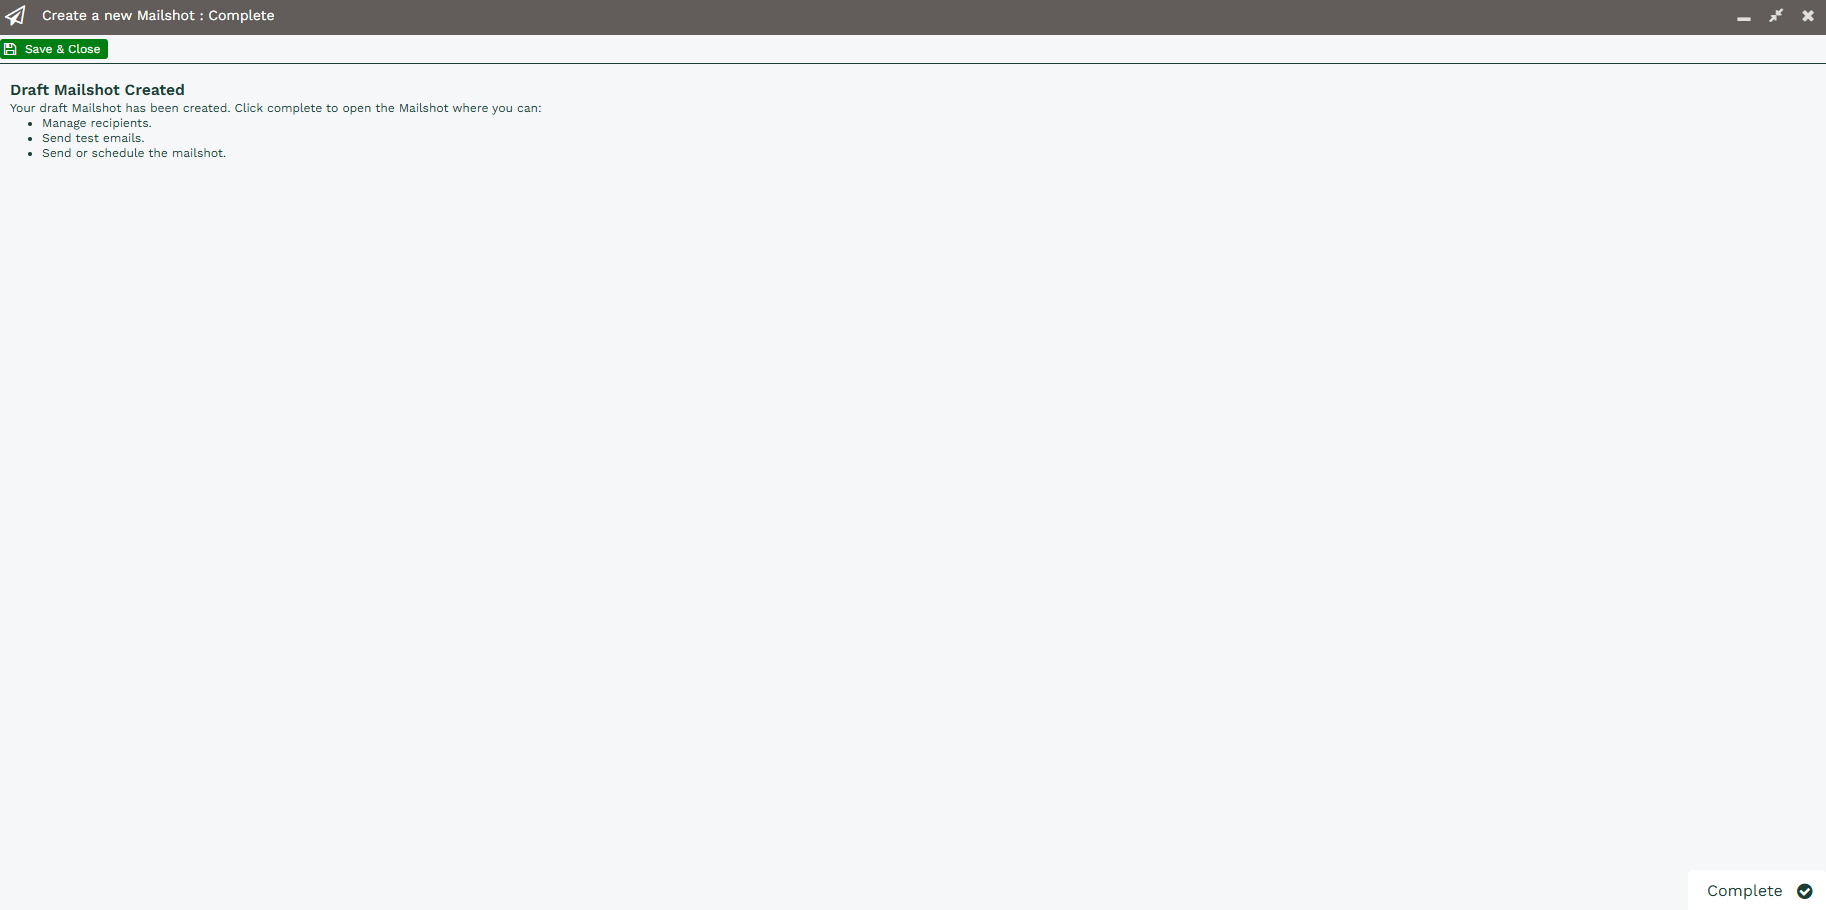
Your Mailshot is now complete, albeit in Draft Status. Here you can add further attachments, send a test email, edit the ‘from’ and ‘reply to’ email details, set a scheduled date and time for the Mailshot to be sent and even change the template used, if appropriate.
Click Complete and we have create a Mailshot.
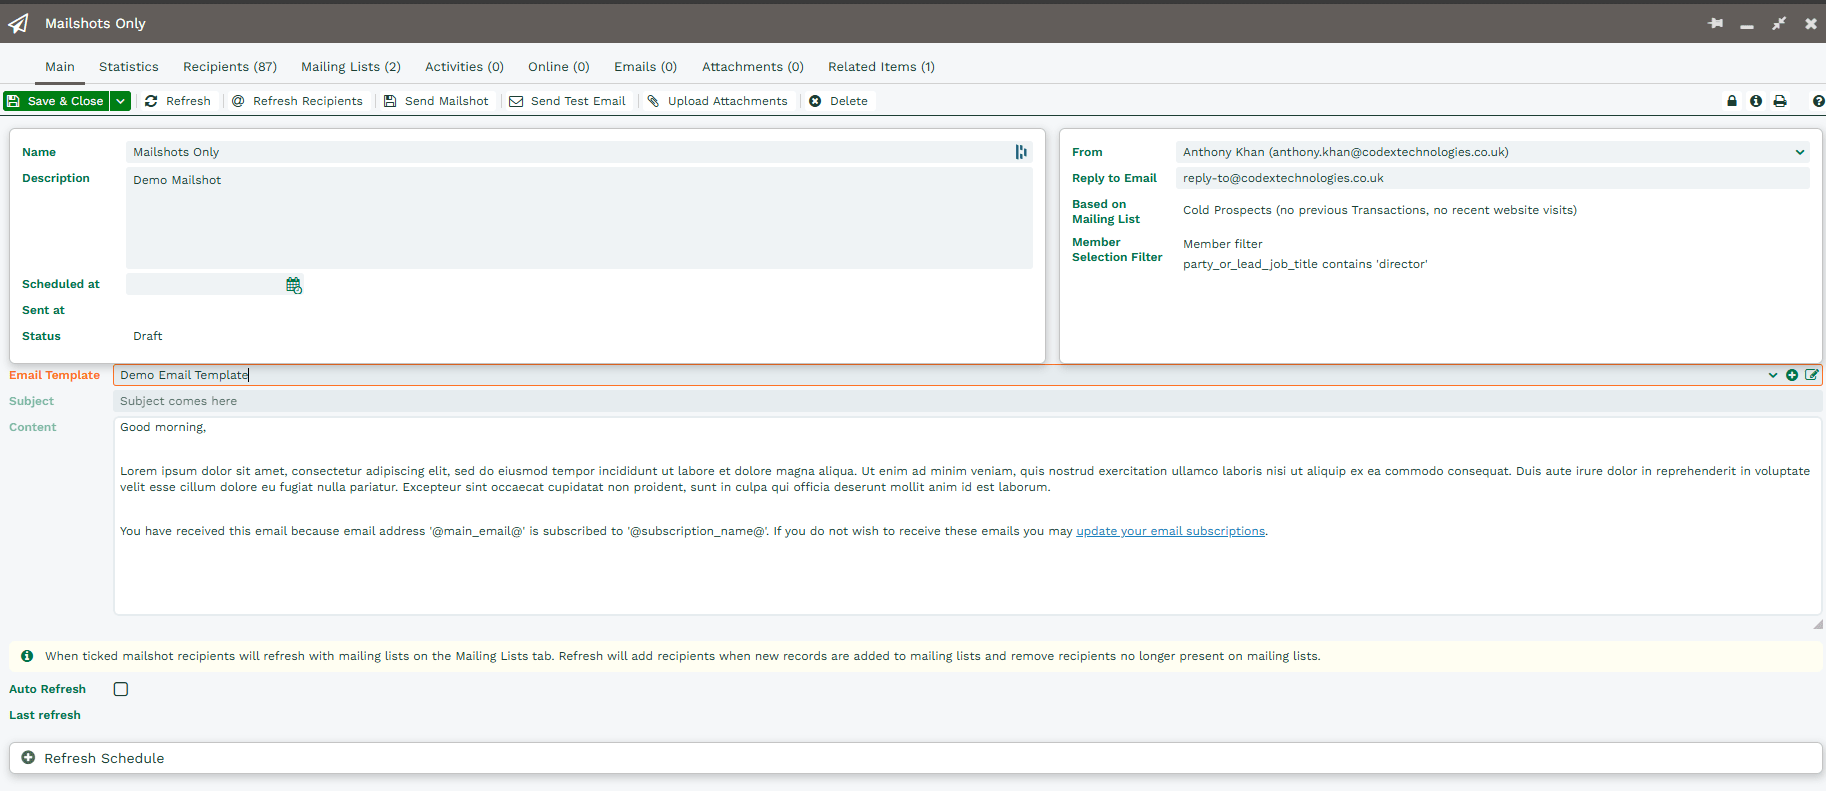
Mailshot Summary
This screen provides a summary of the steps you’ve taken so far. You can:
- Preview your email and send a test email – click on Send test email. You’ll be prompted to search for a record to use within the test. Choosing a record will display the Mailshot populated with the values from that record but with your login email details as the recipient. We recommend that you do send yourself a test email to check that you’re happy with the details and formatting.
- Send the Mailshot now – click Send Mailshot and the emails will be sent straight away. The length of time it takes for all the emails to be sent will depend on the number of recipients.
- Schedule the Mailshot to be sent later – enter the date and time you want the Mailshot to be sent in the ‘Scheduled at’ field.
- Schedule the Mailing List to refresh. If you’re using a Dynamic Mailing List, you can set it to automatically refresh at specified times or use ‘Refresh Recipients’ button to refresh Members manually. New list members will be added and members no longer present will be removed from the MailShot.
NOTE: Once the Mailshot has been sent out, the refresh recipients functionality will get automatically disabled. .
Adding more Members to the Mailshot
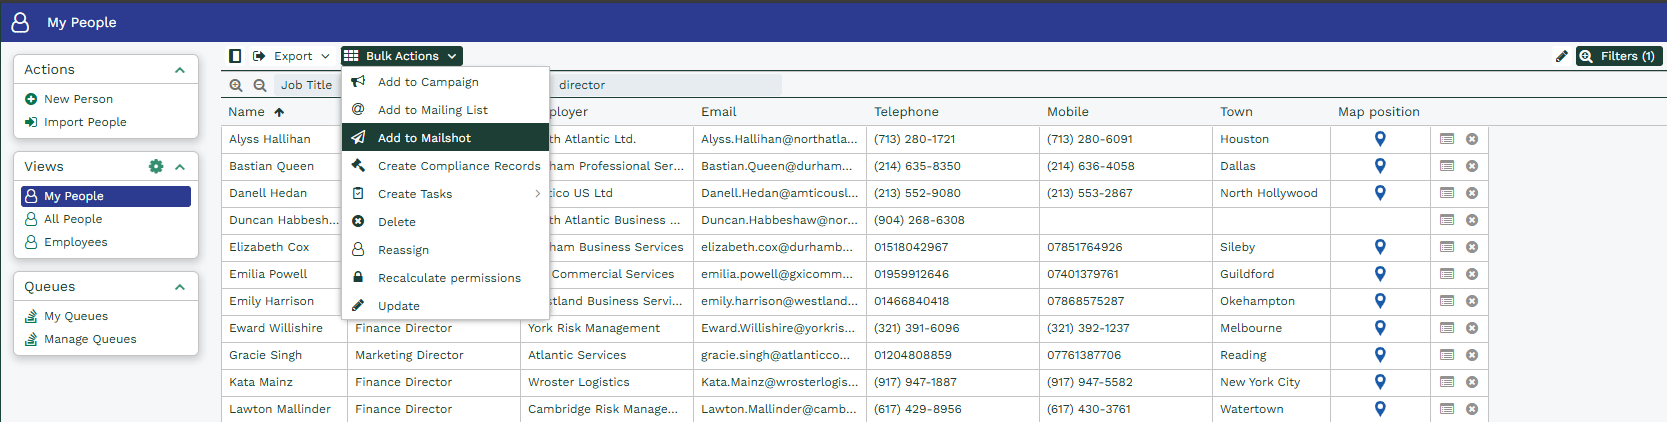
You are able to add more recipients by going to the Recipients tab and clicking the Add button.

Or by using Bulk Actions button on People, Sales Leads, Mailing Lists, Mailshots and Online Activities.
NOTE: Mailshot recipients will see an Unsubscribe link in the email they receive, enabling them to unsubscribe from any Mailing List or Campaign of which they are a member or to unsubscribe from receiving any further email marketing at all. The format of the screen they see can be modified within the Configuration > Email Integrations > Preference Centre
Mailshot Email Report
- After you have initiated the mailshot, information will be shown on the Main Tab. This screen will give you the status of your mailshots, once the process is complete, the status will switch from “Scheduled” to “Sending” to “Sent“.

- If any errors occurred during the sending process, the Email Report view will highlight these, and you can then click on the rows below to see which emails have been affected.
NOTE: In the event that an email initially fails to send, the system will make 9 further attempts, each spaced 10 minutes apart. The Status box will only be set to display errors after all 10 attempts at sending have failed.
Mailing List Statistics
The Statistics tab shows the information of Mailshot recipients and provides the number of those with unique and eligible email addresses.
