


Creating Custom Fields
How to create Custom Fields and the differences between each of the types available.
Tip
Including a Description on your Custom Fields can reduce confusion when Customising Form Layouts.
Commonly used Fields such as Assigned To already exist for each Record Type out of the box, but you can also create Custom Fields.
Custom Fields can be created on most Record Types in Workbooks to enable you to store information on your Workbooks database that is relevant to your business.
Navigate to Start > Configuration > Customisation > Record Types where you can see the list of Record Types that can currently be configured as shown below:
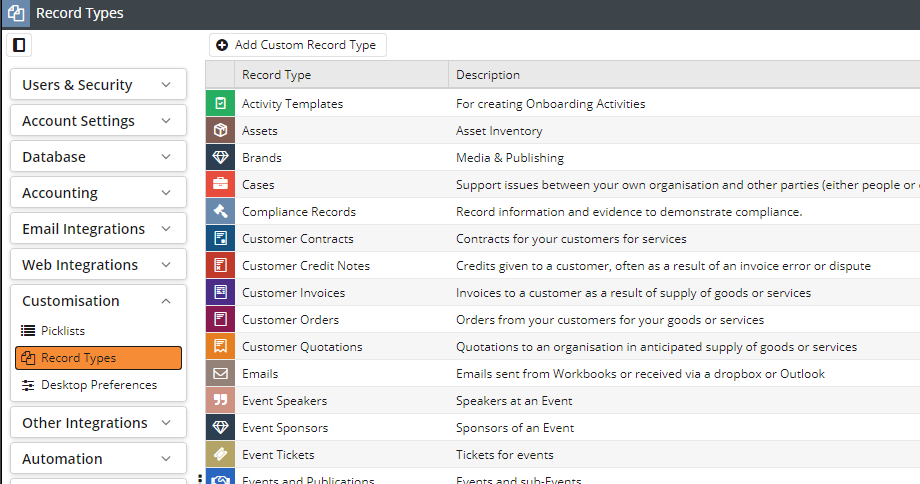
NOTE: It is possible to change the names of these Record Types. Simply click on the relevant record type and change the name on the Main tab. For example, you may want to change People to ‘Clients’ or Campaigns to ‘Events’. The original name will be stored in the ‘Original Name’ column as seen above.
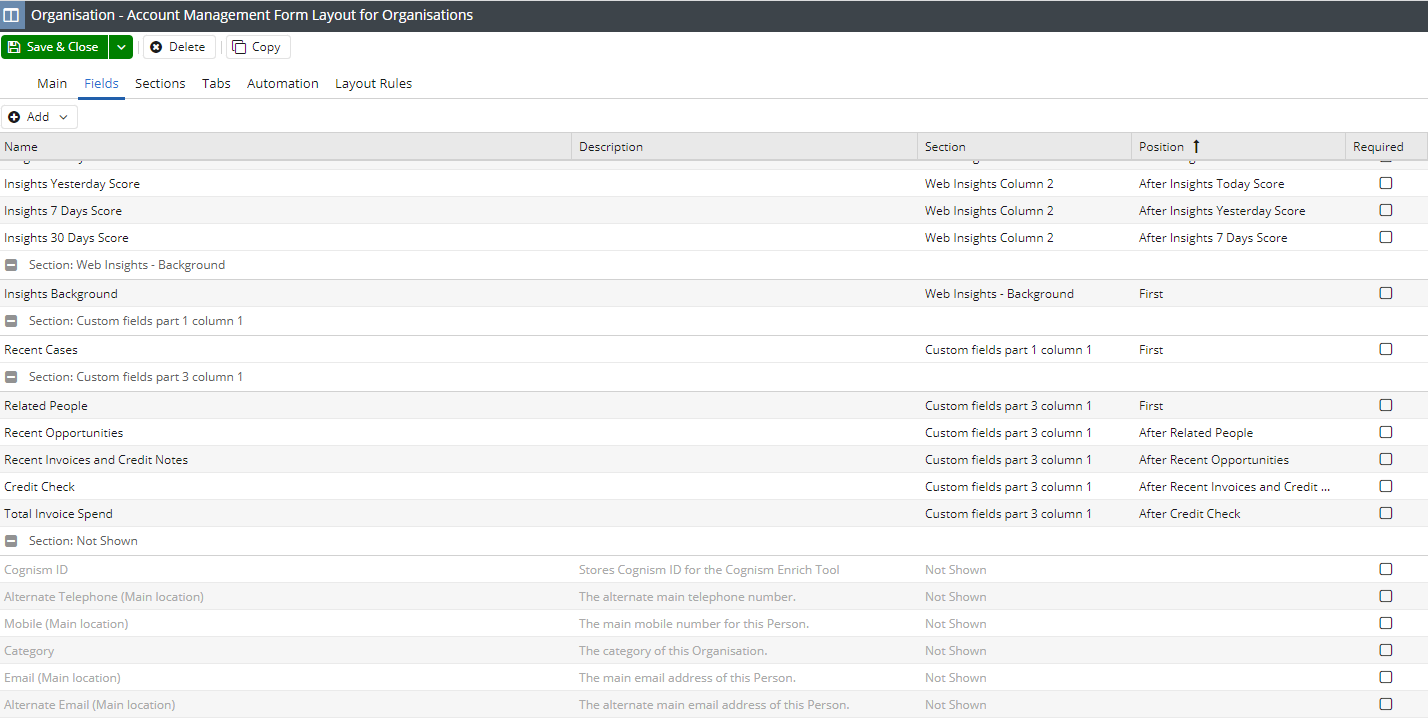
There are a number of standard Workbooks fields which are initially hidden from view. It is bad practice (and will probably cause problems later) if you create Custom Fields which have the same field label as either an existing custom field on the same record type or with the same field label as an existing standard Workbooks field. For this reason, we recommend checking if the field you need exists, before creating a new one. To enable you to carry out this check, all standard and custom fields are visible in the Fields tab.

The Field label is the name you see when you use the field, and the Field name is what we use behind the scenes and in the API. Custom fields will have a Field name prefixed with cf_ to help you identify them from standard fields. It is possible to change the field label of existing fields. Simply select the relevant field from the fields tab and adjust the name.
NOTE: Some standard fields cannot be renamed. When you open the field, the field label will be read-only.
Some fields which already exist may not be visible on your form layout. Before creating a custom field, go to the relevant form layout and scroll to the bottom of the Fields tab, where there will be a number of fields that are greyed out, because they haven’t been selected to Show. If the field exists, simply select and click ‘Show’ to add it to your form layout.
If the field doesn’t already exist, you can create your own custom field. To add a custom field to a specific record type, click Start > Configuration> Customisation > Record Types. Select the record type to which you want to add the field, from the list on the right. Now open the Fields tab and click ‘New Custom Field‘; if you’re adding a Custom Field to a Line Item on a transaction record, you should open the Line Item Custom Fields tab. When clicking New Custom Field, Workbooks will present you with a list of the field types available for creation. Click on the desired field type.
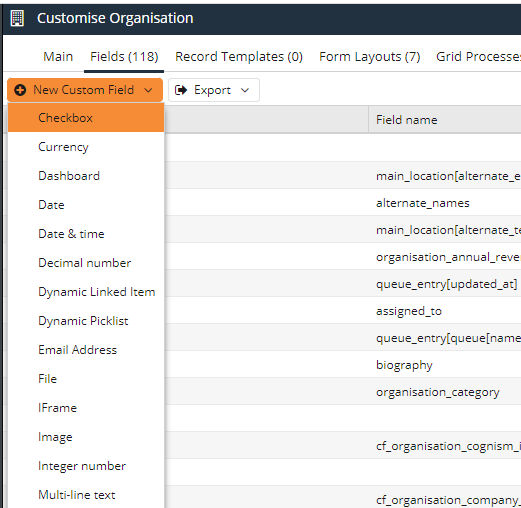
Listed below are the different types of data you can apply to a custom field. Some settings are common to many of these fields, including:
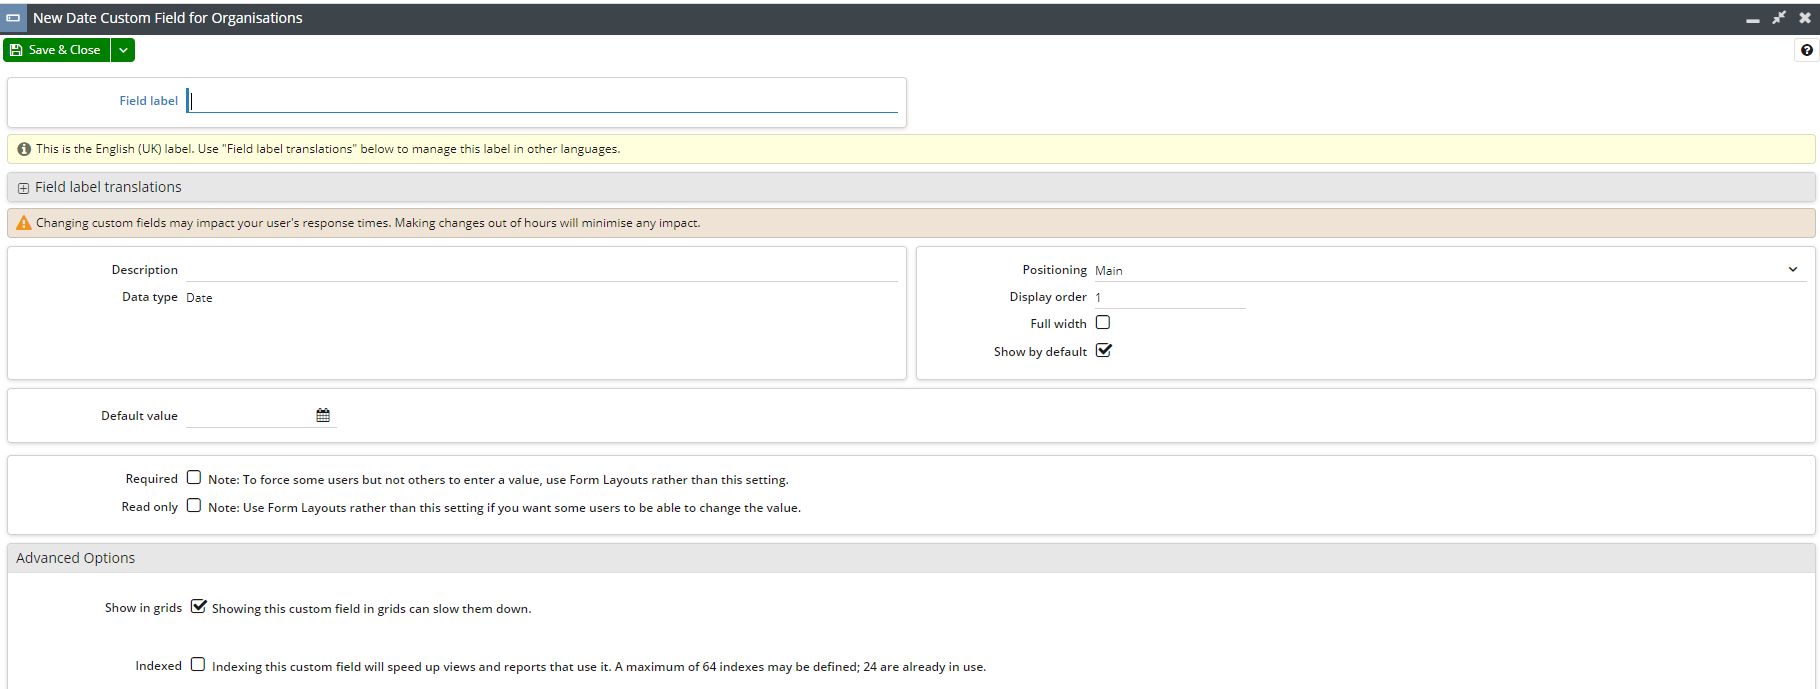
- Description: This field can store additional information about the Custom Field. This information could relate to how the Field is meant to be used or important internal notes, such as ‘Do Not Delete’. It is important to note that if a Custom Field was created prior to this feature, this Field will remain blank until updated.
NOTE: The value in this field can be very useful when Customising Form Layouts.
- Required: Ticking this box makes completion of the field mandatory at the database level. If you want the field to be mandatory for some users but not others, use Form Layouts rather than this setting. We would always recommend the latter to avoid any potential issues down the line. Required fields will be marked with a blue line if the field has not been populated.
- Read only: Ticking this box makes the field read only (so can be useful for displaying important on-screen information). If you want the field to be editable for some users but not others, use Form Layouts rather than this setting;
- Show in grids: Ticking this box determines whether or not this field is hidden or available to be switched on in grid views such as Landing Pages, Tabs and Line Items.
- Show by default: Ticking this box forces the new field to be shown on all of your Form Layouts for that particular record type.
- Allow Quick Searching: Ticking this box enables quick retrieval of matching records when a prefix is supplied, the Quick Search looks at the fields in the Record where this information is stored. For example, when searching for an email address it will look at Person or Organization Record (not limited to these Records) to provide you results faster.
- Allow Extended Searching: Ticking this box enables extended searching which uses the search engine in Workbooks in case no matching prefix is found, or the desired matching prefix is not found, and it may be useful for text fields that have multiple words. This now looks at all the Records which contain the prefix entered in the database. For example, if you search an email address with Extended Search, it will not only look at the Records Fields where the information might be stored but also the Fields in Emails such as body or subject (or anywhere in the database where the prefix could have occurred).
- Indexed: Ticking this box can speed up reports and filtered views that use the customised field as a criteria. Indexing is most effective when fields are likely to be used frequently, and if there is a large number of distinct values. So, a checkbox would be an example of a poor use case for an index, you’d want to use something like email address for the best results.
- Default value: If you want records to be populated with a default value, enter it here.
- Max Characters: Simple text fields default to showing a maximum of 50 characters but you can amend this. The maximum characters limit for text fields is 255.
NOTE:
1. Although it is possible to make a Custom Field required and/or read only at this point, best practice suggests in nearly all cases this is not a good idea, as customising your database using Custom Form Layouts means you have greater control and flexibility over the positioning and order of fields, as well as being able to override whether or not the field has a default value, is mandatory or is read only.
2. If the maximum number of characters, or the Indexed checkbox, are changed for an existing custom field, the change will be performed in the background and a notification will pop up once it is complete.
3. The Custom Field will not be immediately available for use, as the creation takes place in a scheduled task. The Custom Field will be visible in the Fields Tab but will have a status of ‘Being Created’. Once created, the status will change and a notification will pop up.
4. Not all Custom Fields have functionality that allows Quick Searching/Extended Searching. The Custom Fields that support this functionalities are, Email Address, Integer Number, Phone Number, Text, Picklist (only Allows Quick Searching) and Multi-line text (only Allows Extended Searching).
Checkbox
A box which can be ticked to indicate that a particular parameter is met, or left empty if the parameter isn’t met.
Currency
Choosing a data type of currency will generate some new dialogue boxes where you can specify which currency should be displayed, and whether or not users can change the currency code. The currency options available are those for which an exchange rate has already been defined and added to the foreign currencies available for your Own Organisation.
Date
A date field (with the format dd/mm/yyyy).
Date & Time
A date/time field. Times are displayed using the 12-hour clock, e.g. 4:00 AM or 4:00 PM.
Decimal Number
Decimals are displayed to two decimal places (rounded up).
Dynamic Linked Item
A Dynamic Linked Item allows you to create a picklist compiled of values held elsewhere in Workbooks. The list of options in a Dynamic Linked Item’s picklist is based on a report, so you can use the full power of reporting to select which values appear in the list.
For example, you might want to create a field on an Opportunity record to show the primary contact for that Opportunity, using a Dynamic Linked Item field. Additionally, you can configure the field so that when you pick an option from the list other fields, such as Email, Phone Number and Address are automatically populated. Once you have chosen a Linked Item from the picklist, you can hyperlink to that record using the button next to the field. More information about creating a Dynamic Linked Item is available here.
NOTE: A Dynamic Linked Item field can only display up to 300 results at one time. If you do not see the result you are looking for, start typing into the field, and the results will get restricted to those that start with what you have typed.
Dynamic Picklist
A Dynamic Picklist is essentially the same as a Dynamic Linked Item. The only difference is that this picklist doesn’t include a button that allows you to link to the linked record.
NOTE: A Dynamic Picklist field can only display up to 300 results at one time. If you do not see the result you are looking for, start typing into the field, and the results will get restricted to those that start with what you have typed.
Email Address
There is a button next to this field that you can click to send an email to the address in the field.
File
A file can be uploaded directly to a Record’s Form for storage. This Field should be used for a specific file type such as “Terms & Conditions” or “CV” as the uploaded file will be renamed to “FieldName ObjectReference” when downloaded from the Field.
iFrame
Creating an iFrame custom field enables you to access information held in an external system via a Workbooks field. For example, you might want to create a field on an Organisation record that displays a Google map showing the location of the Organisation (based on the values entered in the postcode and country fields). You can control whether or not the iFrame appears on the main tab of the record, or in a separate tab. You could, if you wanted, create several different iFrame tabs for links to different systems.
To create an iFrame for a Google map follow the steps below:
- Start > Configuration > Customisation > Record Types. Select the record type of Organisations and open the Custom Fields tab > New Custom Field.
- Select iFrame as the custom field type.
- Give the field a name, e.g. Google Map.
- Enter the following into the URL field:
https://maps.google.co.uk/maps?q=@main_location[postcode]@,@main_location[country]@&t=m&z=14&view=map&hl=en&ie=UTF8&iwloc=&num=1&output=embed
By default, the checkbox next to ‘Show Link Button’ is ticked, which means that in addition to displaying the Google map on the Organisation record, you will also see a button you can click to open the map in a new window. If you don’t want the ability to open the record in the new window, simply remove the tick.
Alternatively, if you want the map to display in a new tab (which will have the same name as you have given the custom field), tick the checkbox next to ‘Show as Tab’. Then click Save & Close.
Now, when you open an Organisation Record where the Postcode and Country fields are populated with valid values, then you will either see a field that displays the Google map for that Organisation’s location, or you will see a new tab which displays the map.
Image
An image can be uploaded directly to the Form of a Record, simply by dragging and dropping a .gif, .jpg or .png file into the the Image Field. This can then be downloaded from the Record at a later date.
Custom Image Fields can be used to store images up to a size of 16MB, this limit can be set within the Field’s Configuration screen. The standard ‘Photo’ and ‘Logo’ Image Fields on the Person and Organisation Records respectively have a limit of 10MB.
Integer Number
A field to store a whole number. Alpha characters cannot be entered in number fields. This field can be made searchable.
Multi-line text
A field where you can enter multiple lines of text. This field can be made searchable. This field can hold up to 65,536 characters, although few users ever add this much data.
MultiSelect
Use this if you want to create a picklist from which the user can select more than one option.
Percentage
Values here will be displayed with a % sign. You can also set the minimum and maximum values that can be entered in the field.
Phone Number
There is a button next to the phone number which lets you directly call the number in the field, provided you have integrated Workbooks with a VOIP system such as Skype. This button also enables you to create a phone call Activity automatically. Depending on your VOIP integration you may be able to record the call or take other actions.
NOTE: Whilst Workbooks doesn’t dictate the format for which phone numbers must be entered, your VOIP system may do, so we recommend that you check the documentation for your system.
Picklist
This data type generates a picklist where only one option can be selected. You must select a picklist that already exists when creating a new picklist field, or you can choose to create a new one using the plus button.
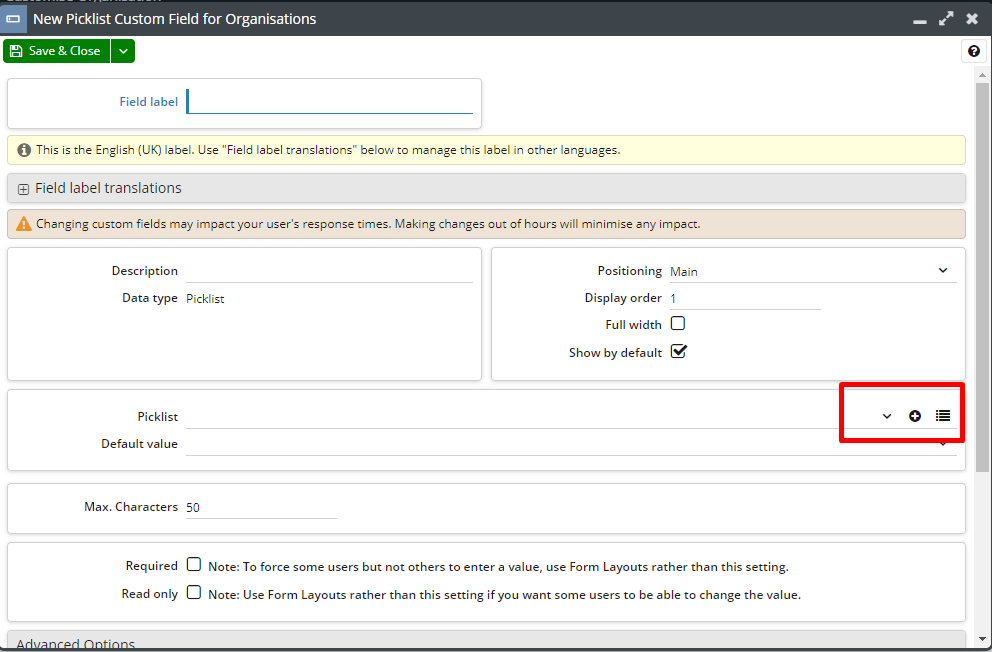
NOTE: A Picklist field can only display up to 300 values at one time. If you do not see the result you are looking for, start typing into the field, and the results will get restricted to those that start with what you have typed.
Report Fields
You can add read-only data into your Forms that is populated from data on Reports so that you can dynamically display data. You can display the whole grid, or just an individual cell and you can apply a constraint that limits the data to just that which is relevant to the record you’re looking at. For example, you could display a Report cell on an Organisation record that shows their total invoiced amount, year to date. In that situation, you’d only want to see the amount invoiced for that specific Organisation, not the total spent by all Organisations, which is achieved by applying a constraint.
If you don’t want the information to be displayed on the Main tab of the record, you can show the Report as a tab and in addition, you can add an entire Dashboard to a tab.
More information on Report-based fields is available here.
Rich Text
Choosing this option will create a field where you can enter text, which can be formatted using the toolbar that appears above the field. This also provides the ability to enter the value as HTML. This field can be made searchable, and can hold up to 65,536 characters, although few users ever add this much data.
Text
Use this option if you want to enter alphanumeric characters (up to a maximum of 255 with a default limit of 50). This field can be made searchable.
Time
Times are displayed using the 12-hour clock, eg 4:00 AM or 4:00 PM.
URL
A URL field can be used to hold a URL address so that at the click of a button the user can access a specific web page. The simplest way to use this field is to give it a Field Label and leave the URL field blank. This allows the user to enter a URL of their choice and then link to that destination. Note that when you create a URL field, the default length is 50 characters but you can increase this to a maximum of 2,000, if required.
Alternatively, you can enter a URL that, when combined with the value that a user enters in the field, generates a whole URL. In a similar way to an iFrame, this enables you to link to an external destination (relevant to the Workbooks record you have open) without the user having to enter the whole URL. To do this, include @value within the URL. This indicates the point in the URL where the value entered by the user (in the form field) will appear and thus generate the whole URL to which they can link.
For example, if you entered www.bbc.co.uk/@value@ in the URL field, a user could enter news or radio4, which would enable them to link straight to the BBC News or BBC Radio 4 site respectively.
If you include a URL custom field in a Landing Page view you can click on the value in the grid to launch the relevant site. It is also possible to have a URL custom field on Line Items.
NOTE: In order for URL links to work correctly, you should ensure that your browser is not blocking pop-ups.
For information on how to create custom fields that appear on more than one record type (such as a value on a Lead that appears on a Person when the Lead is converted or on a Product that appears on a Line Item), see the instructions here.
NOTE: If you delete a custom field, all the data held in that field will disappear and cannot be retrieved. If you think you might need the data later, simply hide the custom field rather than delete it. Standard Workbooks fields cannot be deleted, but can simply be hidden from view on the Form Layout.