


Modifying Document Templates
Information regarding modifying document templates, including how to control what information is displayed and what colours/images are used.
![]()
Clicking Start > Configuration > PDF Templates > PDF Templates will open the PDF Templates Landing Page.
The grid on the right lists all the document templates on your database. Only those templates which have been enabled (as shown by the tick in the Enabled column) will be available in the list users choose from when generating a PDF.
The appearance of your PDF Output Documents is determined using a combination of the template, its Settings, Colours and Images. To edit an individual template, hover over its Name until it becomes underlined and click on it.
We recommend that you read through the information provided here before changing the appearance of your templates. You can go straight to specific areas by clicking on the links provided:
Main tab
| Name | The document name |
| Document Type | The type of Transaction with which the document can be used. |
| Own Organisation | If you have more than one Own Organisation you can use the dropdown picklist to specify which one this document applies to. |
| Enabled | Tick this checkbox to make this document appear in the list of templates available for users to choose from when generating a PDF. |
Settings tab
Settings allow you to control which pieces of data are used on your template. If you don’t specify settings for individual templates then the settings from Default Settings will be used instead.
Workbooks is supplied with a pre-defined list of settings which you can apply to your template(s).
NOTE: Not all the Settings are available for every document type. For example, Bank Account details cannot be activated on a Customer Order but can be activated on an Invoice.
Some settings allow you to pull through data that appears on your Workbooks record, thus enabling each PDF to contain different information. In order for this data to appear, the field on your transaction document must be populated AND the Setting has to have been added to your template document. For example,if you want to show the FAO field on a Customer Order, you need to make sure that the field on the Order record has been populated AND that you have added a Template-Specific Setting for FAO to your Order.
Some settings allow you to add information to your template that doesn’t appear on your Workbooks record. This means that whatever you add will be the same on every PDF. For example, you can add information about your Bank, such as the Account Name, Number, Address and so on, which doesn’t appear on the underlying Workbooks record. The values you enter can be single or multi-line text.
Adding a Template-Specific Setting
With the PDF Templates Landing Page open click on the name of the Template you want to amend and open the Settings tab. (Any existing Template-Specific Settings – including any Custom Settings – will be listed here.)
Click Add Template-Specific Setting and use the dropdown picklist to choose the Setting that you want to add. The first screenshot below shows a Setting that pulls through the value from a field on your Workbooks record and the second one shows one where you can enter a non-variable value directly onto your PDF. (Click to enlarge.) In both instances, notice that you can change the Label field (which is the placeholder that is shown on the PDF).
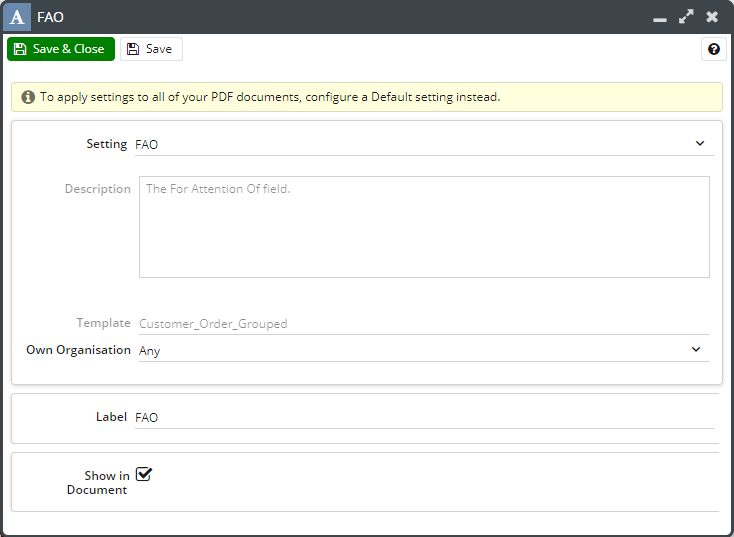
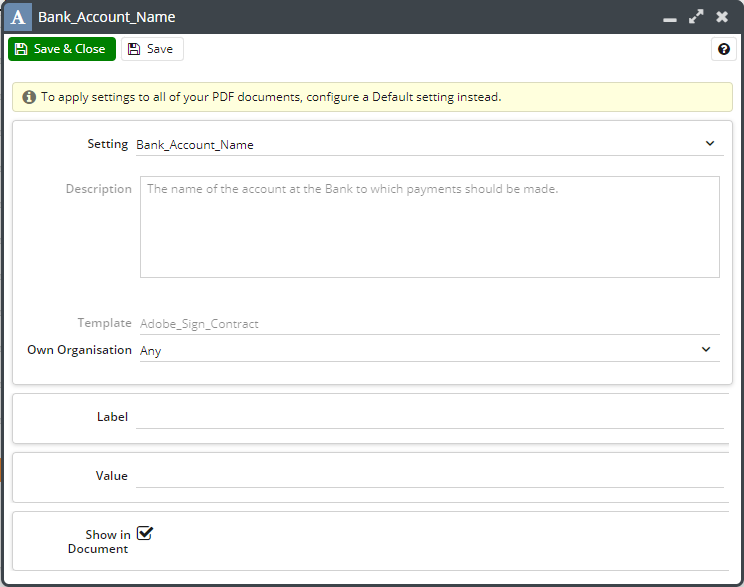
You will need to populate both the Label and Value fields in order for the information to appear on your output PDF.
Notice that the (read-only) Description field provides information to explain what will be displayed by the Setting. You must tick the checkbox next to Show in Document in order for the Setting to take effect. In addition, you can specify which Own Organisation (if you have more than one) for which the Setting applies. Some settings will allow you to tick a “multi-line” checkbox allowing you to store more than the standard text limit of 255 characters. See here for an example on how to add extended terms and conditions to your documents.
Colours Tab
You can control the colour of different sections of your template within the Colours tab. More information on how to do this can be found by clicking here.
Images
You can upload an image to include in your document(s) – typically this is your company logo. By default, the image will appear in the top right-hand corner of your document. If you want it to be displayed elsewhere or want to include more than one image you need to edit the unified.xsl document. More information about adding an image to your output document can be found here.