


Linked Fields & Reference Fields
How to use Fields to make information stored on one record appear on another, such as the Postcode from an Organisation record to appear on an Opportunity record.
Sometimes you might want to see the information stored on one record type displayed on another so that you can find the details you need without having to open other records. For example, you might want to see information about a Person’s Employer displayed on the Person record or you might want to see information about the Prospective Customer displayed on an Opportunity record. There are two ways you can do this and the option you choose will depend on the behaviour you require:
- Linked Fields
- Reference Fields
1 Linked Fields
Many record types include Fields of type ‘Linked’. This means that the Field provides you with a link to data stored on another table. For example, on an Opportunity you can link through to the User table of data via the ‘Assigned to’ field or through to the Organisation data table via the ‘Prospective Customer’ field. On a Case you can also link through to the User table of data via the ‘Assigned to’ field. In addition, you can link to information on the Contract via the ‘Contract’ field and to information about the sale via the ‘Opportunity’ field.
Field values that you create using Linked Fields can be displayed on Landing Pages and can be used to apply filters to that Landing Page. You can make the field display as read-only or it can be an editable field. If you edit the value in the field on the destination record, this does not automatically update the equivalent field on the source record. You can set the field up so that it refreshes if the value held in the source record is edited but the value in the destination record will only be updated when the destination record is opened and then it must be saved if you want to commit that change to the destination record.
To display data from one record on another using Linked Fields, you need to create a Custom Field on the ‘destination’ record which can store the value being ‘fetched’ from the related record.
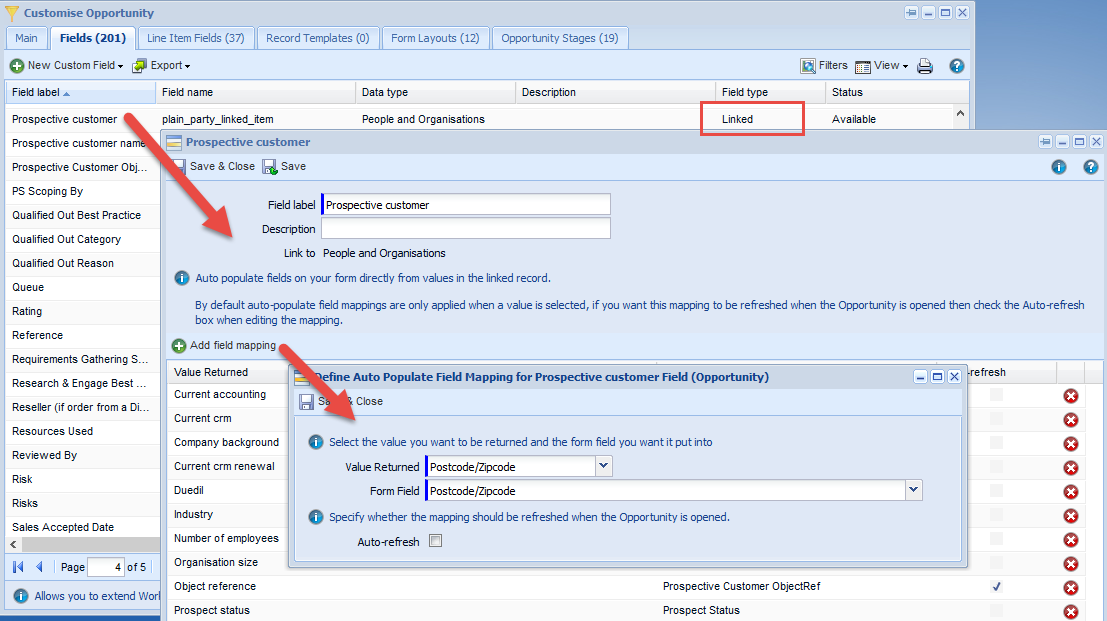
For example, if you want the Postcode from an Organisation record to appear on an Opportunity record, you should create a Custom Field of type Text on the Opportunity record, then open the Fields tab and choose Prospective Customer.
In the dialogue box that appears click Add mapping. Use the dropdown picklist next to Value Returned to select Postcode/Zipcode and the dropdown next to Form Field to select the name of the new Custom Field you created on the Opportunity, as shown in the screenshot below (click to enlarge). If you want the value on the Opportunity record to auto-refresh (ie, to check the value on the Organisation and refresh it on the Opportunity), tick the checkbox next to Auto-refresh. Remember, this value will only update when you open the Opportunity and will only be committed to the Opportunity if you click Save.
2 Reference Fields
An alternative approach to displaying data from one record on another is to use Reference Fields. This is quicker to set up as it doesn’t require the creation of a Custom Field on the ‘destination’ record. The data in Reference Fields is always read-only and always displays the current value in the source record (ie, you don’t need to open the record for the value to update). Reference Fields are not, however, available to display in the Landing Page grids of the destination record.
Reference Fields enable you to retrieve data from another record that is directly associated to the one where you want to display the information, via either our built-in Linked Fields or via any Dynamic Linked Item Custom Fields that have been set up. You can add a link to the associated record, which will open that record and highlight the specific value on the source record. Note however, Reference Fields cannot display values from the following field types:
- Linked Items
- Custom Dynamic Linked Item
- Report Cells
- Report Grids
- Report Selects
- Dashboards
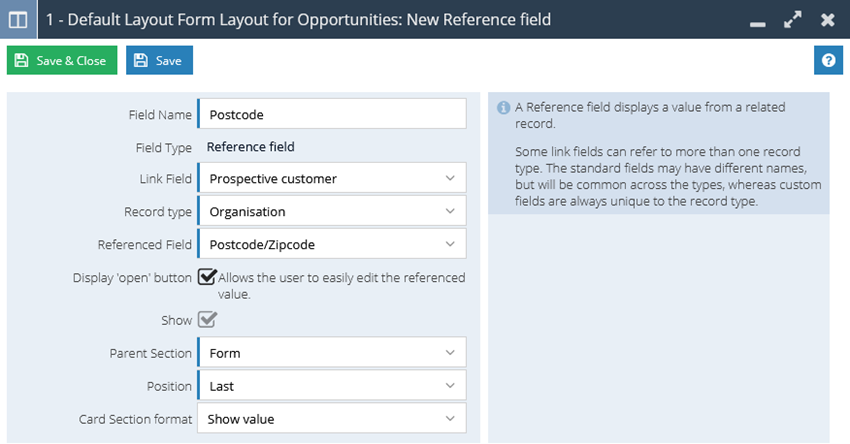
Using the same example as above (showing the Prospective Customer’s Postcode/Zipcode on an Opportunity), open the Opportunity Form Layout to which you want to add the Reference Field. On the Fields tab click Add > Reference Field. In the Link Field, select ‘Prospective customer’. This will reveal a field called Record Type, where you should select either Organisation or Person. (This is because Workbooks supports customers being Organisations for customers operating in the B2B environment or being People for customers in the B2C world.) From the dropdown next to Referenced Field, select the field you want to see, which in this example is Postcode/Zipcode. If you want the Reference Field to include a button to let you link from the destination record to the source record, tick the checkbox next to ‘Display ‘open’ button’. You then need to select the Parent Section and Position for the field and whether or not to show it if the selected Section has been configured as a Card Section.
NOTE: Activity records (both Tasks and Meetings) do not include a built-in Linked Field that links to the Primary Contact for the Activity. If you want to pull through data from the Primary Contact field you could set up a DLI for the contact. However, if you want to display the photo for the Primary Contact (whether that’s a Person or a Lead) or the logo (for the Person or Lead’s employer), you can do this by revealing the Photo and Logo fields on a Task form layout.
Watch the video below for more information on setting up Reference Fields.