


Using HubSpot with Workbooks
Synchronise data between Hubspot and Sales Leads to track what website pages your Leads are visiting
HubSpot is a tool for managing your inbound marketing; you can use it with Workbooks as a source of leads.
When you set up synchronisation between HubSpot and Workbooks, you set up a bi-directional connection between the products: as your HubSpot contact data is created or modified it is copied over to Workbooks leads, and vice-versa. This is explained in detail towards the end of this page.
The synchronisation is achieved using a scheduled process which is configured with your HubSpot credentials. Setting this up requires you to:
- Be using the HubSpot Professional or HubSpot Enterprise product and have access to Workbooks Automation.
- Copy the “HubSpot Integration” script from the script library and configure a web process to install it.
- Create a number of custom fields to hold HubSpot data within Workbooks Sales Leads.
- Authorise Workbooks to access HubSpot on your behalf.
- Exclude any Workbooks leads from HubSpot sync that you do not need in HubSpot.
- Configure a scheduled process to run the synchronisation regularly.
- Monitor the synchronised leads.
You need to be logged into Workbooks as a user with System Administration capabilities which will be the user the synchronisation will run as.
1. HubSpot and Workbooks Editions
Integration with Workbooks can only be achieved if you’re using either the Professional or Enterprise edition of HubSpot.
You must also be using an edition of Workbooks which includes Automation; in practice, this means you cannot be using Workbooks Free Edition.
2. Copy the “HubSpot Integration” Script and run it as a Web Process
- Go to the Script Library (Configuration > Automation > Scripts) to take a copy of the HubSpot Integration script.
- Advanced users may choose to review the script’s configuration section; by default, the most useful fields are propagated between the systems.
- Add a Web Process, give it a name such as HubSpot, and choose the HubSpot Integration script as the script to run. Click to Save the new process.
- A form appears which guides you through the next steps, starting with creating the required custom fields.
The form looks like this; here two custom fields which are necessary for the synchronisation process have not yet been created:
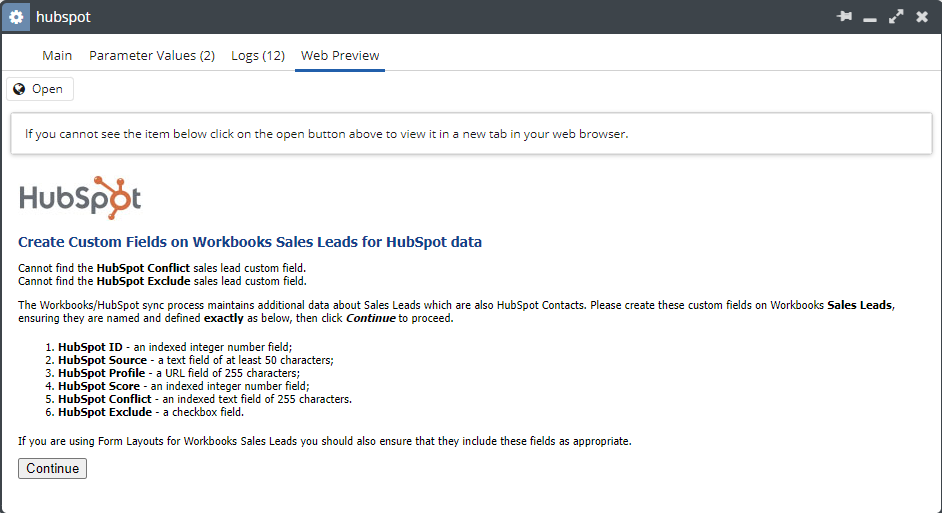
3. Create a number of custom fields to hold HubSpot data within Workbooks Sales Leads
Create fields as prompted by the installation process (see below for more details).
4. Authorise Workbooks to access HubSpot
The Web Process now prompts you to enter your HubSpot “Hub ID” and to allow Workbooks to access your HubSpot Contacts.
5. Exclude Unnecessary Leads from Sync
Set the HubSpot Exclude custom field to ‘checked’ (true) on any leads which you do not want synchronising into HubSpot. This might be all closed leads; use bulk update to achieve this.
6. Schedule the Synchronisation Process
- Add a Scheduled Process, called HubSpot Lead Sync and choose the HubSpot Lead Sync script as the script to run. Set the maximum time value to make sure you allow it up to 300 seconds each time it is run. Click to Save the new process.
- Set a schedule for the process to run – as regularly as you like; hourly during weekdays is generally frequently enough.
- Take a look at the Process Logs within the Automation area to check that the synchronisation is running. If the synchronisation stops a notification will appear in Workbooks.
7. Ongoing Maintenance
The synchronisation will now run indefinitely or until you remove access to your HubSpot system. A custom field on Sales Leads, HubSpot Conflict, is populated with the names of any fields whose values differ between Workbooks and HubSpot: periodically you may choose to review records where this is not blank and make them the same in both systems; having made such a change the next synchronisation cycle will resolve the conflict.
How Workbooks synchronises records with Hubspot
HubSpot integration runs through a series of phases:
- Installation: waiting for pre-requisites.
- Ready to synchronise for the first time.
- Workbooks to HubSpot Initial Synchronisation.
- HubSpot to Workbooks Initial Synchronisation.
- Workbooks to HubSpot Incremental Synchronisation.
- HubSpot to Workbooks Incremental Synchronisation.
- Idle: there is nothing left to do until the next synchronisation cycle, at which point the incremental synchronisation will be repeated.
The scheduled process does its work in batches of up to two minutes at a time so that other scheduled processes can also operate.
When the HubSpot web process runs during installation it creates a set of API Data containing the system configuration before it takes the user through creating a set of required custom fields. The key ‘hubspot_custom_properties’ defines a set of custom fields to be created in the HubSpot system. The key ‘hubspot_field_mapping’ defines the mapping between Workbooks and HubSpot fields.
These custom fields required by the integration, and the user is prompted to create them by the HubSpot web process:
- HubSpot ID – an indexed integer number field.
- HubSpot Source – a text field of at least 50 characters.
- HubSpot Profile – a URL field of 255 characters.
- HubSpot Score – an indexed integer number field.
- HubSpot Conflict – an indexed text field of 255 characters.
- HubSpot Exclude – a checkbox field.
Some field mappings are special:
- Email address and HubSpot ID
Used to match Workbooks Leads with HubSpot Contacts. Where a match exists, the records are considered to be equivalent and the process will attempt to synchronise their contents.
- ‘HubSpot Exclude’checkbox
If set on a Workbooks Lead then that record will not be propagated to HubSpot. However, if a change happens in a matching HubSpot Contact then it will propagate back to Workbooks and the ‘HubSpot Exclude’ field will be cleared. Hence one strategy to deploy the Workbooks/HubSpot integration is to start by setting ‘HubSpot Exclude’ to true on all Sales Leads in Workbooks.
- HubSpot Conflict
This is maintained as a list of any Workbooks field names for which Workbooks and HubSpot differ in that field and its value has already been set. This is because there is no guarantee that subsequent data from HubSpot is better than earlier data: a form may be filled in with poor quality (bogus, wrong, or just erratic) data on subsequent occasions as the user gets bored with form-filling. This field is cleared automatically during subsequent synchronisation cycles if field values converge again.
- Newly-created Workbooks Sales Leads
These are associated with the ‘HubSpot Leads’ marketing campaign if it exists or with another campaign named by the ‘Marketing Campaign Name’ scheduled process parameter. HubSpot Contacts with no name fields (first name or last name) are ignored.
If a Workbooks Lead is deleted then any associated HubSpot Contact will also be deleted.