Installing and Managing Workbooks and Google Calendar Integration
We have created a Google Calendar Plugin to help make the installation easier
As a System Administrator, there are two main aspects to the Google Calendar integration:
- Installation – Setting up your organisation’s Google Apps for Work account to allow Workbooks and Google Calendar to communicate, and establishing the correct environment on your organisation’s Workbooks implementation to let users use the integration.
- Usage and Maintenance – An explanation of how the integration can be managed from a System Administrator’s perspective.
Installation
The installation process is broken down into four key steps:
- Installation of the Workbooks Google App – Installing a Google App to your Google Apps for Work account to allow Workbooks and your user’s Google accounts to interact.
- Choosing the User who will install the Plugin – Ensuring that the scheduled processes will run without the potential for interruption.
- Ensuring Capabilities are properly established for User Groups – Establishing the correct capabilities for your User Groups so that you and your users can interact with the necessary menu options to use the integration.
- Installing the Google Sync Plugin
Installation of the Workbooks Google App
The Google Calendar Synchronisation requires the Workbooks marketplace app to be installed on your company’s Google apps account.
- The app is available free of charge here.
- For information on how to install an app to your Google account, please refer to Google’s support pages for the latest information here.
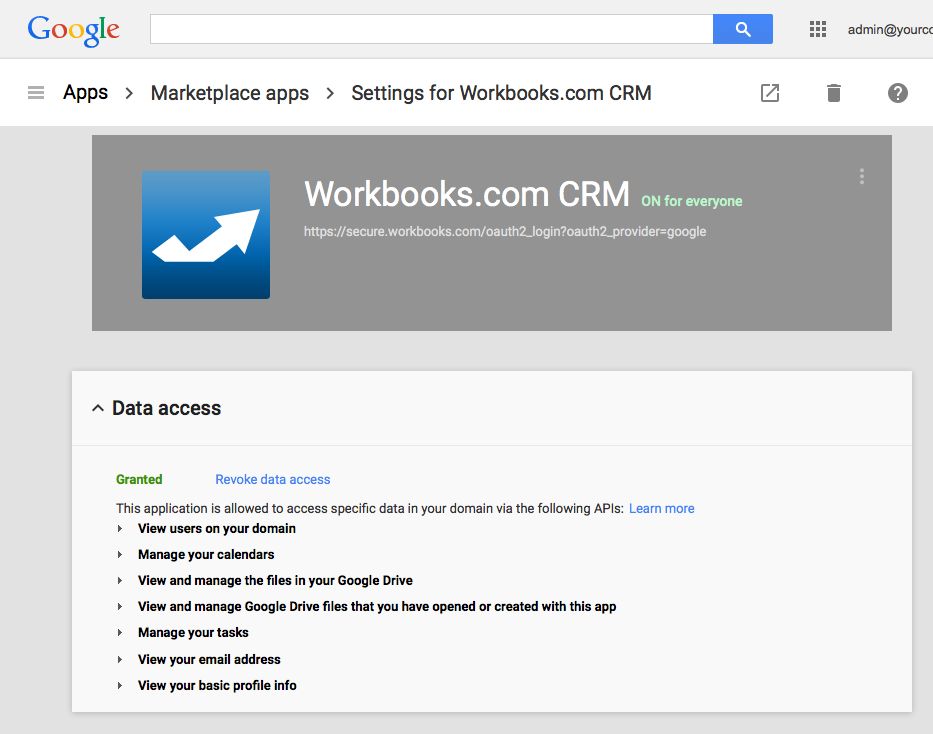
The configuration above should be carried out by your company’s Google Apps administrator. The app requires access to several areas within your Google account as it is also used for other Google integrations. These must be agreed to when carrying out the installation if you wish to continue. Google should present you with the following message:

Choosing the User who will install the Plugin
The Plugin installs several Scheduled Processes that perform the tasks that are required for the Google Calendar integration. These processes will be run by the User that installs the plugin. For this reason, it is advisable to have a User set aside specifically for this purpose.
The main reason for having a separate automation User account as opposed to using an employee’s account is that if you wish to deactivate the User for any reason (e.g. the employee leaves the company) then all of the processes will stop and you will lose Synchronisation functionality. After you have selected or created an account to install the plugin with, it is important to ensure they are part of a User group that affords them the necessary Capabilities to install and configure the functionality.
NOTE: To gain access to a User’s Google Calendar, Workbooks needs to know the User’s Google identity. To add this identity to Workbooks the User must login to Workbooks using their Google account via the ‘Use your Google account’ link on the login page.
Ensuring Capabilities are properly established for User Group
It is worth noting that there are generic Workbooks Capabilities, not Google Calendar integration specific ones, that are required to enable this integration. There is a good chance that they will already be set up correctly for your User Groups, but if the name of the User Group has previously been edited they may not be, in which case follow this link to find out which capabilities to add.
Installing the Google Apps Plugin
Log in to Workbooks as the User you have decided is going to run the Scheduled Processes that perform the Google Calendar synchronisation.
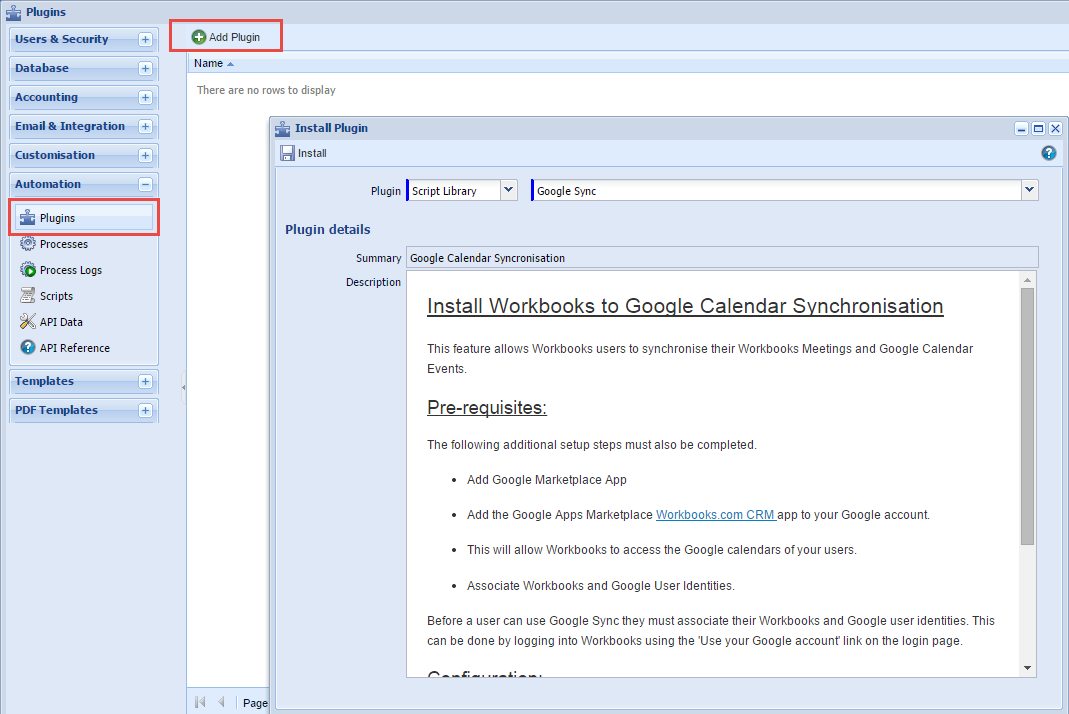
Click Start > Configuration > Automation > Plugins > Add Plugin:

From here, select “Script Library“ from the left hand picklist and then “Google Sync” from the other. NOTE: There might be other Plugins in this list dependent on other integrations that may be written in the future, or if you have developed any integrations of your own.
Click Install. Once the installation is successful, you will see the following message:

Usage and Maintenance
Managing Users Synchronise Calendars
A System Administrator has the ability to see which Users have synchronised a Google Calendar, the name of the Calendar they have chosen, and to disable the synchronisation.
For added control over the information that can be shared with Workbooks, it is suggested that you create a new Calendar in Google that will solely be used for integrations with Workbooks. This is because personal information is often not marked as private and is subsequently synced with Workbooks.
NOTE: It is standard Google functionality that invitations will be sent to your primary Google calendar. These invitations will need to be moved or shared into the Workbooks calendar in order for them to be synced.
Go to Start > Configuration > Email & Integration > Google Sync Config.
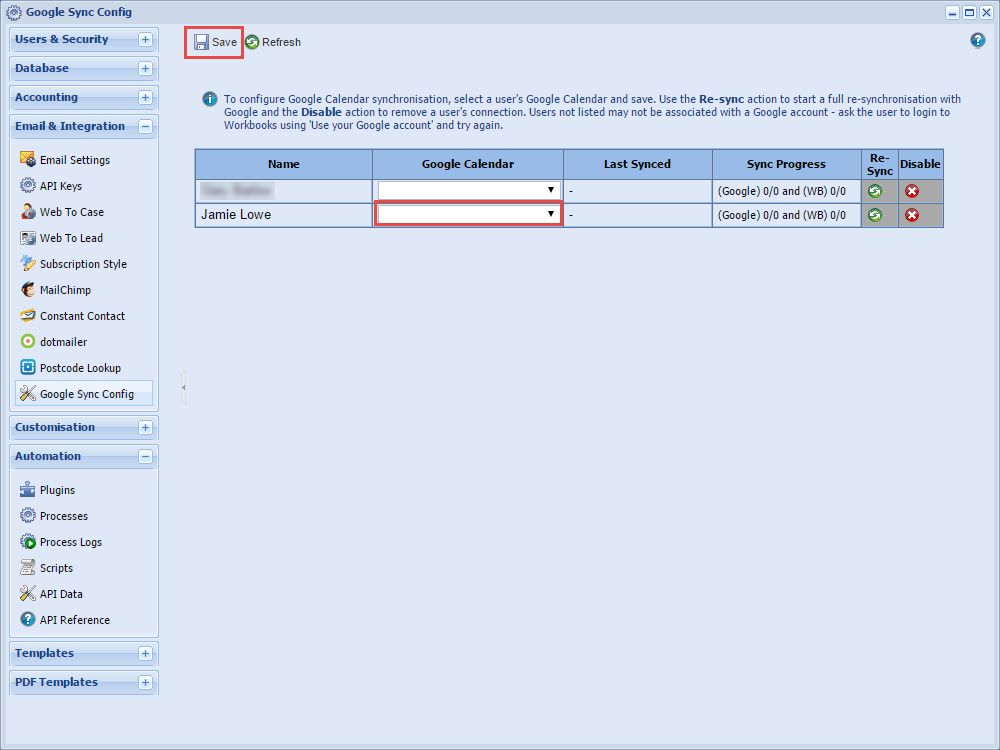
From here, any Users that haven’t synchronised their Google Calendar will have a picklist in the Google Calendar column as seen below:

This allows you to pick a Calendar from the list of Calendars that they have created in Google on their behalf and synchronise them. Care should be taken at this stage, as any events that the User has in this calendar which are not marked as Private will be synchronised into Workbooks. For this reason it is advisable to establish an Organisation-wide naming policy for the creation of Workbooks specific Google Calendars. Once the desired Calendar has been selected from the picklist, click the Save button in order to confirm all changes made.
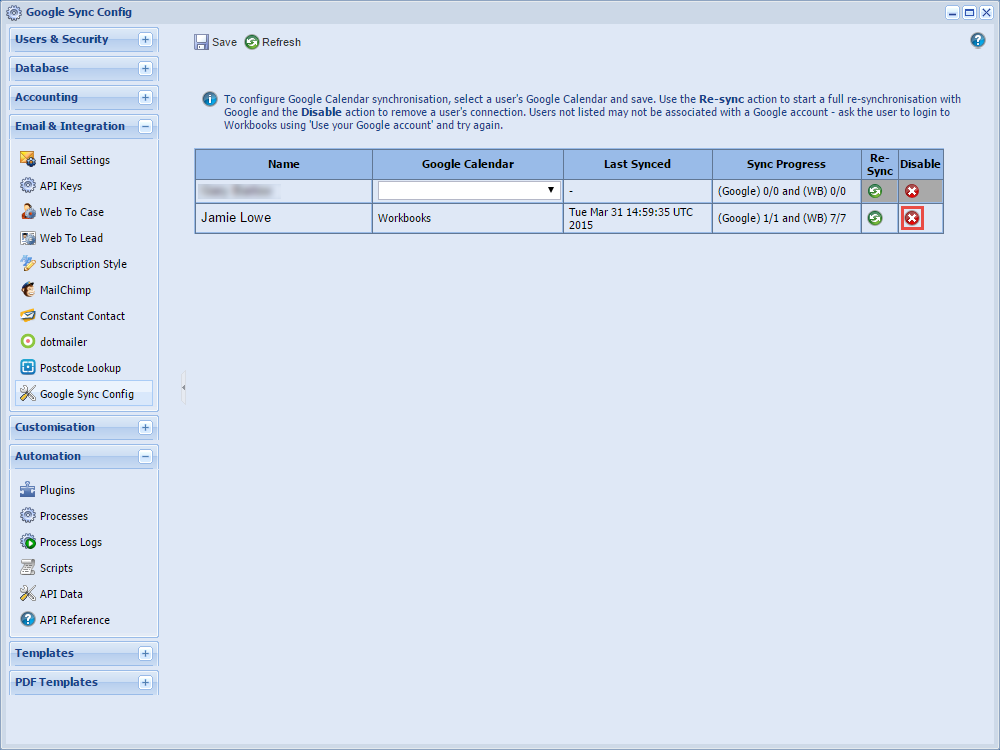
If you wish to either disable or synchronise a different Google Calendar to a User’s Workbooks account, click the Disable button next to the relevant user as shown below:

You will see the following screen:

In order to cancel this process, click the Cancel button. If you wish to proceed, ensure you take note of the Delete synced records checkbox. If you choose to select this box then any Meetings synchronised to Workbooks from your Google Calendar will be deleted from Workbooks. This means that all Meetings will be preserved in the environment they were originally created, and only the synchronised copies will be deleted. This prevents duplicate copies being made if the same calendar is synchronised to Workbooks again.
After considering this and making the appropriate selection, click the Disable button if you wish to proceed with the process, or the Cancel button if you don’t. After you have completed this process you will be able to synchronise a new calendar with Workbooks via the process used previously.