Knowledgebase articles
- Welcome to the Knowledge Base
- Introduction
- Workbooks Support: Your Go-To Guide
- Getting Started
- Preferences
- Activities
- Cases
- Introduction to Cases
- Displaying & Adding Cases
- Managing Cases
- Using the Case Portal
- Email
- Importing Data
- Leads
- Marketing
- Introduction to Marketing
- Event Management
- Compliance Records
- Spotler Integration
- What is Spotler?
- Navigating your Spotler homepage
- Introduction to GatorMail
- GatorMail Configuration
- Sending Emails in GatorMail
- Advanced Features
- Setting up the Plugin
- Viewing Web Insights Data on your Form Layouts
- Domain Names and Online Activities
- Reporting incorrect Leads created through Web Insights
- Reporting on Web Insights data
- Using UTM Values
- Why aren’t Online Activities being created in the database?
- Why is GatorLeads recording online activities in a foreign language?
- GatorSurvey
- GatorPopup
- Integrations
- SFTP/FTP Processes
- Mapping
- Docusign Integration
- DocuSign Functionality
- Adobe Sign Integration
- Zapier
- Introduction to Zapier
- Available Triggers and Actions
- Linking your Workbooks Account to Zapier
- Posted Invoices to Xero Invoices
- Xero payments to Workbooks Tasks
- New Case to Google Drive folder
- New Case to Basecamp Project
- New Workbooks Case to JIRA Ticket
- Jira Issue to new Case
- 123FormBuilder Form Entry to Case
- Eventbrite Attendee to Sales Lead and Task
- Facebook Ad Leads to Sales Leads
- Wufoo Form Entry to Sales Lead
- Posted Credit Note to Task
- Survey Monkey responses to Tasks
- Multistep Zaps
- Email Integrations
- Microsoft Office
- Auditing
- Comments
- People & Organisations
- Introduction to People & Organisations
- Using Postcode Lookup
- Data Enrichment
- Reporting
- Transaction Documents
- Displaying & Adding Transaction Documents
- Copying Transaction Documents
- Transaction Documents Fields Help
- Transaction Documents Line Items Help
- Printing & Sending Transaction Documents
- Managing Transaction Document Currencies
- Managing Transaction Document Statuses
- Setting a Blank Default Currency on Transaction Documents
- Credit Notes
- Customer Orders
- Invoices
- Quotations
- Supplier Orders
- Sagelink
- Configuration
- Releases & Roadmap
Printing & Sending Transaction Documents
How to create a PDF copy of your document to be printing or set it up to automatically be attached to an email.
Transaction Documents can be printed irrespective of whether they are in a DRAFT or a POSTED state. Printing whilst in a DRAFT state can be useful when checking the content or as part of an approval process. Transaction Documents can be printed and mailed or can be sent via email (as a PDF attachment) from within Workbooks. The email will be stored in the Related Items tab of the Transaction Document.
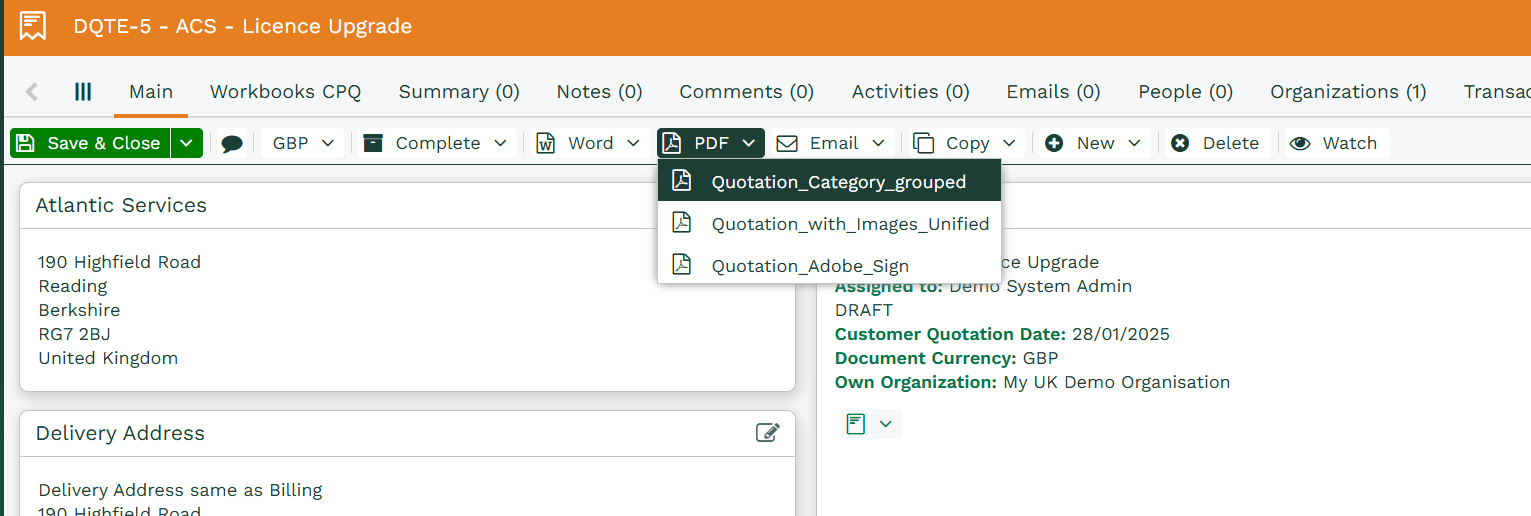
In your Transaction Document (eg. Quotations), click PDF to see a PDF version of your document. If your database has set up with more than one possible PDF template you’ll be given a choice of which one to generate. You can print the resulting PDF or choose to save a copy on your network.


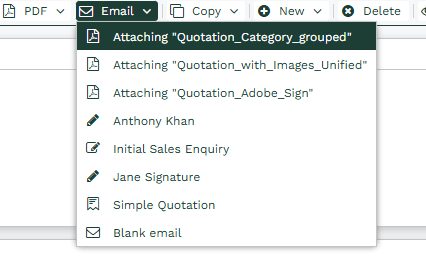
Clicking Email generates a menu allowing you generate an email that has a copy of the PDF document attached to it automatically. This is the first option shown in the screenshot below, i.e, Attaching “Quote_Category_grouped”. The resulting email will be blank but will have a copy of the PDF attached to it.


NOTE: Once the blank email has been generated you can then apply a template by clicking Apply Template and choosing the appropriate template option. Alternatively, you can choose any of the other options you see (and these options will depend on how many – if any – templates have been created for the type of transaction record you’re working on), which will open an email but the PDF document will not be attached.