


Desktop
Information on what options the Start Menu contains, how to use Search, personalising your Workbooks User Interface and using shortcuts.
Introduction
When you log in to Workbooks, you will see the Workbooks Desktop. It is made up of two key elements – the Taskbar and the main Desktop area, just like the classic Microsoft Windows UI. This is intended to make Workbooks accessible and easy to understand for end Users.
The Desktop is the backdrop to all of your activity in Workbooks and provides a lot of core functionality that you will use every day, which is explained in more detail below.
Taskbar
The Taskbar can be configured to appear at the bottom, top, or left-side of your Desktop, and includes 6 straight-forward buttons:
- Start Button – Clicking on the Start Button (Workbooks logo) opens the Start Menu; from here you can see all areas of Workbooks that you have access to, create new records, search for records, set your preferences, etc.
- Close all windows – Clicking this button will close all of your open windows within Workbooks.
- Windows manager – This button allows you to see at a glance all of your open Workbooks windows, and gives you the option to close or minimise all of them, or bring specific ones to the foreground.
- Search shortcut – This opens the Search window, allowing you to find records and view your recent items all at once.
- Recent items – Clicking this button will open the Recent Items window, where you can see all of the records and objects you’ve had open recently, and search through them.
- Notifications – The bell icon loads the Notification panel which is where any Notifications you receive will appear, alongside the options to open, snooze, or dismiss them.
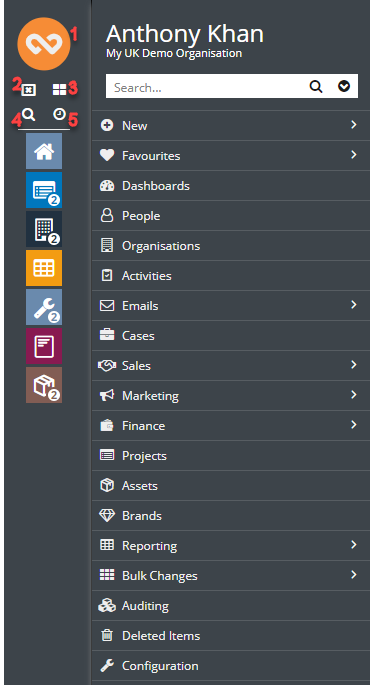
Start Menu
The Start Menu is the main way you will navigate through different areas of Workbooks and access your records, reports, etc. Clicking on the Start Button in the Task Bar opens the Start Menu, which will present you with all the areas of Workbooks you are able to access (as determined by your System Administrator).
While the majority of the Start Menu is made up of links to different Workbooks Landing Pages, such as People, Organisations, and Emails, there are three icons at the bottom of the menu that serve different purpose:
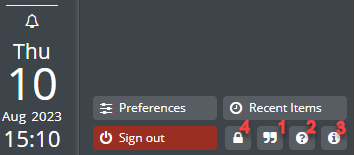
- Bulletins – This icon takes you to the Bulletins landing page which can be extremely useful for your System Admin(s). More info on Bulletins can be found here.
- Help – The question mark icon takes you straight to our Knowledge Base.
- Information – This opens a window detailing your session details, allocated licenses, and User information such as your login name and User name.
- Lock your screen using this button, it will only function if Username Password is implemented at a database level. See more info in Users & Security.
Search
It’s important that you can find the record(s) you need quickly and easily, and Workbooks includes a powerful Search capability for this purpose. The magnifying glass is used to indicate where a search function exists, and you can find three of these icons on your Desktop and Start Menu:
- Using the Search shortcut on your Workbooks Desktop.
- Clicking the magnifying glass icon in your Taskbar.
- Using the Search field that appears when you click the Start button.
Each option allows you to limit your search to a specific record type. For options 1 and 2 you do this by using the ‘Within’ picklist. For option 3, you click on the down arrow next to the magnifying glass which gives you a list of record types/areas of Workbooks to search within.
If you select a record type to search with using option 3, the system will remember what you’ve chosen for the rest of your login session, so that the next time you use that search it will be restricted to the record type you previously specified. This is particularly useful if you regularly search for records of just one type.
Alternatively, you can search the entire database by leaving the setting as ‘All Items’. The search will default to Quick Search and then if it doesn’t find what you are looking for, or it recognises there are potentially other options to search then a dialog box will pop up that asks you to click to extend the search. Quick search can also be customised to include the fields that you require, and that you search often.
Recent Items
The Recent Items view will list the last 100 items that you accessed in Workbooks, starting with the most recent. This can be extremely useful if you accidentally close something, or need to refer back to a record you were looking at the day before.
The Recent Items window also includes a Search bar, where the ‘Within’ field is automatically set to ‘Recent Items.
You can access your Recent Items from three places:
- Clicking on the clock icon under the Start button.
- Using the Recent Items button in your Start Menu.
- Using the Recent Items shortcut on your Desktop.
Session Information
You can log into more than one Workbooks database at a time by using separate browsers or private, ‘incognito’ browser windows for each session. Just be aware that as soon you try to log into another Workbooks database in the same browser instance, one of your sessions will be cancelled and you will be unable to carry out further actions until you log back in.
Clicking on the ‘i’ icon in the Start Menu opens a window that provides useful information about the current Workbooks session. From here, you can find the following information which is always useful, especially when raising cases with the Workbooks support team.
You can find the following information from here:
- User information, including who you are logged in as, name and email address, plus information on which licences are allocated to that User. You can also see which User Groups the current User is in.
- Account information such as the name of the account and database. You will also find the current database ID.
- Licence information including the Workbooks licence and any extensions you may have purchased that are in use by the User.
- Session information including your current User ID, customer ID and which database server you are using.
Hiding the Start Menu
You can hide the start button for user groups that have their Springboard turned on by going into Start > Configuration > Users & Security > User Groups > Select a user group > Expand Desktop Experience > Tick the “Disable Start Menu” checkbox. If the start menu is disabled, the only content you will have are the Logout and the Bulletins and Notifications buttons.

When you disable the start menu for a group you will need to make sure they have access to a Springboard. If they do not have access to a Springboard and the start menu is disabled, they will not be able to log into Workbooks.
Springboard
If you have a Springboard set up, this will appear on your desktop as soon as you login. Your Springboard should include all of the dashboards you need to manage your day. Find out more about Springboards here.
Desktop Shortcuts
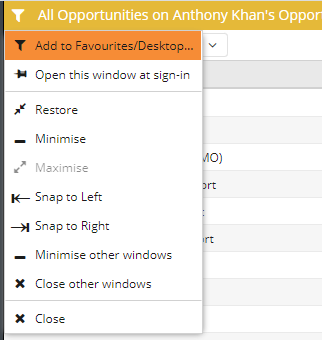
All Users can customise their Workbooks Desktop by creating shortcuts to specific Workbooks Records, Views on Landing Pages, or Reports.
Clicking on the Record icon in the top left-hand corner of a Workbooks record will open a menu with a list of options. Select ‘Add to Favourites/Desktop’. This will pop open a window asking you to name the shortcut, and then it will add an icon shortcut to your Desktop for that object.
The Desktop Shortcut will adopt the name of the Record, View or Report for which you are creating the shortcut by default. To remove any Desktop Shortcuts, right-click on the shortcut and select Remove Shortcut. When you open a shortcut from the desktop it will automatically remember whether or not the window was snapped from the last time it was open.
Personalising the Desktop
System Administrators can personalise the look of the Workbooks Desktop by replacing the default Workbooks logo with an image of your choice. In addition, you can control which, if any, windows open automatically when you login, by ‘pinning’ Landing Pages and/or records using the pushpin symbol towards the top right-hand corner. This will also automatically remember whether the window was previously snapped. More information on this can be found here.