


Knowledgebase articles
- Welcome to the Knowledge Base
- Introduction
- Training
- Getting Started
- Preferences
- Activities
- Cases
- Importing Data
- Leads
- Marketing
- Introduction to Marketing
- Marketing Campaigns
- Mailing Lists
- Products
- Mailshots
- Upload Library
- Templates
- Event Management
- Compliance Records
- Force24
- Spotler Integration
- What is Spotler?
- Navigating your Spotler homepage
- GatorMail
- GatorLeads / Web Insights
- Tracking Code
- Setting up the Plugin
- Viewing Web Insights Data on your Form Layouts
- Domain Names and Online Activities
- Reporting incorrect Leads created through Web Insights
- Reporting on Web Insights data
- Using UTM Values
- Why aren’t Online Activities being created in the database?
- Why is GatorLeads recording online activities in a foreign language?
- GatorSurvey
- GatorWorkflow
- GatorPopup
- Opportunities
- Projects
- Integrations
- Mapping
- Electronic Signing Tools
- Creditsafe Integration
- Zapier
- Introduction to Zapier
- Available Triggers and Actions
- Linking your Workbooks Account to Zapier
- Setting up Zaps
- Posted Invoices to Xero Invoices
- Xero payments to Workbooks Tasks
- New Case to Google Drive folder
- New Case to Basecamp Project
- New Workbooks Case to JIRA Ticket
- Jira Issue to new Case
- 123FormBuilder Form Entry to Case
- Eventbrite Attendee to Sales Lead and Task
- Facebook Ad Leads to Sales Leads
- Wufoo Form Entry to Sales Lead
- Posted Credit Note to Task
- QuickBooks Online
- Survey Monkey responses to Tasks
- Multistep Zaps
- Email Integrations
- Event & Webinar Integration Tools
- GoToWebinar
- ON24
- Microsoft Office
- Outreach
- Installation
- Outreach Authentication
- Sync People to Outreach Prospects
- Sync Organisations to Outreach Accounts
- Sync Workbooks Opportunities to Outreach
- Sync Tasks/Activities from Workbooks to Outreach
- Sync Outreach Sequences to Workbooks
- Sync Outreach Sequence States to Workbooks
- Sync Outreach Sequence Step Numbers to Workbooks
- Sync Prospects/Accounts/Opportunities from Outreach to Workbooks
- Sync Outreach Tasks/Calls/Meetings to Workbooks
- Scribe/Workbooks Connector
- RingCentral
- Auditing
- Comments
- People & Organisations
- Reporting
- Introduction to Reporting
- Using Reports
- Introduction to Charts
- Exporting Reports
- Advanced Reporting
- Report Snapshots
- Dashboards
- Transaction Documents
- Introduction to Transaction Documents
- Displaying & Adding Transaction Documents
- Copying Transaction Documents
- Transaction Documents Fields Help
- Transaction Documents Line Items Help
- Printing & Sending Transaction Documents
- Managing Transaction Document Currencies
- Managing Transaction Document Statuses
- Setting a Blank Default Currency on Transaction Documents
- Credit Notes
- Customer Orders
- Invoices
- Quotations
- Supplier Orders
- Contract Management
- Sagelink
- Introduction to Transaction Documents
- Configuration
- Introduction to System Administration
- Users & Security
- Database
- Accounting
- Email Integrations
- Customisation
- Creating & Modifying Picklists
- Theme
- Record Types
- Creating Custom Fields
- Report-based Custom Fields
- Linked Fields & Reference Fields
- Record Templates
- Form Layouts
- Customising relationships between parties
- Opportunity Stages
- Custom Records
- Sign In Customisation
- Automation
- Contact Support
- Releases & Roadmap
Spotler Data Sync
Last updated : 26th September 2024
What is Data Sync?
The Spotler Data Sync is a tool that connects to the Workbooks platform and synchronises:
- Workbooks Mailing List Members into Groups in GatorMail. This synchronisation only applies to Workbooks Mailing Lists that have been marked as ‘Synchronise with Gator’ and a specific Data Sync needs to be set up for each Mailing List.
- GatorMail Campaigns (ie, ones that didn’t originate in Workbooks) are synchronised back into Workbooks as Mailshots. The audience information is not included but Online Activities are connected and the summary statistics are included (opens, clicks, etc).
Creating a Data Sync
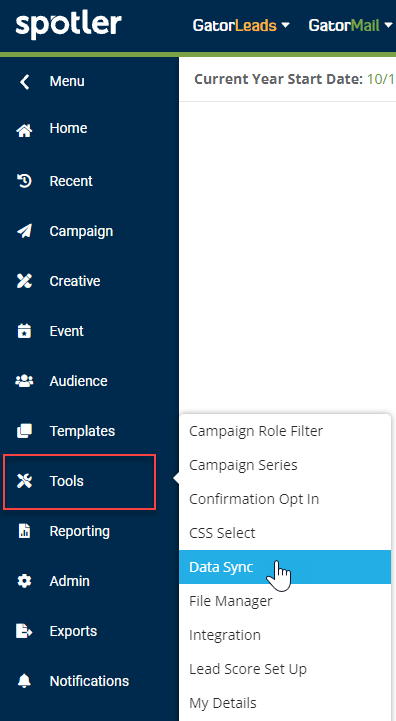
Login to your Spotler account and access your GatorMail product. From the left-hand menu select Tools > Data Sync.
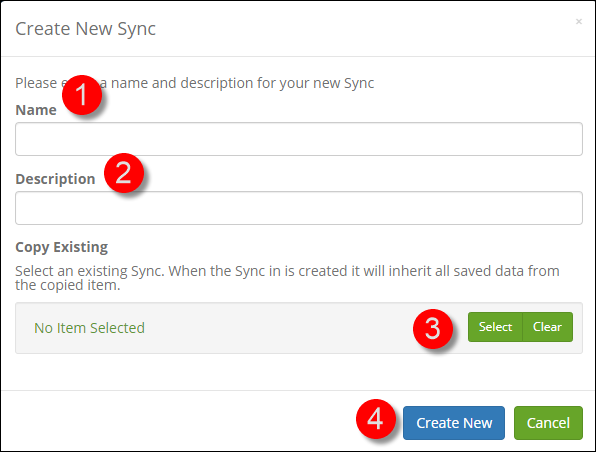
- Give your Sync a name.
- Add a description – this isn’t mandatory but we’d recommend you add text to described why the Sync has been set up.
- If you want to copy an existing Sync you can do so at Step 3.
- Click Create New to be taken to a screen where you provide more information on the details for the Sync.
Sync Detail
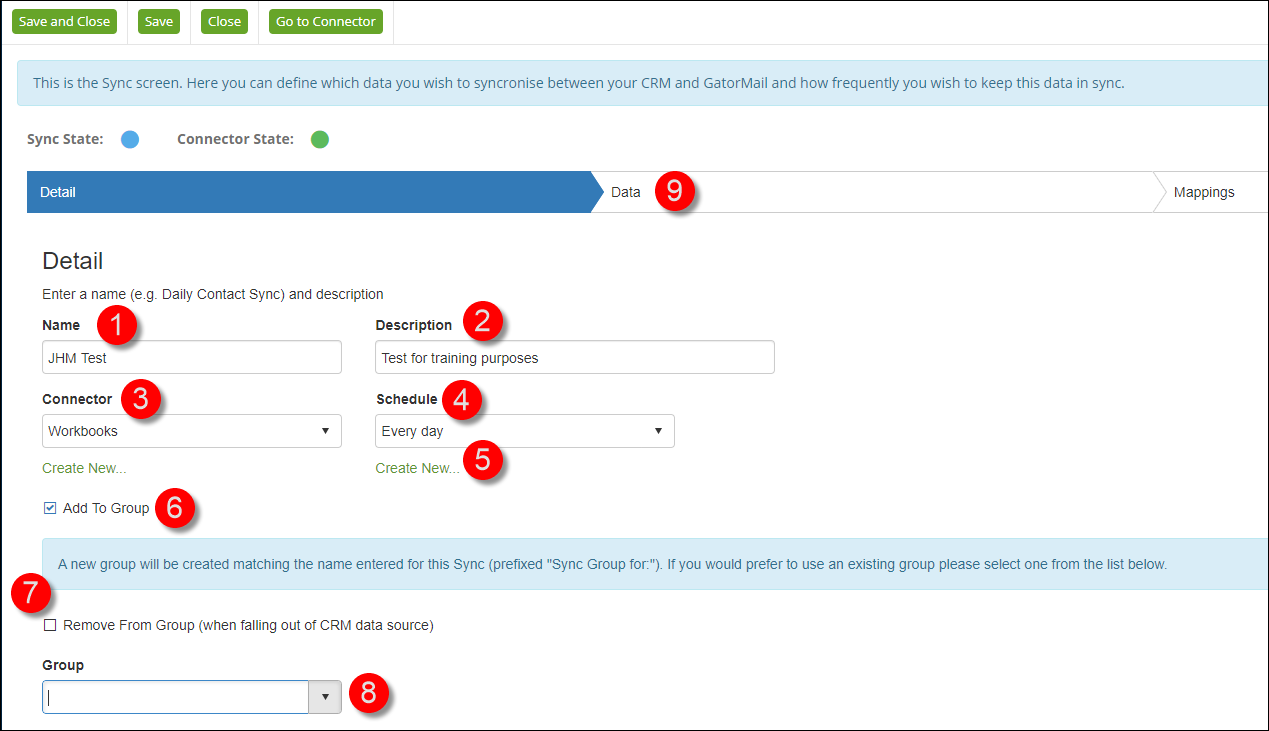
- The name will pull through from the previous screen.
- The description, if you entered one, will pull through from the previous screen.
- The Connector should default to Workbooks.
- You can use the dropdown to select a pre-set schedule for the Sync, or
- Click Create New … to set up your own schedule.
- if you tick the checkbox next to Add to Group you can add the data that is going to be sychronised to that Group. If you’re setting up a Workflow then you should already have set up an empty Group in Gator that has the same name as the Mailing List in Workbooks that defines your workflow entry audience.
- If you’ve specified a Group to add members to, you can also tick the checkbox to remove members from the Group. This means that if a Person/Lead is removed from your Mailing List in Workbooks, they will also be removed from the Gator Group.
- Use the dropdown to select the Group to which you want to add the members. If you leave this blank, a new group with the same name as the Data Sync will be created.
- Click on Data to move to the next step in the Data Sync.
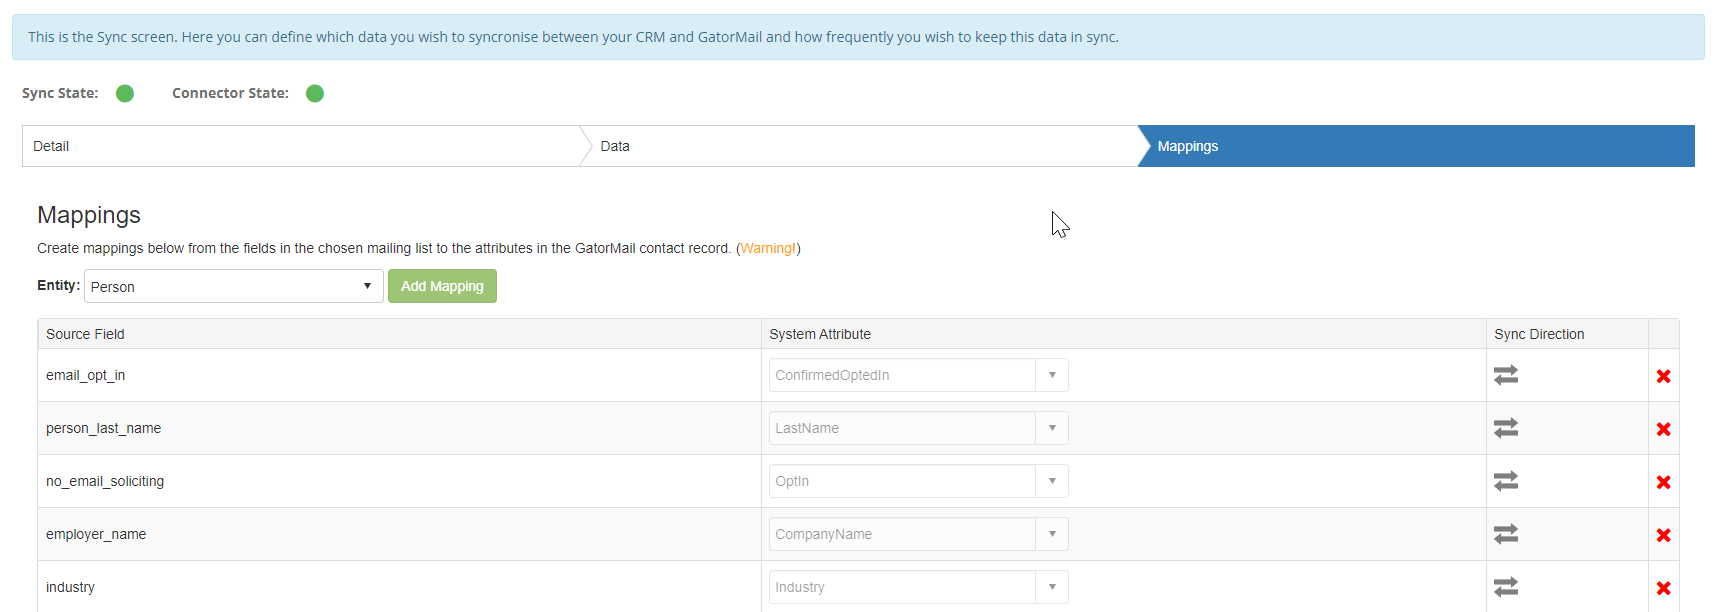
Mapping
On the mappings tab you can configure any additional mappings you may need.
For more information on why you should use data syncs please see Spotler’s help site here.