Get a quick quote with our pricing calculator

Knowledge Base

Browse our knowledge base articles to quickly solve your issue.

New to Workbooks? Use these guides to get started.

Find out more
Back to Knowledge Base
Knowledgebase articles

Worked Example – Create, Read, Update & Delete

Last updated : 25/11/2019

The Workbooks Connector for Scribe can be used for migration and integrations to/from Workbooks CRM. As described here, the connector has full support for Create, Read, Update and Delete actions and uses the Workbooks API under the covers to offer a user-friendly experience when creating maps in Scribe.

The following worked example, explains how to build a map to take a CSV of People from an SFTP Server (see here for instructions how to set up a source connection to an SFTP Server before trying to build out this example):

  • Look for an existing Person in Workbooks using the “Id” column as the query on the Workbooks External Reference field to find a match
  • If found, the record is updated. Otherwise, a new record is created. In both examples, only the basic fields such as Name, Email Address and Assigned To Fields are populated
  • The map will then delete the record it finds as a final step to show a full example
  • The example also provides an Update/Insert alternative approach instead of using separate Create & Update blocks

The first step to building a good map is to understand the data that you have in the source system and what transformations are required to copy the data from the source (in this case, a CSV file on an SFTP server) to a target system i.e. Workbooks. Carrying out this analysis first will also help you to understand the logic that is required to build a map that is robust, and one that deals with duplicate records as much as possible.

In this example, we simply need to copy data from a CSV of contacts to Workbooks People. The map needs to ensure that it doesn’t create duplicate People records, and therefore we need to create a map that searches in Workbooks for an existing record, and then either creates a new record if not found or updates an existing record. Looking at the example CSV below, either the Id or Email Address should be unique to the row in the CSV so these can be used in the Query/Lookup block to Workbooks. For this example, we will map the Id to the External Reference column, as the Email can change and therefore may create a duplicate record if the Email Address is ever updated.

Start building your map, by dragging on the necessary blocks to the Scribe canvas in the following order:
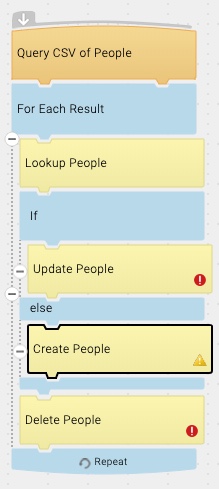
The map requires these steps in order of appearance:

  • Add a Query block. This should be added from connection to the CSV file which is hosted on an SFTP Server – see here for how to configure an SFTP connection in Scribe.
  • Next, lookup People. Add this from the Workbooks connection setting the Entity to People
  • Add a Scribe If/Else Control
  • Within the “IF”, add a Update Block from the Workbooks connection setting the Entity to People
  • Within the “ELSE”, add an Create Block from the Workbooks connection setting the Entity to People
  • Outside of the IF/Else Control block, add a Delete from the Workbooks connection, also setting the Entity to People

The next few steps will revisit each block and configure the settings accordingly.

The Lookup People block added in Step 1 allows us to query a Workbooks database to return any matching records. The Lookup should only return one Person record by matching on a unique field. If a record is found then the map will go on to update the existing Person record, otherwise it will ceate a new Person.

Double click on the Lookup Block, and go to the Lookup Critieria tab. Click the “+” on the right hand side, then select External Reference in the Field column.

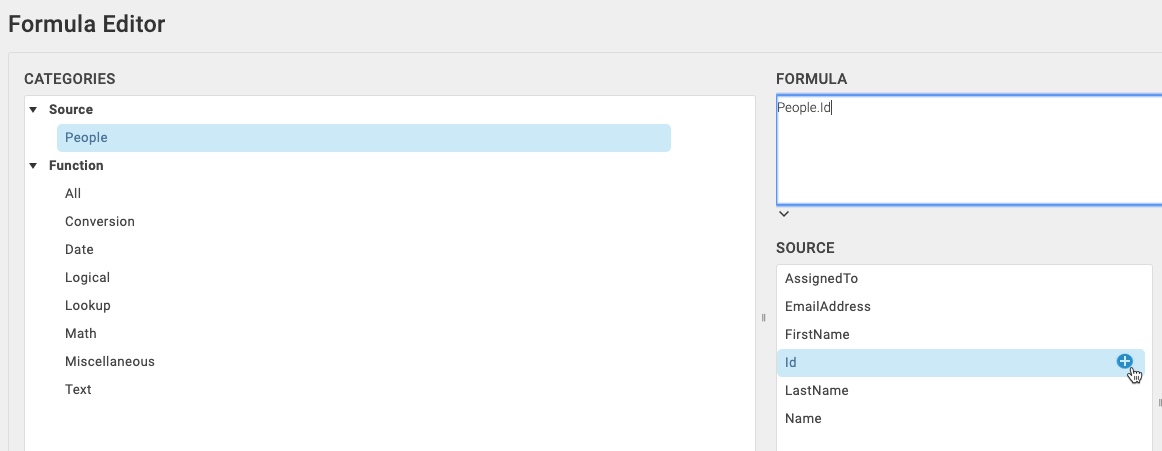
In the Value column, configure this to use the “Id” from our Query block by clicking the “fX” button to open the Formula Editor screen:

Next, on the Field List tab, select the Id & Lock Version columns. These fields are needed later if we find a match, to update the record.

In the case of more than one record being found, the map will fail as it does not know which record to update from the multiple records found, similar to the Workbooks Import tool.

Scribe offers some out of the box Control Blocks which can be used to control the behaviour of a map such as the If/Else statement. An If/Else block is used in this example to control whether a new record is created, or an existing record is updated based on the result of the Lookup to Workbooks. If a record is found, then we use an Update block to update that record, otherwise in the “else” condition, we setup a Create block.
 
Drag an If/Else block underneath the Lookup block, then double click the If to configure the condition that will be tested by clicking the Condition tab:
 
 
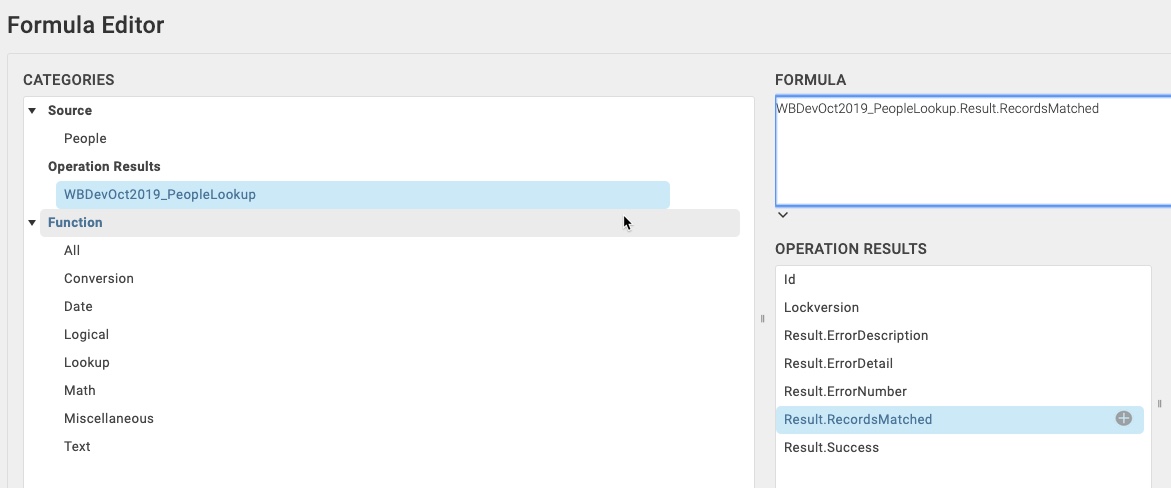
On the Condition tab, hover over the left-hand side then click the “fX” button that appears. From the Operation Results menu, select the Lookup block result, then choose “Result.RecordsMatched” as the formula, then click OK. 


Back on the Condition tab, set the Value on the right-hand side 1.
 
This logic tells Scribe that if there is one record matched, then update it. Otherwise, create a new record.
 

Next, configure the Update block. For an update to Workbooks via the connector, you need to know the Id & Lock Version of the record that you wish to update. In the previous block, we used a Lookup block in an attempt to find an existing record, therefore the map can reference the Id & Lock Version field from this block.
 
Double click the Update block, then select the Matching Criteria tab. From this tab, add a new mapping for Id by clicking the “+” button on the right-hand side. Select Id as the Field, equals as the Operator, and finally click the “fX” button to open the formula window.


From the Operation Results menu, select the Lookup block result, then choose “Id” as the formula, then click OK. 


Click the “+” again, then repeat the above to add another mapping for Lock Version, so that the Matching Criteria tab looks like below:
 

From the Fields tab, you will see the Source Connection (the CSV file) and the Target Connection (Workbooks). Add in mappings from the CSV file, to the Workbooks fields by dragging and dropping the fields from the left to right-hand side of the screen matching up field names. Map the Assigned To, Name, First Name, Last Name & Email Address to the equivalent fields on the Workbooks side.
 
For External Reference, set this to the Id column of our CSV. This is what will be used to find the record again if we re-run the map multiple times otherwise you will end up will duplicate records. To achieve this, either drag and drop as before or select the “fX” logo to add the field mapping via the Formula Editor screen.


For now, we don’t need to worry about transforming the data as we have a simple data set, but for more complex scenarios this would be achieved from the same screen if required.


In this example, for our Create we want to use the same field mappings as defined above. Simply replicate the same steps carried out on the Fields tab, as outlined in Step 4. You do not need to set Matching Criteria for a Create block, thus the tab is not available.
 
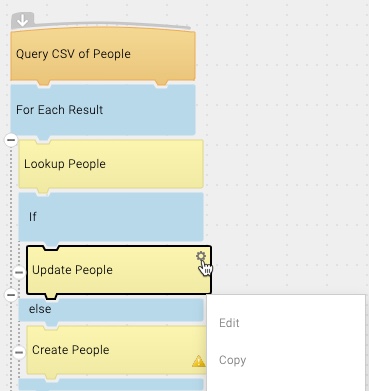
Alternatively, you can copy the Update block and change the block type to Create if you know that all mappings will be the same regardless of a Create or Update action. To do this:
  • Hover over the Update block added, then click the gear icon to reveal a context menu
  • From here, click “Copy”.

  • Single click anywhere on the Scribe canvas, to reveal the context menu again. Click “Paste”
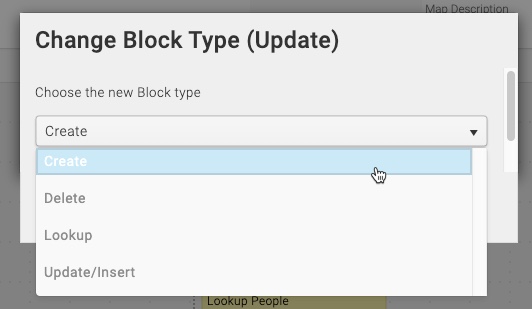
  • From the copied block, hover to reveal the menu again but this time click “Change Block Type”
  • In the dialogue box, change the block type to “Create”
Lastly, remove the existing Create block from the map and replace with the new one


Using a Scribe Map, records can be deleted using the Delete block type. Like an Update, Workbooks requires the Id and Lock Version to remove a record from the system.
NOTE: Whilst included in this example to explain how to achieve a delete via the Connector, you should take this out if using this example in a production environment.
In the Delete block, add in mappings for Id & Lock Version from the Lookup block as per Step 4 under the Matching Criteria tab:


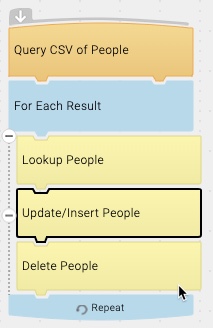
An alternative to using IF/ELSE logic with separate Create and Update blocks in your map is to use the Update/Insert block type. This block type allows you to merge the Create and Update blocks and remove the IF/Else logic, as the Workbooks API will then carry out the correct action, based on the field mappings that are configured.
NOTE: Whilst the map appears much more concise using this approach, it is not possible to use any form of Batch Processing which is possible with the separate Create/Update Blocks. You should consider volumes of records that will be processed via this map before adopting this approach.
Taking the example put together in Steps 1 – 5, remove the If/Else block by dragging it to the side of the map (this should also remove the existing Create & Update blocks at the same time). Next, add in the Update/Insert Block, below the Lookup Block:
 

Double click the new block, and under the Matching Criteria tab add the Id & Lock Version mappings from the Lookup block as per Step 3 (Update) or Step 5 (Delete):


Lastly, add any other mappings under the field tab as before. When this Map is executed, the updated map will have the same behaviour as before but with a more concise design which is easier to follow.